Saturday 22 September 2018

Living life .. with Alz

Morning peeps!

I'm here to share another "You've been framed" layout with you ..

Living life


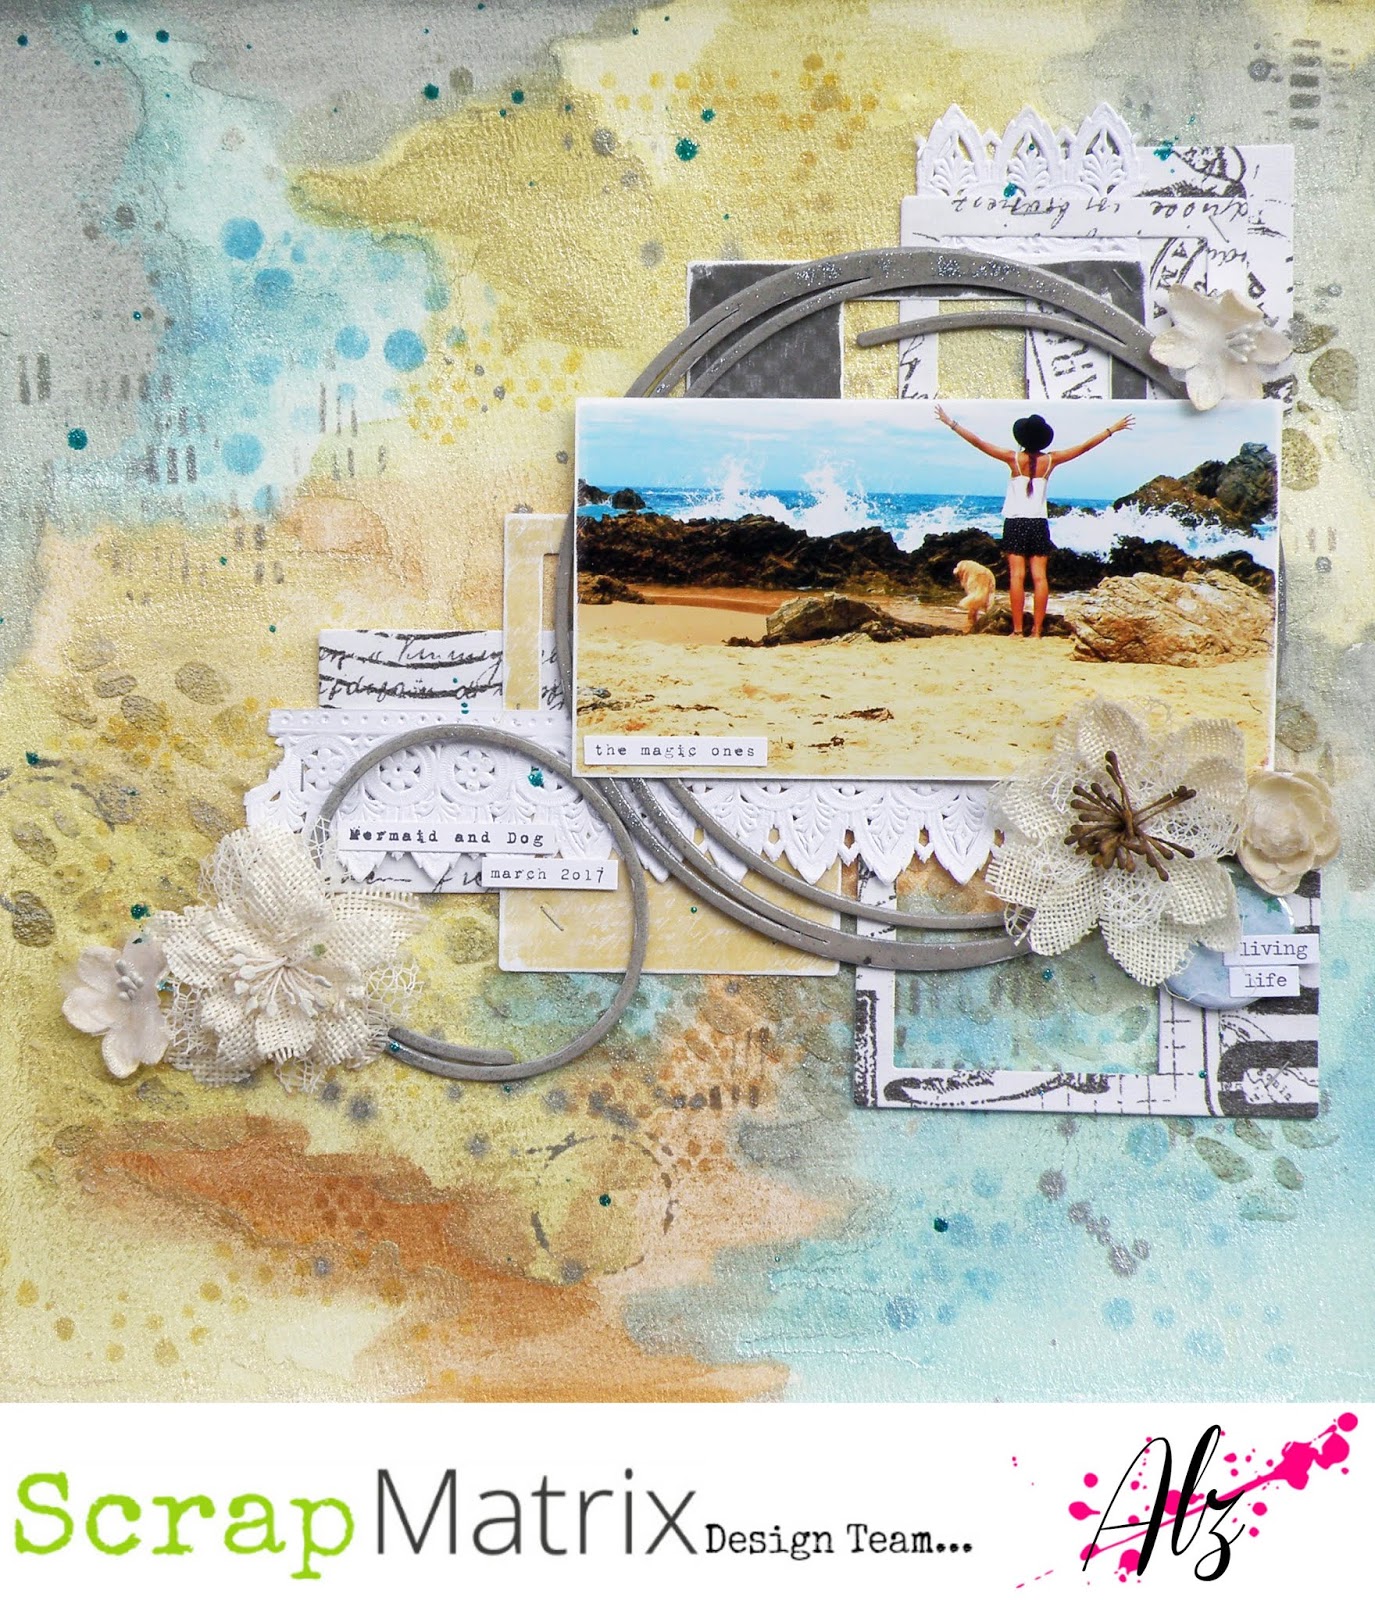
I had a ton of fun creating the background for this layout. It was a bit of an experiment with a new product (new for me that is) for adding colour and I wasn't at all sure how the colours would turn out. With a bit of blind faith, and a lot of Prima Metallic Accents Semi Watercolour Paints I made this ..

(I used a sheet of 12x12 heavy weight watercolour paper)

I love the way the colour has seeped into the watercolour paper whilst the mica powder has stayed on top, giving a kind of blended but opaque finish at the same time. Super cool!

Whilst this was drying, I played with the idea of leaving the background as it was to show off the beautiful colour, shimmer and shine, or to add more layers. In the end, more is always more, lol, so I grabbed some stencils (many stencils!) and my Tim Holtz Distress Inks (Mustard Seed, Scattered Straw, Tumbled Glass, Pumice Stone, Tea Dye and Broken China) and using (mostly) like colour on colour, went to town.


So I'm digging this, but it needed more because, well, more is always more! It needed texture. Something organic and beach-y. Because this was my photo ..

(I love, love, love the new Tim Holtz Mixed Media Mat!)

The Finnabair Texture Paste in White Sand with the Joggles 9x12 Wander stencil would be perfect, or so I thought.

But, once dry, now you see it ..
and now you don't ..
.. which was a bit of a nuisance cos I wasn't going for 'subtle' lol!
(Oh and this depended on the angle from which you were looking at the background.)

What to do la? It'd been a while since I played with my Faber Castell Gelatos so figured 'why not?'. Using Gold Champagne and Silver Ice from the Metallics pack, I placed the Joggles stencil back over the White Sand Texture Paste and smeared the Gelatos on top of the texture paste with my finger and once dry ..

now you see it ..
and now you don't now you still see it ..
magic! (lol)

That was my background done and dusted.

I knew I wanted to use polaroid style frames and chipboard circles to create a layer of frames behind my photo. Because I couldn't cut in a straight line if my life depended on it, I decided to die cut some frames using both 13@rts Colour Basics patterned paper from the 6x6 pad and Tim Holtz Idea-ology tissue paper which I adhered to white cardstock to give it some substance. Although the tissue paper I used is currently not in store, you could just as easily use the Botanical Collage Paper.

For my chipboard circles I used Blue Fern Studios Graduated Circles, the largest of which measures 11" across. The smallest, which I've used on this layout, measures 3" across. In all, you receive five funky circles in the one pack. Oh and I also used the 6" circle on my layout.

(cool huh?!)

I inked both circles with the Pumice Stone Distress Ink, coated them with Ranger Glossy Accents and, whilst wet, sprinkled on some Prima Art Sugar Glitter in Antique Silver. I stapled my paper frames to my background, glued down my chipboard circles, added White French Lace Embossed Paper Lace, and that was my layers done.

ps: if you check out my yellow polaroid frame you can see
that I can't even die-cut in a straight line lol!!

As you probably know by now, I love using flowers on my layouts. This one would be no different and, luckily for me, Petaloo had the perfect flowers for my page .. Ivory Burlap Blossoms and Ivory Mini Paintables. I tucked a teal bloom Um Wow Flair in with a couple of my flowers and added my title "living life" using individual words from Tim Holtz Idea-ology Chit Chat Stickers on top. I printed my journaling using a free font 1942 report and I was done. Here's a few close ups of my finished page ..


Oh and by the way I forgot to add that when it was all stuck down and finished, or so I thought, I decided to flick around a small amount of Turquoise 13@rts Splash Glitter Ink!

Have you thought of playing along with our "You've been framed" challenge this month? You have until midnight on the 30th to upload a pic of your project to the Scrap Matrix Facebook Shares Page. Oh and heh don't forget to let us know which products available from Scrap Matrix you've used.

That's it for me today. I hope you're having an awesome start to your weekend.

'Til next time.

Cheers .. Alz  :)


Scrap Matrix products used:
Prima Art Sugar Glitter - Antique Silver
13@rts Splash Glitter Ink - Turquoise Glitter
Save

Thursday 20 September 2018

You've been framed. A second post from Helen

Welcome back to the Scrap Matrix challenge where this month we are asking you to use frames on your project. You can make a layout, an art journal page or a card.

They can be any type of frames; big, small, square, round, anything you like.   Why not pop over to see what the rest of the team have created to inspire you?


The subject on my page is my darling Grand daughter, who was recently diagnosed with some visual problems and now needs to wear glasses.
The frames of her specs sparked the idea for my layout.

I chose to blur one of the photos to demonstrate how she 
used to see the world before she got her specs. She took to them like a duck to water; her spelling and reading improved almost immediately and she wears her purple frames with pride.

Recently, I was lucky enough to take some classes with Tracy Scott and I've used  her techniques to make the flowers.

It was wonderful to gather with scrappy friends, to laugh, learn and get really messy. I caught up with some of the Design Team, met old friends and made new ones, all in a fun atmosphere.  Thanks so much Vicki Christensen for organizing such a brilliant event.


I covered the paper with a layer of Dina Wakley clear gesso 
as I planned to use mixed media on the page.

The glasses frames are from a cut file by Silhouette.


To add some texture, I scraped some Finnabair modeling paste 
through a stencil from AALL & Create, #13


The purple splashes were made with Tim Holtz Distress Oxides, Wilted Violet; I love how versatile this product is; 
I seem to use it on everything.


The next step was to finger paint a piece of white card stock with Paper Artsy Chalk Inks - Bougainvillea, Caribbean Sea, Banana, Limelight, Lavender.  Then I dried it off with a heat tool. This finger painting was a technique that we did with Tracy... 


Now comes the fun part!   
I chose lots of flower stamps and filled up the entire page using Black Ink.  I used Tim Holtz Archival, Jet Black before drying the card stock again with a heat tool.

The stamps are all from Paper Artsy; ETS21, ETS18, ETS16, ETS06.
I love them all and there are so many more that I need like!

After the classes on the weekend, some of the stamps have sold out, but they are on order again, so it won't be long until they are back in stock.


Next I flicked on lots of splats with Paper Artsy Gold paint. Tracey said the more the merrier.  I ended up with gold everywhere, even on my glasses!  Next time, I'll take it outside.

The final step is to fussy cut the images; something relaxing to do in front of the TV while someone else does the dishes!


To ensure the stamping and splats were completely dry, I went on with prepping the chipboard with white gesso. It's called Blue Fern Stars.  I noticed that firm is closing down, so if you love these chippies; it's time to stock up.

Whoops!  I forgot to photograph the painted stars.  I just mixed some Tim Holtz Distress Oxides, Seedless Preserves and Salty Ocean, to get the pink colour I wanted. You can see them in the next photo.


Just playing around with placement, to emphasize the world in colour and in focus, that is now part of my DGD's life.


Finally I added a few bits of black stamping here and there.
I used  AALL & Create #23, (temporarily out of stock) and 
some oldies from my stash.

Phewh!  Congrats if you read all the way to the end, 
it's a bit of a marathon post.

Thanks for calling in today, I hope you find time to play along, 
just add your entry to the Scrap Matrix Shares page in the corresponding folder; don't forget to let us know what Scrap Matrix products you used and what inspired you.  You could be in the running for a $30.00 gift voucher from the generous Vicki Christensen and perhaps a Guest Design Team spot down the track.

Tuesday 18 September 2018

'Beautiful Day' by Elisa Ablett - September Inspiration

Hi everyone,

Elisa here from the design team for Scrap Matrix, thanks for stopping by the blog today to check out my latest project based on the September challenge at Scrap Matrix Shares.


Image may contain: 1 person


Let's get to it!

USING YOUR GEL PLATE TO CREATE A FRAME FOR YOUR LAYOUT

HOW???? 😧😧😧


Here is my second creation for Scrap Matrix design team for the month of September, a very colourful and vibrant Spring inspired project. 

I wanted to show you how you can use your gel plate (whether it be square or circle) to create a solid base frame for your photo and then add embellishments to further frame around your photo.

TIP- be adventurous with using any sort of framing design on your layouts, it does not have to be the normal sort of frame, use a solid base, use embellishments to hug your photo, use colours to your advantage. Be creative and unique!


Products used from Scrap Matrix - 


undefined
Funky Fuschia Dylusions paint


Image result for dina wakley circle stencil


To create your background - 

Step 1 - Start with the light green colour on your gel plate first. Use paint, ink, sprays or stains, or even swipe a distress inkpad over the gel plate and then spritz it with water then place your paper over the top and gently rub the back of the paper. Peel the paper back carefully and let dry

Step 2 - Add your funky fuschia dylusions paint to your gel plate in a haphazard way starting from the bottom of the gel plate. Then tip the gel plate up and stamp over the top of your green coloured background stamp.

Step 3 - Add some splatters of each colour over the top and let dry.

Step 4 - Using your Dina Wakely Circle stencil and a distress tool, blend ink through your stencil mainly in the bottom right hand side of the coloured circle background. Add some gold splatters.

Step 5 - Using a versafine or archival black ink pad stamp foliage stamps around the bottom half of your layout, maybe even layer them up and around a bit further to frame your background circle a bit more.


Step 6 - Using different mediums stamp all your flowers and leaves using the Tim Holtz Ideology stamp set. I used Funky Fuschia dylusions paint, Twisted Citron Distress inkpad, Mowed Lawn Distress Stain, Squeezed Lemonade Distress Inkpad, and Spiced Marmalade as well. Mix and match them, let them dry and then fussy cut in front of TV! It's essential :-) 

Step 7 - Emboss your metal leaves using Ranger Black Embossing Powder, fussy cut out a stamped butterfly or use a chipboard butterfly inked black, and twist your wire ready for putting your layout together. 

Here are some close ups for the finer details!!


That's it from me today, I hope I have made you think outside the box when it comes to frames on your scrapbooking layouts and designs. 

Make sure you leave me some love xx

Elisa 


Monday 17 September 2018

Cheers by Sandra Brimelow

Hi everyone, I am back with my second layout for September as a guest designer for Scrap Matrix, for the frames challenge. Here is the graphic for the challenge:
I love how versatile this challenge is, so many different ways to use frames.
Cheers

This layout, had me go in a slightly different direction. I decided to cut a frame using one of my papers from the 13 Arts - Art Journey range - Creativity and Travel papers, which I used as a surrounding frame for the layout. 
Using the Tim Holtz distress oxides - Walnut stain, I added some depth to the papers, and also edged the frame.
To the backround I also spattered some Lindy's Stampgang Starburst spray - bodacious blush
A bit of stamping also added to the background using Ranger archival ink - jet black and Aall and Create stamp set #10, and Blue Fern Studio stamp set - texture circles.
To finish the background, I used Aall and Create stencil #10, and texture paste. I also spattered the background using Irresistible spray - wedding dress.
To embellish, I stamped some images using Aall and Create stamp set #11 and #44 and Tim Holtz distress oxides - walnut stain and tattered rose. I also added a little wood veneer frame to my cluster. The Tim Holtz Idealogy small talk stickers were also nifty little additions on the layout. 
To finish the layout, I embellished using Blue Fern Studio flowers - late winter lillies.
Thanks again Vicki and Scrap Matrix team and followers for having me as guest designer this month, I have enjoyed this opportunity.