Monday 22 July 2019

Indian Summer Gift Box by Elisa Ablett


Hi everyone, 

My turn up on the Scrap Matrix blog today with my latest creation based on this month's challenge.

If you haven't joined us in the Scrap Matrix Shares Facebook group as yet, head on over and join in the fun in our monthly challenges. This month we have a bright and fun moodboard and colour palette of pinks, oranges and yellows.


No photo description available.


I decided for my 2nd project as part of the design team that i would attempt an off the page project and then I saw a friend using her new Art Alchemy waxes and I just knew I had to have them!

Here are some of the products used from the Scrap Matrix shop - 


Image 1Image 1
undefinedFinnabair Art Alchemy Metallique Wax


Blue Lagoon, Electric Violet, Indian Pink,  Vintage Gold, Bronze

other materials include - Prima Art Stones, Prills, Tim Holtz Stencil Brush, Door knob

and here is a few close ups of the finer details.


You can just see the Dylusions paint - Lemon Zest peeking through the layers and then finishing with a strong pink finish using the Indian Pink Wax.


That's it from me today, thanks for stopping by the blog!

Grab out your supplies and try an Off the Page project today!

Hugs 

Elisa x


Saturday 20 July 2019

'Count your Rainbows' by Lisa Amiet


Hello!
It's Lisa here today to share a layout I have created. 
I am in love with this month's challenge mood board,
I have created this with these colours in mind.


I have started with a white piece of cardstock for my base. 
I have sealed this with 'Liquitex White Gesso'.
I have then used some of my 
'Dylusions Inks' in 'Postbox Red', 'Lemon Zest' and 
'Squeezed Orange'. 
I have dried this with a heat gun, moving it around as it dries. 


I have also added in a little 'Distress Oxide Spray - Picked Raspberry'.
I have then used my '7 Dots Studio Paint Chips Hatched Stencil' 
and baby wipes to remove a small amount of colour in the stencil areas.   


I have then used the same stencil and 'Finnabair's Light Paste' to stencil onto my page.
I love how the light paste is able to show some of the colour under it. 


I have then added in some stamping, I have used my '7 Dots Studio Hazy Days Clear Stamps' and
'7 Dots Studio Paint Chips Clear Stamps' along with 'Distress Ink Pad - Picked Raspberry'
and my trusty 'Ranger Archival Ink - Black', to stamp randomly over my base page. 


I have then adhered pieces of the '7 Dots Studio Papers - Underpaper' & 'Razzleberry'.
I have also adhered pieces of the 'Paint Chips Element Stickers' 
and the 'Paint Chips Die Cut Elements'.


I have then added some pieces of 'Paint Chips Glaze' paper, 
again layered with some of the 'Paint Chips Element Stickers' 


I have then used some of the 'Embossed Lace Paper - Duchese',
that I have scrunched up and layered 2 pieces, behind my photo matt.


I have used a piece of the 'Paint Chips - Clover' paper to matt my photo. 
I have then added some more of the 'Paint Chips Die Cut Elements' & 'Paint Chips Word Stickers' on my page. 


To finish I have added one of the 'Dyan Reaveley's Dyslusions Creative Dyary Back Chats' stickers and some of the Finnabairs 'Mechanicals Metal Embellishments - Stars',
scattered over my page. 


I hope that you like what I have created and
that you get a chance to play along with the challenge. 

Until next time!

Lisa


Scrap Matrix Products Used:

'Postbox Red'
'Lemon Zest'
'Squeezed Orange'
7 Dots Studio Paint Chips Papers -

Tuesday 16 July 2019

Go Out and Love someone- By Tanya Froud

Hi All, Tanya Here!

How good is this color challenge.. I'm loving everyone's work and their take on the colors, they are all so different!

This is my next page using the colors as inspiration

 I had no real plan in mind for this one, just the colors. So I piled a heap of bits and pieces all available in store at Scrap Matrix that I would like to play with and went from there....


Next I got my Prima Watercolours out and did a messy background in 2x places on my white card stock ensuring I left lots of white space


Once that was dry I sponged through some Aall and Create stencils using Archival Ink in Coral and Monarch 

Once I had Stenciled I Stuck down some Dina Wakley Collage papers to add contrast. I then played with bits and pieces from the pile of stuff I had pulled out earlier including some Tim Holtz Ephemera die cuts and German Scraps.

Here are some close ups....


That's from me This month.. Keep the great entries rolling in, don't forget there is some great prizes to be won!

Until next time xxxxx


Sunday 14 July 2019

art journal page - by Lynn

Hi everyone, today I am back with my second project for this months challenge.  Again I have created an art journal page


I have used a page from the Art by Marlene Medium Journal. I have used Tim Holtz Distress Inks for the background - Mustard Seed, Carved Pumpkin and Picked Raspberry.


On a separate piece of paper from the Art by Marlene journal (I love the thickness of the paper) I stamped the flower and leaf images  from Art by Marlene Flower Stamp


I have used Jane Davenport water colours on both the flowers and leaves - adding a little flouro pencil for highlights.


I have added some liquid pearls to the centre of the flowers and white and black posca pens for highlights.

The quote and girl  is from the Art by Marlene Die Cuts

Here are some close ups:


I hope that I have given you some inspiration to have a go at this months challenge.  


It is easy to enter - all you need to do is upload a picture of your project to the Scrap Matrix Shares facebook group and tell us at lerast one product that you have used that is available from Scrap Matrix.

til next time - happy crafting :)


Friday 12 July 2019

Tam can't stop playing!!

Hey there creatives.

So....have I had fun with the current moodboard!
I may have got carried away.

As my go-to colours are generally blues, greens and teals,  playing with oranges and pinks was a bit of a challenge....but one I LOVED and once I started, I couldn't stop.

That's the beauty of  challenges. 
They force you to try something different....to think outside the box.


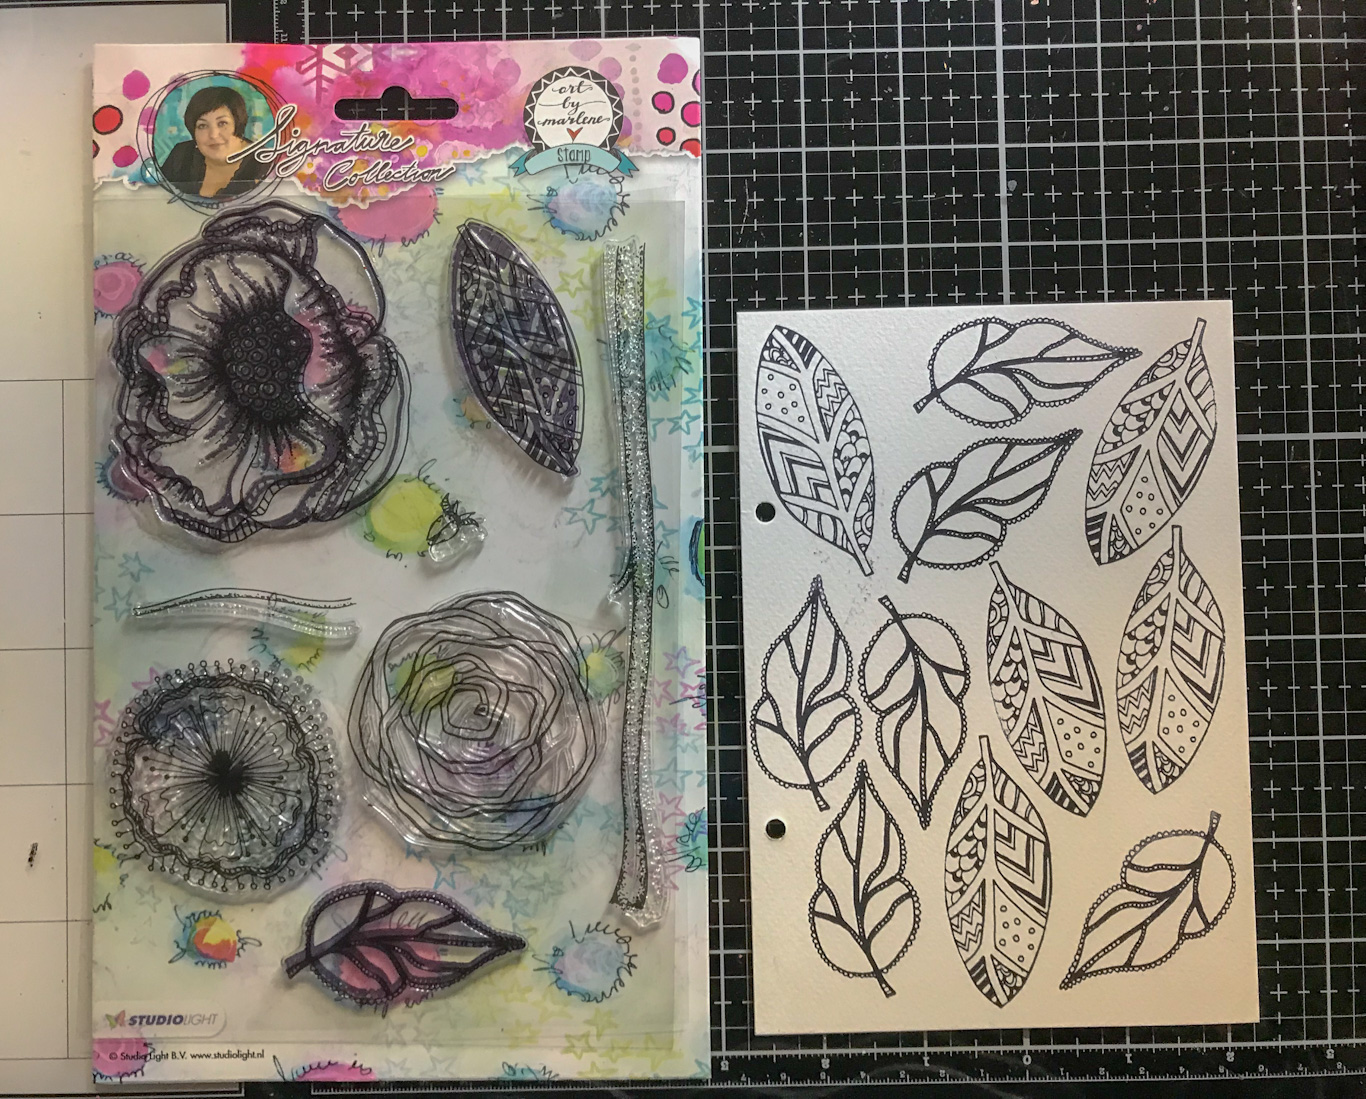
I began with this one, firstly drawing the face and then adding in lots of Tracy Scott flower stamps in the hair. 

I used Set ETS124 and ETS21

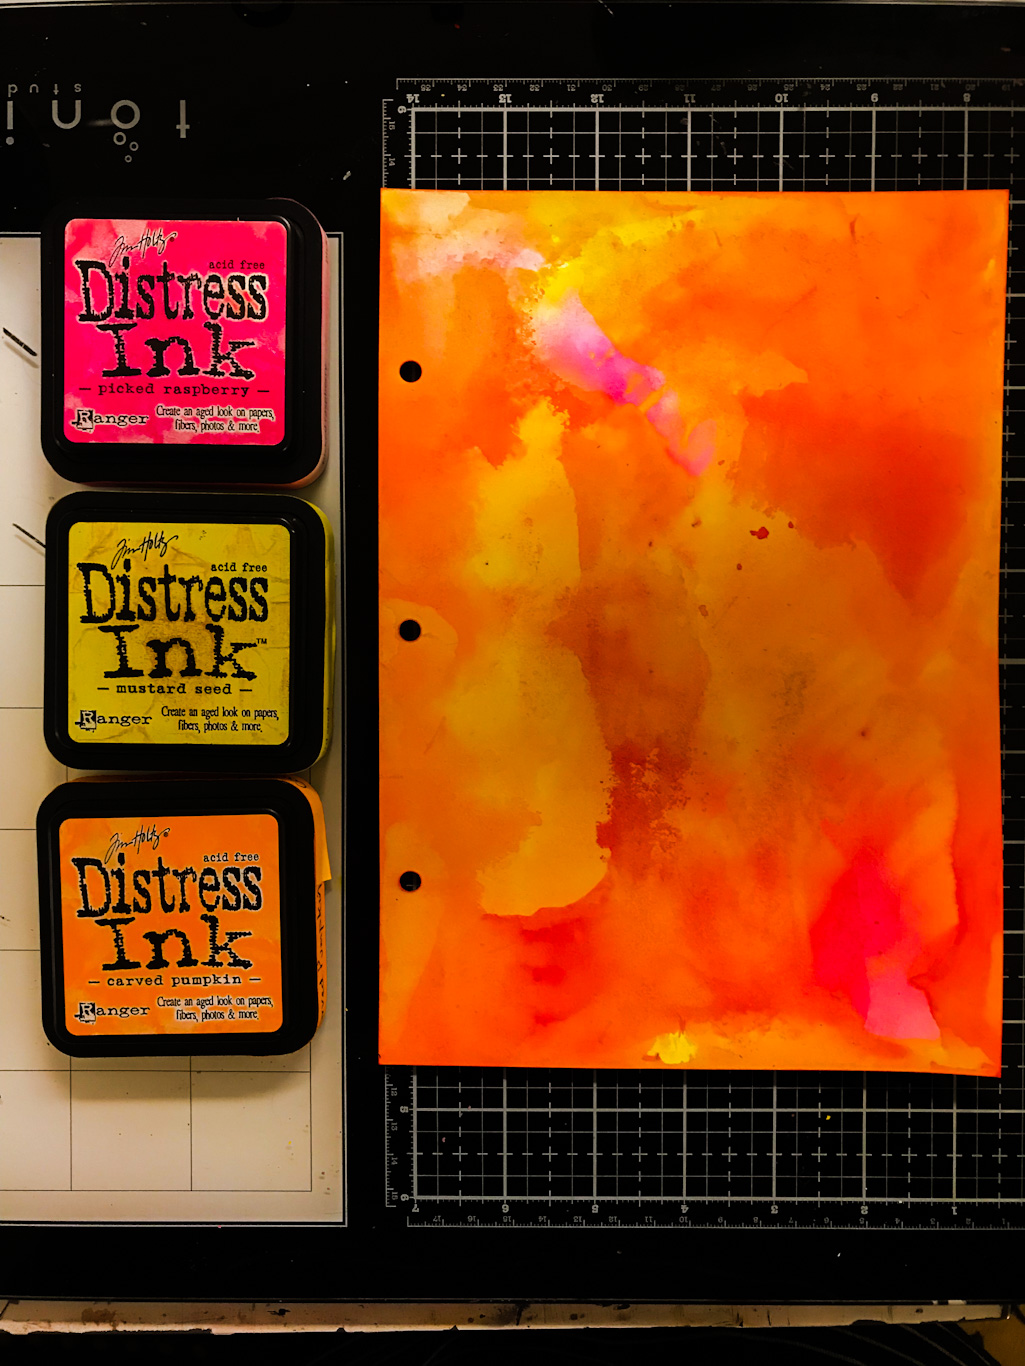
All the colour was added using Art by Marlene's watercolours in Bold and Bright.


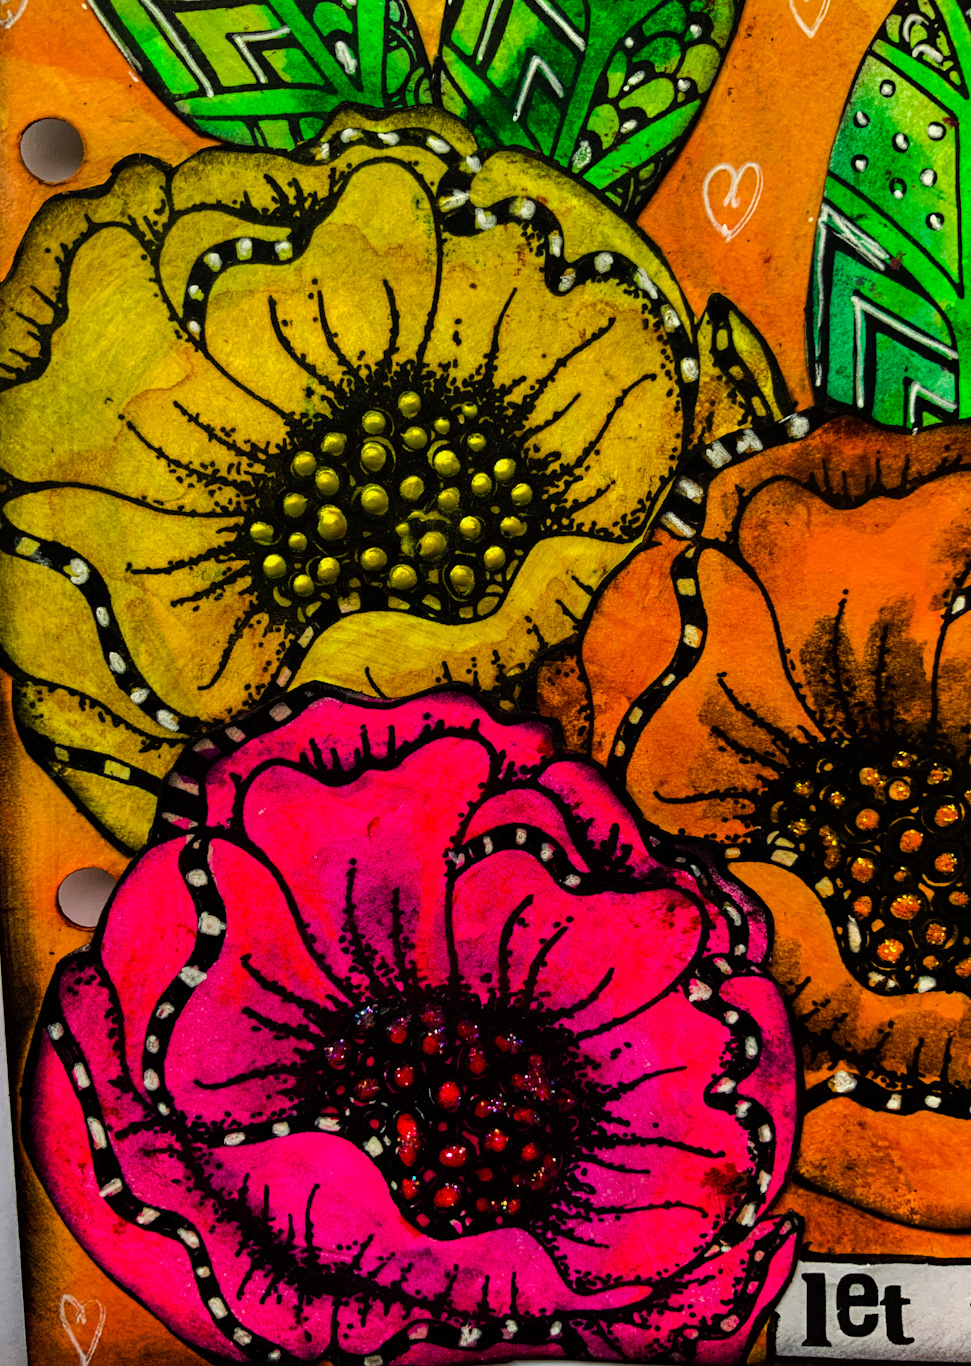
To be honest, I don't like this one, I felt like I'd ruined the scribble flower by adding in black outlines.


You see I tried stamping and embossing with them, but it didn't work and I tried to cover it up with thicker lines.


After lots of fiddling, I just resigned myself to the fact that it hadn't worked, and it was time to move on.

Always good to try things out though, sometimes they work, sometimes they don't.

So time to turn a new page......


This one was inspired by Michelle Grant. I love her flowery hair designs.

I also combined it with a previous post I did where I created watercolour flowers in the background of a scrapbook layout.....here's a reminder of the page.....and you'll find the details HERE.


I really enjoyed creating flowers out of blobs, so using the same technique, I again created a face, then added some watercolour blobs around the face using Art by Marlene Watercolours.


I let them run and then once dry went in and drew in flowers with a black pen and a white pen.

I just love those drips!!


So much happier!!!

And to be honest, so much easier!!!
Sometimes simpler is better.


I then added a sticker from the Art by Marlene Whimsy Sticker book.


I have also created some watercolour cards.


I love the sunset image in the moodboard.


and I have a bit of a thing for trees....


So simple, and so great to have some cards on hand.


Ok, now I promise this is the last one for today....


I absolutely love that Tracy Scott Stencil....


I added Art by Marlene Watercolour and again allowed it to drip down the page.


I then added some 'Peach Nectar' PaperArtsy paint through the stencil using a dry baby wipe.


I then added a Dina Wakley stamp sentiment and I grabbed some black paint and flicked it onto the page and swiped it around the edges.

The final step was to add some pen marks - the secret is to work quickly!

Ok, I think I'm DONE!!

Can't wait to see what you guys come up with.

Here's the moodboard


and here's a link to the details about this months challenge.

I'll see you next month

Luv Tam
xxx