Showing posts with label Tim Holtz Idea-ology. Show all posts

Tuesday, 16 July 2019

Go Out and Love someone- By Tanya Froud

Hi All, Tanya Here!

How good is this color challenge.. I'm loving everyone's work and their take on the colors, they are all so different!

This is my next page using the colors as inspiration

 I had no real plan in mind for this one, just the colors. So I piled a heap of bits and pieces all available in store at Scrap Matrix that I would like to play with and went from there....


Next I got my Prima Watercolours out and did a messy background in 2x places on my white card stock ensuring I left lots of white space


Once that was dry I sponged through some Aall and Create stencils using Archival Ink in Coral and Monarch 

Once I had Stenciled I Stuck down some Dina Wakley Collage papers to add contrast. I then played with bits and pieces from the pile of stuff I had pulled out earlier including some Tim Holtz Ephemera die cuts and German Scraps.

Here are some close ups....


That's from me This month.. Keep the great entries rolling in, don't forget there is some great prizes to be won!

Until next time xxxxx


Tuesday, 18 September 2018

'Beautiful Day' by Elisa Ablett - September Inspiration

Hi everyone,

Elisa here from the design team for Scrap Matrix, thanks for stopping by the blog today to check out my latest project based on the September challenge at Scrap Matrix Shares.


Image may contain: 1 person


Let's get to it!

USING YOUR GEL PLATE TO CREATE A FRAME FOR YOUR LAYOUT

HOW???? 😧😧😧


Here is my second creation for Scrap Matrix design team for the month of September, a very colourful and vibrant Spring inspired project. 

I wanted to show you how you can use your gel plate (whether it be square or circle) to create a solid base frame for your photo and then add embellishments to further frame around your photo.

TIP- be adventurous with using any sort of framing design on your layouts, it does not have to be the normal sort of frame, use a solid base, use embellishments to hug your photo, use colours to your advantage. Be creative and unique!


Products used from Scrap Matrix - 


undefined
Funky Fuschia Dylusions paint


Image result for dina wakley circle stencil


To create your background - 

Step 1 - Start with the light green colour on your gel plate first. Use paint, ink, sprays or stains, or even swipe a distress inkpad over the gel plate and then spritz it with water then place your paper over the top and gently rub the back of the paper. Peel the paper back carefully and let dry

Step 2 - Add your funky fuschia dylusions paint to your gel plate in a haphazard way starting from the bottom of the gel plate. Then tip the gel plate up and stamp over the top of your green coloured background stamp.

Step 3 - Add some splatters of each colour over the top and let dry.

Step 4 - Using your Dina Wakely Circle stencil and a distress tool, blend ink through your stencil mainly in the bottom right hand side of the coloured circle background. Add some gold splatters.

Step 5 - Using a versafine or archival black ink pad stamp foliage stamps around the bottom half of your layout, maybe even layer them up and around a bit further to frame your background circle a bit more.


Step 6 - Using different mediums stamp all your flowers and leaves using the Tim Holtz Ideology stamp set. I used Funky Fuschia dylusions paint, Twisted Citron Distress inkpad, Mowed Lawn Distress Stain, Squeezed Lemonade Distress Inkpad, and Spiced Marmalade as well. Mix and match them, let them dry and then fussy cut in front of TV! It's essential :-) 

Step 7 - Emboss your metal leaves using Ranger Black Embossing Powder, fussy cut out a stamped butterfly or use a chipboard butterfly inked black, and twist your wire ready for putting your layout together. 

Here are some close ups for the finer details!!


That's it from me today, I hope I have made you think outside the box when it comes to frames on your scrapbooking layouts and designs. 

Make sure you leave me some love xx

Elisa 


Tuesday, 12 June 2018

Capture magic .. with Alz

Morning peeps!!!

I'm back with my second project for the current Scrap Matrix challenge "The Point Is". I've been scrapping my doogles so much lately I figured it was time to throw in a layout of my beautiful niece Mia ..

Capture magic

Of my many nieces and nephews, I'm probably closest to Mia. Maybe because she's as doogle crazy as I am? Anyways, this is Mia with Levy. If you're looking for Levy, just find Mia. You know how it goes .. if you're looking for Mia, just find Levy! Whilst I could wax poetic about Mia and Levy til the cows come home, I should probably give you a refresher of the current Scrap Matrix challenge ..


I had a lot of fun creating this page. A bit of work on a patterned paper background, some layering and embellishing and it was done and dusted. It only took about three weeks. Ha ha! Three weeks?!! I know right?! Life has been so extraordinarily hectic lately I've had to grab five minutes here and there to scrap. So frustrating. But for a greater purpose, so I no complain. The greater purpose? Hubby is retiring and the countdown to R Day is on. Don't worry, I know what you're thinking. For the record, I'm much, much younger than he is lol. But yeah who knew there would be so much to organise. Appointments, phone calls, meetings, paperwork, phone calls, more paperwork. Its all so very exciting though and in not too many weeks I'll have him home, home for good, and I can not wait!!!!! What's the point of sharing this I hear you say. No reason. Not really. Just chatting with you and digressing. A bit. As I do. Does there always have to be a point? Well I guess in this context maybe. So ..

My background is pretty much a recipe I follow when creating on a patterned paper background ..

start off with a piece of patterned paper (obviously duh!)

apply white gesso with a brayer to tone it down a wee bit

figure out around about where my pic will go
 bringing the TCW 12x12 Mums stencil into play because I love the pointy petals

and applying Paper Artsy Fresco Finish acrylic paint in Wisteria with a sponge
then outlining the pointy petals, somewhat messily, because I like messy, with a Fudeball Pen

sanding it back, all the better to absorb Lindy's Starburst Spray
in Tea Pot Purple

and finally adding some black texture paste through TCW stencil
(12x12 Sketch Grid)
and using a Jet Black Archival Ink Pad to stamp some pointy triangles
with an Aall and Create stamp (#10)

When I'm happy with my background, I usually build up some layers to go behind my photo. Not always. But usually. It depends really on whether I want my background to be an extension of my photo or to enhance it. I guess. What about you? When you create a mixed media background do you use layers behind your photos? Anyways, in this instance I felt the need, the need for layers.


FYI .. the lace isn't tattered! I deliberately cut into it to make it a bit frayed and grungy.  ;)

After fiddling with the layers a bit, it was time to actually stick the photo down, add some embellishments, a title and the journaling.

Here, I've broken down a large Curly Rose in Cream. I'm trying to create less bulky pages, but then I went and put a bulky-ish white rose from the Blue Fern Studios Heartland Roses and Blooms pack in the middle so that kinda defeated the purpose of pulling the large Curly Rose apart. Sigh. lol.


I've used various paints, including a Dina Wakley Media acrylic paint in Eggplant, for a bit of pop and contrast, on a couple of large Antique Silver Feathers. An Um Wow Studio Flair from the Teal Bloom pack almost finishes this embellishment cluster.

Except that I also added a Kinder Kreations chipboard feather which I painted with Violet 13 Arts Splash Glitter Ink. I was super inspired by Debbie Pulford's use of the Glitter Ink in her Guest Design Team post of 1st June 2018. Thanks for those tips Deb! Oh and I slotted in a couple of green wires I pulled off from the Curly Roses. In the past I used to throw them out but now I reckon they make great 'embellishment cluster fodder'. 


When I was ordering my supplies for this layout, I knew I'd want to cut out some shapes (most likely, triangles for arrow heads) but I didn't want to cut into a 12x12 sheet of patterned paper for, quite literally, some triangles. Instead, I ordered the 6x12 Die-Cut Elements from the same range as my patterned paper background (7 Dots Studio Northern Lights). The 12x12 Tags would have worked equally well, especially if you like tucking tags in here and there. 

Anyways, I'm probably showing my age with this next bit lol, but did you ever have a Math-O-Matt in school? I did. It was a bit of plastic with cut out geometric shapes, measurements and stuff. I never threw mine away. Heaven only knows why lol! These days I find it quite handy and in this instance, I used one of the triangles to outline which of the 6x12 Die-Cut Elements I was going to cut into.

pretty cool huh?

I sanded the edges of my triangles and added them to my layout in groups of three. You may have noticed that I sand pretty much every edge of pretty much everything. Its that 'one thing' I do. Do you have a 'one thing'?


Lastly, my title. Again, I've used the Tim Holtz Idea-Ology Chitchat Stickers Verbiage which I stuck with foam tape to one of the banners from the 6x12 Die-Cut Elements sheet. I also used foam tape to stick that onto my layout, just to give it a bit of definition. And that was that!


That's it for me today. You now only have a couple of days to get your entry done and uploaded to the appropriate album on the Scrap Matrix Shares Facebook page. Entries are due by midnight, 14th June. Please don't forget to let us know which of the products, available from Scrap Matrix, you've used. Its such a pleasure to be inspired by others' creations.

Wishing you happy scrappy days.

Cheers .. Alz   :)


Scrap Matrix products used:
7 Dots Studio Northern Lights - 6x12 Die-Cut Elements
TCW 12x12 Stencils - Mums and Sketch Grid
Lindy's Starburst Spray - Tea Pot Purple
Ranger Archival Ink - Jet Black
Embossed Paper Lace - French Lace Black
Vintage Coloured Lace - Gabrielle Lilac
SaveSaveSaveSave

Friday, 25 May 2018

"Everyday moments" .. with Alz

Morning peeps!

So the current Scrap Matrix challenge (What's the point?) got me thinking. What is the point, after all? Of anything? Of everything? Of nothing? Of life? In an effort to divert my mid life, existential crisis, I scrapped ..

Everyday moments

This is Harry. Harry is a ratbag. Don't get me wrong, I love and adore him, but he's a ratbag. This pic shows him sprawled on the top of the outdoor table out on our back deck where we like to have brunch from time to time. You know like, where we like to eat. There is no respecting boundaries with a ratbag! This is but one example of his ratbag-iness. Stay tuned .. there will be more. But meanwhile, he's also 'my little man', my ratbag, and a very, very sweet boy.

Have I digressed? I think that's my speciality. Digressing. See?!


When tackling this challenge, I knew I wanted to work with some 'pointy' papers and a grey-ish colour scheme, so Pinkfresh Boy's Fort was definitely the way to go. But first off I wanted to add some colour and texture to my background. I did this by .. smearing around some Dina Wakley Media acrylic paint in Marine and Elephant; applying Opaque Matte Ranger Texture Paste through an Aall and Create stencil (#7); and whilst that was still wet, sprinkling on some Antique Silver Prima Art Sugar. Once all of that was dry and I'd shaken off the excess Prima Art Sugar, I splattered some 13 Arts Splash Glitter Ink in black around the page.


With that all done and dusted I cut some 'pointy' borders out of the Pinkfresh Boy's Fort patterned papers (following angled patterns where I could) and adhered them to my page, some with foam tape to create some depth in my layers.

I also wanted to use some 'pointy' chipboard on my page ..

(hasn't Ratbag got just the cutest paw??)

I painted and inked a variety of Blue Fern Studio chipboard. The Tattered Diamond Bits were painted with the Elephant Dina Wakley Media acrylic paint and the Radiant Bursts were painted with Marine Dina Wakley Media acrylic paint. I inked my chipboard title Everyday Moments, also by Blue Fern Studio, with a black Ranger Archival Ink Pad.

The final step once everything was stuck down was to add just a few extra details with some final embellishments.


Small White Flowers scattered about, some black bling I cut from a Molossi Crystal Line, randomly placed, and a few words from Tim Holtz Idea-ology Chit Chat Stickers and I was almost done.  Because they're quirky, and fun, and dogs (!!!) I had to add a Ryan Reaveley's Dylusions Creative Diary Die Cut Animal which I coloured in with Prima Watercolour Pencils.

Voila!

Don't forget you have until midnight on the 14th of June to add your entry to the appropriate album on the Scrap Matrix Shares Facebook page. Please also add details of the Scrap Matrix products you've used. Oh and don't forget (lol) to be inspired by this ..


.. as that's kinda the point (ha ha!) of the current challenge!

Wishing you happy, scrappy days.

Cheers .. Alz  :)


Scrap Matrix products used:
Pinkfresh Boy's Fort patterned paper - High Five and Thumbs Up
Dina Wakley Media acrylic paint - Marine and Elephant
Ranger Texture Paste - Opaque Matte
Ranger Archival Ink - Jet Black
Blue Fern Studio chipboard - Tattered Diamond Bits
Prima Watercolour Pencils - Scenic Route and The Basics

Thursday, 10 May 2018

"Hold dear always" .. with Alz

Morning peeps!

I'm back to share another Tic Tac Toe Monochromatic page with you. This time I went with brown ..


Hold dear always

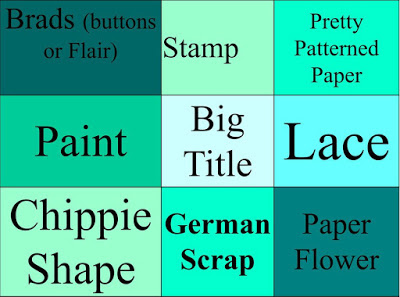
.. and the vertical strip on the left .. Brads (buttons or flair), Paint and Chippie Shape.    


This layout posed some challenges. First of all, brown. What was I thinking? Lol! Its not that I don't like brown. I mean crikey, I have a brown dog, and brown furniture. In fact my whole house is varying shades of brown now that I think about it. Except for some accent walls. But I digress (oops).

I created my own background on watercolour paper with various inks, stencils, stamps and 'stuff'. First, I used the same technique for sticking down dictionary paper as I used in my last project (see here). Once it was completely dry, I sprayed my page with water and started adding 13Arts Ayeeda Paint Rainbow Colour in Brown. Because I was working on a few pages at the same time, I had the luxury of allowing my page to dry naturally which meant I could allow each layer of the brown ink to dry before repeating the process, ie, spraying my page with water and adding some more of the 13Arts Rainbow Colour. By doing this, I was able to achieve, albeit not a lot, but some, depth of colour in my brown.


Of course I couldn't stop there, so I grabbed my TCW Mums Stencil and Paper Artsy Fresco Finish Chalk Acrylic Paint in Nougat and sponged the paint through the stencil onto my background. Once it was dry I felt it really needed some definition so messily outlined each of my Mums' petals, three times. I did it whilst I was 'watching' TV so it really didn't take that long. Next, I added some black texture paste through another TCW stencil. Finally, as you'll see on my close up photos below, I used various Aall & Create Stamps and a Jet Black Ranger Archival Ink to add that final touch to my background.    


As with my last share I decided against using layers behind my photo. With hindsight, a few weeks after creating my layout, I think maybe some plain white and/or cream layers would have worked well. But at the time, well yeah. Moving on lol! It was time for embellishing, one of my favourite parts of scrapping.

I sprayed various pieces of Chipboard (Circle Words Adore Italic #2 and Doily Border) with 13Arts Ayeeda Chalk Mist in Dark Brown and once dry (which took a while as chipboard is sooooo absorbent), inked the edges lightly with the Jet Black Ranger Archival Ink. Inking the edges gave the chipboard just a bit of definition helping them to stand out from the page.


I removed the 'pearl coloured' centres from some Prima flowers and replaced them with Prima Memory Hardware Glass Pearls in a dark colour. I also painted some Metal Flowers with black paint and then lightly scratched back some of the dried paint to reveal the metal underneath. In my embellishment clusters I also included some of my favourite flowers (Petaloo Botanica Minis) .. they're the perfect size for tucking in here and there, you can do so much with them, including leaving them plain, and a pack seems to last me an awful long time.

Because of the Tic Tac Toe line I had chosen, I had to include a Brad, Button or Flair. I went with an Um Wow Studio Flair. I've said it before, and I'll say it again, I love these flairs! They're just that little bit larger than your average flair, and they're just that bit flatter. I love them!!


Some of my stamping was a wee bit messy so to partially cover and distract from the particularly bad spots, I stamped some birds with Aall & Create Stamp Set #6, cut them out, coloured them with a brown pencil from the Prima Watercolour Pencils in Earth Tones, and adhered them to my page with foam tape.    


I also scattered around a few black rhinestones I cut from a strip of Molossi Crystal Lines. If, like me, you love bling, you seriously have to get some of these Molossi Crystal Lines! A packet will last you forever. No joke. Yes, you can use them as a strip, but one packet comes with five strips, and you can cut them up into smaller strips or individually as I generally do. Aaaand at the time I wrote this post, there are eight different colours in stock, including teal and pink and lime green .. sigh!    


Finally, I needed to add a title and some journaling. You'll probably notice I tend not to journal a lot on my pages. I also don't usually add large titles. I like to rely on my product to provide my title and/or journaling. For example, I could have titled this page "Adore" as that's the word being repeated on my chipboard circle. But I have a lot of pages titled "Adore". So I added some of the words from Tim Holtz Idea-ology Chit Chat stickers - Verbiage, and that was that. My second Tic Tac Toe Monochromatic layout was finished. Yay!

Don't forget you have until midnight on the 14th of May to add your entry to the appropriate album on the Scrap Matrix Shares Facebook page. Please also share with us which Scrap Matrix products you've used. Finally, because this is yet another long post, and you might need a reminder, here's the Tic Tac Toe Monochromatic board for you to have another look see at ..


I've really enjoyed the entries loaded so far and look forward to seeing more .. even yours! So get creating and have fun!!!!! Til next time ..

Cheers .. Alz  :)


Scrap Matrix products used ..
Ranger Archival Ink - Jet Black
Chipboard - Circle Words Adore Italic #2 and Doily Border
So Much Metal - flowers
Save