Showing posts with label gelli printing. Show all posts

Thursday, 12 September 2019

Tam's Village using Art Foamies

Hi there creative souls!

Tam back today to share my second 'Art Foamies' Creation!!

This one was inspired by many of you who contribute to our Facebook Shares Group.
I love the little community we have there, and recently quite a few of you were creating cute little house pages so I just had to have a go....


And yep I got the idea for that border from there too!!!
LOVE IT!
Thanks everyone for the inspiration.


I just LOVE the explosion of colour and the contrast of that black and white border.
I also love the whimsical feel.


I used nearly ALL of the Art Foamies I own on this layout!!

Let's take a look at how it came together...

This page was sparked by your little houses. I knew I wanted to create a village scene.
I was playing around a couple of weeks ago with my Gelli Plate and my Art Foamies, and some of the prints I managed to create reminded me of sunrises....and well the page just grew from there.


These are some of the prints that I created that sparked the sunrise idea...

I made the papers using Dina Wakley Paints, my Gelli Plate, the 'Doodle Centre' Foamie and the 'Dino Skin Small' Foamie.

I just LOVED that pink and yellow sunrise/sunset image, so I adhered this to my page using Matte Gel.  I made sure one of the circular shapes was centred to act as my sunrise image.


I then painted some hills onto the bottom side of this....


Once dry, I added some mark making using the 'Dino Skin Small' Foamie and the 'Inner Struggle' Small Foamie. 
These are available individually, however, I purchased mine in a packet called 'Balzer Deluxe Small'. 
I think Vicki is out of stock of those sets at the moment, however I'm sure if you contacted her she would order them in for you. They are awesome for mark making.


Next step was to make some little houses and trees for my village.
I used 'Art by Marlene - Dutch Houses' Foamies.


I stamped them onto some old book paper.....


I did the same using a couple of the leaves from the 'Art by Marlene Leaf Geo' Foamies.
They make the perfect trees!


I then used the 'Balzer Ring Fling' Foamie to stamp multiple times.
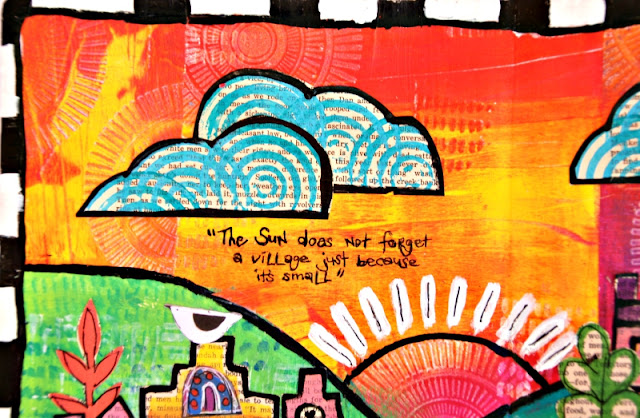
 Once cut out they look like clouds!.
(Note this Foamie is also included in the Deluxe Balzer Pack, or available separately)


I then cut them all out, and outlined them in either black paint or pen.


Cute hey!!
Time to start sticking them down.


Love those clouds!


I added  a quote and a few little bits and pieces from the 'Art by Marlene Die Cuts Sheets'.
I mainly added these to the windows and doors, and made a little garden of flowers....oh and added a cute little birdie.


Lastly, I added that black and white border.
(Oh and a couple of cats!! Wouldn't be somewhere I want to live without them!)


Now just to decide which house I actually want to live in!! 
I think that little one on the left with the love heart and pink roof will be just fine.
Who wants to move in next to me??
What a crafty little village we would have.

Well that's it from me today.
I'll be back again next month.

I really hope you join us this month.
There's so much you can do with Art Foamies, so get playing!!!
Once done, pop over to the Scrap Matrix Shares page and pop it in the 'Art Foamies Album' for September.
Don't forget to tell us which Art Foamies you have used!!


Balzer Deluxe Small Art Foamies
Art by Marlene Dutch Houses Art Foamies
Gelli Plate

Tuesday, 18 September 2018

'Beautiful Day' by Elisa Ablett - September Inspiration

Hi everyone,

Elisa here from the design team for Scrap Matrix, thanks for stopping by the blog today to check out my latest project based on the September challenge at Scrap Matrix Shares.


Image may contain: 1 person


Let's get to it!

USING YOUR GEL PLATE TO CREATE A FRAME FOR YOUR LAYOUT

HOW???? 😧😧😧


Here is my second creation for Scrap Matrix design team for the month of September, a very colourful and vibrant Spring inspired project. 

I wanted to show you how you can use your gel plate (whether it be square or circle) to create a solid base frame for your photo and then add embellishments to further frame around your photo.

TIP- be adventurous with using any sort of framing design on your layouts, it does not have to be the normal sort of frame, use a solid base, use embellishments to hug your photo, use colours to your advantage. Be creative and unique!


Products used from Scrap Matrix - 


undefined
Funky Fuschia Dylusions paint


Image result for dina wakley circle stencil


To create your background - 

Step 1 - Start with the light green colour on your gel plate first. Use paint, ink, sprays or stains, or even swipe a distress inkpad over the gel plate and then spritz it with water then place your paper over the top and gently rub the back of the paper. Peel the paper back carefully and let dry

Step 2 - Add your funky fuschia dylusions paint to your gel plate in a haphazard way starting from the bottom of the gel plate. Then tip the gel plate up and stamp over the top of your green coloured background stamp.

Step 3 - Add some splatters of each colour over the top and let dry.

Step 4 - Using your Dina Wakely Circle stencil and a distress tool, blend ink through your stencil mainly in the bottom right hand side of the coloured circle background. Add some gold splatters.

Step 5 - Using a versafine or archival black ink pad stamp foliage stamps around the bottom half of your layout, maybe even layer them up and around a bit further to frame your background circle a bit more.


Step 6 - Using different mediums stamp all your flowers and leaves using the Tim Holtz Ideology stamp set. I used Funky Fuschia dylusions paint, Twisted Citron Distress inkpad, Mowed Lawn Distress Stain, Squeezed Lemonade Distress Inkpad, and Spiced Marmalade as well. Mix and match them, let them dry and then fussy cut in front of TV! It's essential :-) 

Step 7 - Emboss your metal leaves using Ranger Black Embossing Powder, fussy cut out a stamped butterfly or use a chipboard butterfly inked black, and twist your wire ready for putting your layout together. 

Here are some close ups for the finer details!!


That's it from me today, I hope I have made you think outside the box when it comes to frames on your scrapbooking layouts and designs. 

Make sure you leave me some love xx

Elisa 


Tuesday, 3 July 2018

Tam's Sweet Memories.....

Hi there Scrap Matrix lovelies!
Tammy here today to share my first creation for our current "How Sweet it Is" Challenge.
So I bet you can all guess what inspired me about the moodboard..... Why COLOUR of course!
Here it is......


All that glorious colour!!

I was also totally inspired by the shapes of the lollies and the shapes of the macaroons.
So I went a bit crazy with the circle theme.  I pretty much dug out every circle stamp I have!


I also went with the 'Sweet' Theme, both in my title and in the theme. 
I scrapped my kids eating Kitchener Buns. Oh how they LOVE them!


And do you know what? I got so inspired whilst creating this layout that I totally forgot to take step by step photos!!
WHOOPS!!!
But don't worry, I decided to recreate it in my art journal, just so I could show you the steps.
So here goes......
First of all I stamped onto my page using one of the gorgeous new Aall & Create Stamps. This one is No 63 by Olga Heldwein. Such a beautiful stamp that I just know I will get a lot of use out of.
I stamped using an Archival Ink, as I knew I wanted to add wet mediums and I wanted to ensure the stamping didn't run.


Please note that on my layout, I added a layer of clear gesso to my white cardstock before stamping.
Next I added a few more stamps using another Aall & Create Stamp. This one is No 34 by Tracy Evans.


I love how much they remind me of the macaroons!!
Finally I added some swirly circles from my favourite stamp set by Paper Artsy - Tracy Scott's 09


Ok, that's the base work done.

Now onto the colour!

I used my Prima 'Tropicals' Watercolour Set, and began by colouring in the circles, using the colours in the moodboard as my inspiration.


I then wanted them to drip down the page, so I added some water, held up the page and let the magic happen.


I wanted to add some more colour, so from various scraps (some are literally scraps left from other creations, others are ones I made using my Gel Plate). These are still from the first experimental batch I made.....I've used them to death. For tags, for layers, for stamping.
I love their vibrancy and really must make some more.


Once stamped, I cut them out. To my layout I attached them using foam tape, to add some dimension, but in my journal I just stuck them down with some Soft Matte Gel.
I don't use foam tape in my journal as it would just be too bulky.


Next I added some stamps from 7Dots Studio - Hazy Days I love this set and use it all the time.  I added the paint splodge onto the background, and then used that small stamp - which looks like flicks of paint.


I then used this stitched looking stamp from the first Aall & Create stamp that I used. (No. 63)
I love how this one can fill in the gaps, and again I know I will use it over and over again!


I really wanted those large black splodgy stamps to stand out a bit more, so I grabbed my Pico Embellisher IrRESISTable in black (I love this stuff so much - I love the gorgeous resin finish it gives and how fluid it is).


I swirled this around  the circles and then added some scribbles.
I feel that this really finished off the background and 'pulled' it all together.


So now I moved onto layering behind my photos, which I didn't do on my art journal page, but basically I used a few tags from 7Dots and I also made my own tags from those papers that I used earlier (the ones I created using a Gelli Plate), plus I added a few scraps of leftover papers.

To add some extra textures, I added some tissue paper by Dina Wakley, which I recently purchased on a lovely shopping spree!!


Vicki really does get in the BEST stuff!!


I added a few circle stickers, word stickers and Die cuts from various 7Dots ranges.

I'm a big fan of 7Dots word stickers and really love how they seem to suit EVERY layout that I create!!
I added a title using the MAMBI Chip Stickers, these also seem to end up on every layout I create!!
So that's about it!!
For my art journal page, I added a quote....... here's the finished page


And here's a few more pics of the layout........


I'm really happy with how it turned out.
Oh wait, I've just remembered the final step is to swipe black paint around the edges.
I try to be as messy as possible with this step. I think it gives it an 'arty' feel.
It also acts as a border to the layout.


Here's a reminder of the moodboard that inspired me.......


I hope I've inspired you to enter our challenge....you could win some free gorgeous Scrap Matrix products and also the chance to be a Guest Designer and play along with us!!!

For those of you who have played along before, we now run the challenge in a single calendar month! Easier to keep track of and that means you have until the 31st of July to get your entries in.
All you need to do is create something using this moodboard as inspiration....it could be a layout, some cards, some tags, an art journal page.......you must use at least one product available from Scrap Matrix (obviously the more the better).
You don't need a blog, just upload your entry to the Scrap Matrix Shares group.....pop it in the right album, and just let us know in the comments section what Scrap Matrix Products you used.
I can't wait to see all your SWEET creations.....
Until next time, happy creating!
And if you can't wait that long you can see more on my blog HERE

Scrap Matrix Products used:

White Bazzill
Aall & Create Stamp #63
Aall & Create Stamp
7Dots Cotton Candy Word Stickers
Mambi Chips - Chalkboard