Showing posts with label mixed media scrapbooking. Show all posts

Thursday, 3 September 2020

Tam's Colourful Characters......

Hey there creatives!

Tam here to share my colourful characters.......


Cute, quirky little birdies....


So let's take a look at how this page came together....

I began by adding gesso to a page in my large Dylusions Art Journal.

I knew I wanted to create some birdies so I painted some blues onto the background.

I then used a new TCW stencil called 'Lush Petals' and rubbed off some of the paint through the stencil.
It kinda made clouds....


I've been busting to play with these, and as soon as I looked at them I saw feathers and birdy wings and bodies.
I love doing that with stamps, finding alternate uses.


I then cut them out and added colour.


Whilst drying I sketched a branch and some bird shapes.
I began by painting in the bodies.


I then added the branch using Dina Wakley's 'Penny' and 'Umber'.


I then added in leaves using TCW Stencil called 'Herbarium'.
I simply rubbed paint through the stencil with a dry wipe using a combo of Dylusions 'Cut Grass' 'Fresh Lime' and 'After Midnight'.

I then added pen marks to these leaves...


Next I added the bodies and leaves onto the birdies using the stamped images and some TCW Gel Medium.....


Next I went to town adding in some dots and details to the birdies....


Finally I added a quote....


Love that little upside down birdy.....
I hope he never grows up!!
Or actually learns how to act in public!! 
Just be you little birdy.

There you have it!!
So much fun to create.


What colourful creatures can you create for this challenge??

Be inspired by the amazing art and artists found on Pinterest...


Add your entry to the 'Colourful Characters Album' over in our Facebook Scrap Matrix Shares group and let us know in the comments what Scrap Matrix products you used.

yep it's that simple, and you could win a shopping voucher to the store!!

Can't wait to meet your colourful characters....

Wishing you colour and joy.
xx

Monday, 16 September 2019

Sea Shells by the Sea Side- By Tanya Froud

Hi There Peeps! 

Here is my next project - a mixed media layout using  Art Foamies.


To start with I applied Dina Wakley Heavy Body Acrylic Paint to Sea Side Art Foamies with a brayer and stamped 25 images from the Sea Side range.
I dried these and then fussy cut them all out.

On a sheet of white 12x12 card-stock in a band across the middle I stamped Broken Blocks by applying  Dina Wakley Heavy Body Acrylic Paint. I repeated the same technique with the Train Track stamp and the Writers Block. I dried it completely.

Next I matted my photo and stuck it down on the center of the page slightly to the top.
 I then made a cascade of the seashells coming down from the photo mounting them at different heights using dimensional dots.
Then flick some paint splats around and you are done!

A pile of pretty Seashells all cut out....


The Background...


Well That's it from me for today, thanks for stopping by!
Hugs 
xxx


Saturday, 8 December 2018

'Arty Angels' by Elisa Ablett


Hi everyone,

Oh my goodness, December already! this year has flown by....

Instead of getting all Christmasy at Scrap Matrix for our Challenge, Vicki went with a veritable rainbow of colours which is just AMAZING!

This is a fabulous challenge as it gives us all a chance to learn a bit more about the colour wheel if we are rusty or to use the entire Rainbow and I LOVE COLOUR.

Here is the link to the challenge album in the Scrap Matrix Shares facebook group.

No automatic alt text available.
 

After a bit of research I wanted to show you what you can do with a colour scheme that sits next to each other on the colour wheel, it's called an Analogous Colour Scheme. 

Analogous Colours from the Colour Wheel - Analogous colour schemes use colours that are next to each other on the colour wheel. They usually match well and create serene and comfortable designs. Analogous colour schemes are often found in nature and are harmonious and pleasing to the eye. 

I picked a 'cool' colour Analogous scheme of Blues, Turquoise and Greens and I was inspired by the water colour colour wheel in the bottom left hand corner of the challenge graphic.

 
Related image


Products and links to the Scrap Matrix Shop: - 

Head on over today to check out the great range of Scrapbooking and Mixed Media products on offer.


http://scrapmatrix.com/search.php?search_query=paint+chips - 7Dots Paint Chips Collection, Tags and Stickers.

Let's take a look at the close ups for the finer details :- 


To colour my Angels, I sprayed a small amount of each of the colours onto my craft messy mat and used a small paint brush to colour my Angels. I also added more water where needed to create a more pastel version of the colours.


Add some coordinated accents like wings, tags, tabs, quotes and distressed sewing! 


To create some texture in the background, I added some modelling paste through a stencil, and then used the sprays over the top and then tipped my page so the sprays would run down over the stencilled back ground. 


Add some extra hand drawn circles over the top of your wheels that you have created and some inking through stencils and splatters to tie the layout together.

That's it from me today, thank you for stopping by the blog, i hope i have inspired you to take on the Colour Wheel challenge and also an Analogous Colour Scheme!

Hugs xx

Elisa 
 

Wednesday, 14 November 2018

Metals & Petals layout .... by Lynn

Hi everyone, Lynn here to share my second layout for this months challenge - Metals & Petals.

I have loved this months challenge.  Sadly we had to put our furbaby down a month ago, and I have created this layout in memory of her.


I have used Happy Accident paper, 13 arts stencil and crackle paste to create some texture in the background.  I have used paper artsy paints - Tango, Greeen Patina, Banana and Pumpkin soup.  I have stamped around the area where the layout will go with Tim Holtz Stampers Annoymous Stamp - Perspective.


The flowers have been created using wipe off sheets - this is where I have been making background and wipe off the brayer onto paper.  I have then stamped the Paper Artsy Stamp - ETS22  onto this paper and cut out.


I have randomly used some deco foil around the layout to add some "bling"


Metal flowers have been cut in half and inserted behind the photo 


I have die cut a heart and stamped the word fly from the Paper Artsy stamp set.  The "something to remember" is a sticker from the 13 arts collection - Secret Letters


A white paint pen adds finishing touches on the flowers and a "favorites" sticker from the Mambi sticker set

Products used:


Thanks for stopping by and I hope that you are inspired to have a go at this months challenge.  You do not need to have a blog just post your layout, tag, card, project into the Scrap Matrix Shares Album in facebook and tell us at least one product that you have used that is available at the Scrap Matrix Store - easy peasy!

Til Next time - Happy Crafting.


Wednesday, 3 October 2018

Tam's got Mail......dear Mama

Hi everyone, Tam here today to share my layout for the current 'You've Got Mail' Challenge at Scrap Matrix.
 
I love this theme......so many options.  As soon as I saw it, I knew what I wanted to do.
 
You see I've had these precious letters that my daughter wrote to me a couple of years ago. They are just beautiful, heartfelt and so very precious to me. I actually carry a copy around with me in my purse at ALL times.  I often sit and read them, and I think they bring a tear every time.
 
Anyway, I really wanted to preserve these letters, and now I have!!
 
Here's my layout.....


Yep, in that hand made envelope sits the letters.


So let's see how this came together......
 
I began with a gorgeous paper from 7Dots 'Writer's Block' Range.  The script feel is just perfect.
 
I knew I would add lots of colour.....yep it's gotta have colour, so I added a thin coat of clear gesso to act as a barrier/sealer to protect the paper.


Whilst this was drying, I grabbed another sheet from the 7Dots 'Writer's Block' Range.  I chose a darker colour, as a contrast to the  background.


I grabbed an envelope that I had laying about the place, and I opened it up, and used this as a template.


I traced it and cut it out


I then taped it back together.....such a simple way to have a perfectly co-ordinating envelope.


Now it's time to add some colour to the layout..... you know how much I LOVE colour!


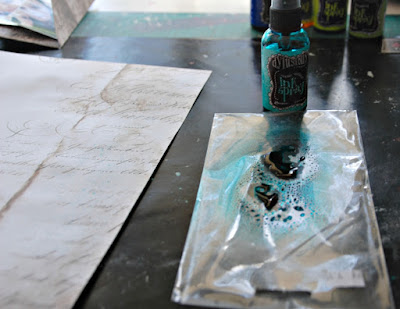
For this part, I used the 'clear packaging' technique.
 
I began with Dylusions 'Polished Jade', and spritzed some onto some old packaging, I also added some water.
 
I then turned this over and splodged it onto my layout. (super technical hey!)


I then repeated this process with Dylusions 'Lemon Zest'.
 
Then just a hint of  Dylusions 'After Midnight'.
 
*Make sure you dry in between each colour*


I then added some string to my page.


You will notice that these are vertical on the page, however, on the final layout they are horizontal.
 
When I got to the very end of the layout, I changed my mind and decided that this needed to change!
So I swapped the string to vertical.
I just felt it 'tied' in with the layout more (he he see what I did there)


I then added a few stamps to the background. 
 
I used AALL & Create #60. I used the circle/script/word section of this stamp.


I grabbed a Dina Wakley flower stamp and stamped this onto white cardstock using an Archival Black Ink.
 
I again used the 'clear packaging' technique to add colour to these stamped images.


I cut these out and began layering and tucking in and around my photos using both the flowers and lots of 7Dots Tags, again from the 'Writer's Block' collection.


For my title, I decided to use a tag I made from 7Dots paper.
 
I stamped onto it using these very cool Idea-ology Alpha Stamps.
 
I added some hand-writing, so that the tag read 'Dear Mama, Love Paige'


I then attached this to the envelope, making sure it could still open and close.


I added a few embellishments, including some 7Dots die cut elements from the 'Air Mail' range, a gorgeous German Scrap Pen Nib, and a cute metal envelope charm.  This just finished off the tag perfectly.


Aren't the pen nibs just gorgeous!!


Now it was time to add in more layers.......embellishments, tags, stickers, pen nibs, and the stamped flowers and leaves.


I added some journaling to a 7Dots tag, and some word stickers from 7Dots too.


Here's the word stickers and embellishments I used.


I then spritzed some of these little white flowers in the Dylusions 'Vibrant Turquoise' and 'Lemon Zest', and scattered these amongst the layers too.


Love the colour combo, and the overall effect.


This layout has a special place in my heart, and I'm so glad this challenge was set as it forced me to create a forever keepsake.
 
What special keepsake/ephemera could you scrap, thus preserving the memories forever?
 
Head on over to our Facebook Shares page to add your entry, and let us know what Scrap Matrix Product/s you used.
Just pop it in the 'You've got Mail' Album.
 
Here's a reminder of the challenge:


That's it from me today.
 
I hope this has inspired you.
 
If you'd like to see more of my work head to my BLOG.
 
I will leave a list of the products used below.
 
See you again soon.
 
 
Scrap Matrix Products used:
 
7Dots Lost and Found Word Stickers
Dylusions Ink Spray - Polished Jade, Lemon Zest, After Midnight. Vibrant Turquoise