Showing posts with label Tracy Scott stamps. Show all posts

Thursday, 3 September 2020

Tam's Colourful Characters......

Hey there creatives!

Tam here to share my colourful characters.......


Cute, quirky little birdies....


So let's take a look at how this page came together....

I began by adding gesso to a page in my large Dylusions Art Journal.

I knew I wanted to create some birdies so I painted some blues onto the background.

I then used a new TCW stencil called 'Lush Petals' and rubbed off some of the paint through the stencil.
It kinda made clouds....


I've been busting to play with these, and as soon as I looked at them I saw feathers and birdy wings and bodies.
I love doing that with stamps, finding alternate uses.


I then cut them out and added colour.


Whilst drying I sketched a branch and some bird shapes.
I began by painting in the bodies.


I then added the branch using Dina Wakley's 'Penny' and 'Umber'.


I then added in leaves using TCW Stencil called 'Herbarium'.
I simply rubbed paint through the stencil with a dry wipe using a combo of Dylusions 'Cut Grass' 'Fresh Lime' and 'After Midnight'.

I then added pen marks to these leaves...


Next I added the bodies and leaves onto the birdies using the stamped images and some TCW Gel Medium.....


Next I went to town adding in some dots and details to the birdies....


Finally I added a quote....


Love that little upside down birdy.....
I hope he never grows up!!
Or actually learns how to act in public!! 
Just be you little birdy.

There you have it!!
So much fun to create.


What colourful creatures can you create for this challenge??

Be inspired by the amazing art and artists found on Pinterest...


Add your entry to the 'Colourful Characters Album' over in our Facebook Scrap Matrix Shares group and let us know in the comments what Scrap Matrix products you used.

yep it's that simple, and you could win a shopping voucher to the store!!

Can't wait to meet your colourful characters....

Wishing you colour and joy.
xx

Friday, 10 April 2020

What an Inspiration...


Oh my. Where do I start.  
I cannot tell you exactly when Tammy's work started to catch my eye.  I'm pretty sure that it was in a scrapbooking magazine.  I haven't bought one of those for years now though, so it was some time ago.  

Her bright colours always stand out.  
The layers of elements and stamping, seemingly randomly placed, always look perfect to me.  
And how does she come up with the ideas of using stamps for functions other than their initial purpose?  She keeps telling me that she is an upside down and back to front person, but she seems normal to me. 😆  In fact, since joining as a guest design team member, she has been very helpful, encouraging, inspiring and supportive.  
A truly wonderful person who genuinely cares. 

Well, that's enough gushing from me.  


This is my inspiration for my project.  

I found this prompt for this month's challenge a little daunting.  I'm hopeless at trying to copy someone else's work and my first three attempts failed miserably because I wanted to use different products. 
So I went through the blog and followed her directions.  
Those who know me will be shocked.  Me, follow instructions!  I normally just look at the project and do it my way.  
Her instructions are so easy to follow, how could I have gotten it so wrong. 

So here is I what I did.

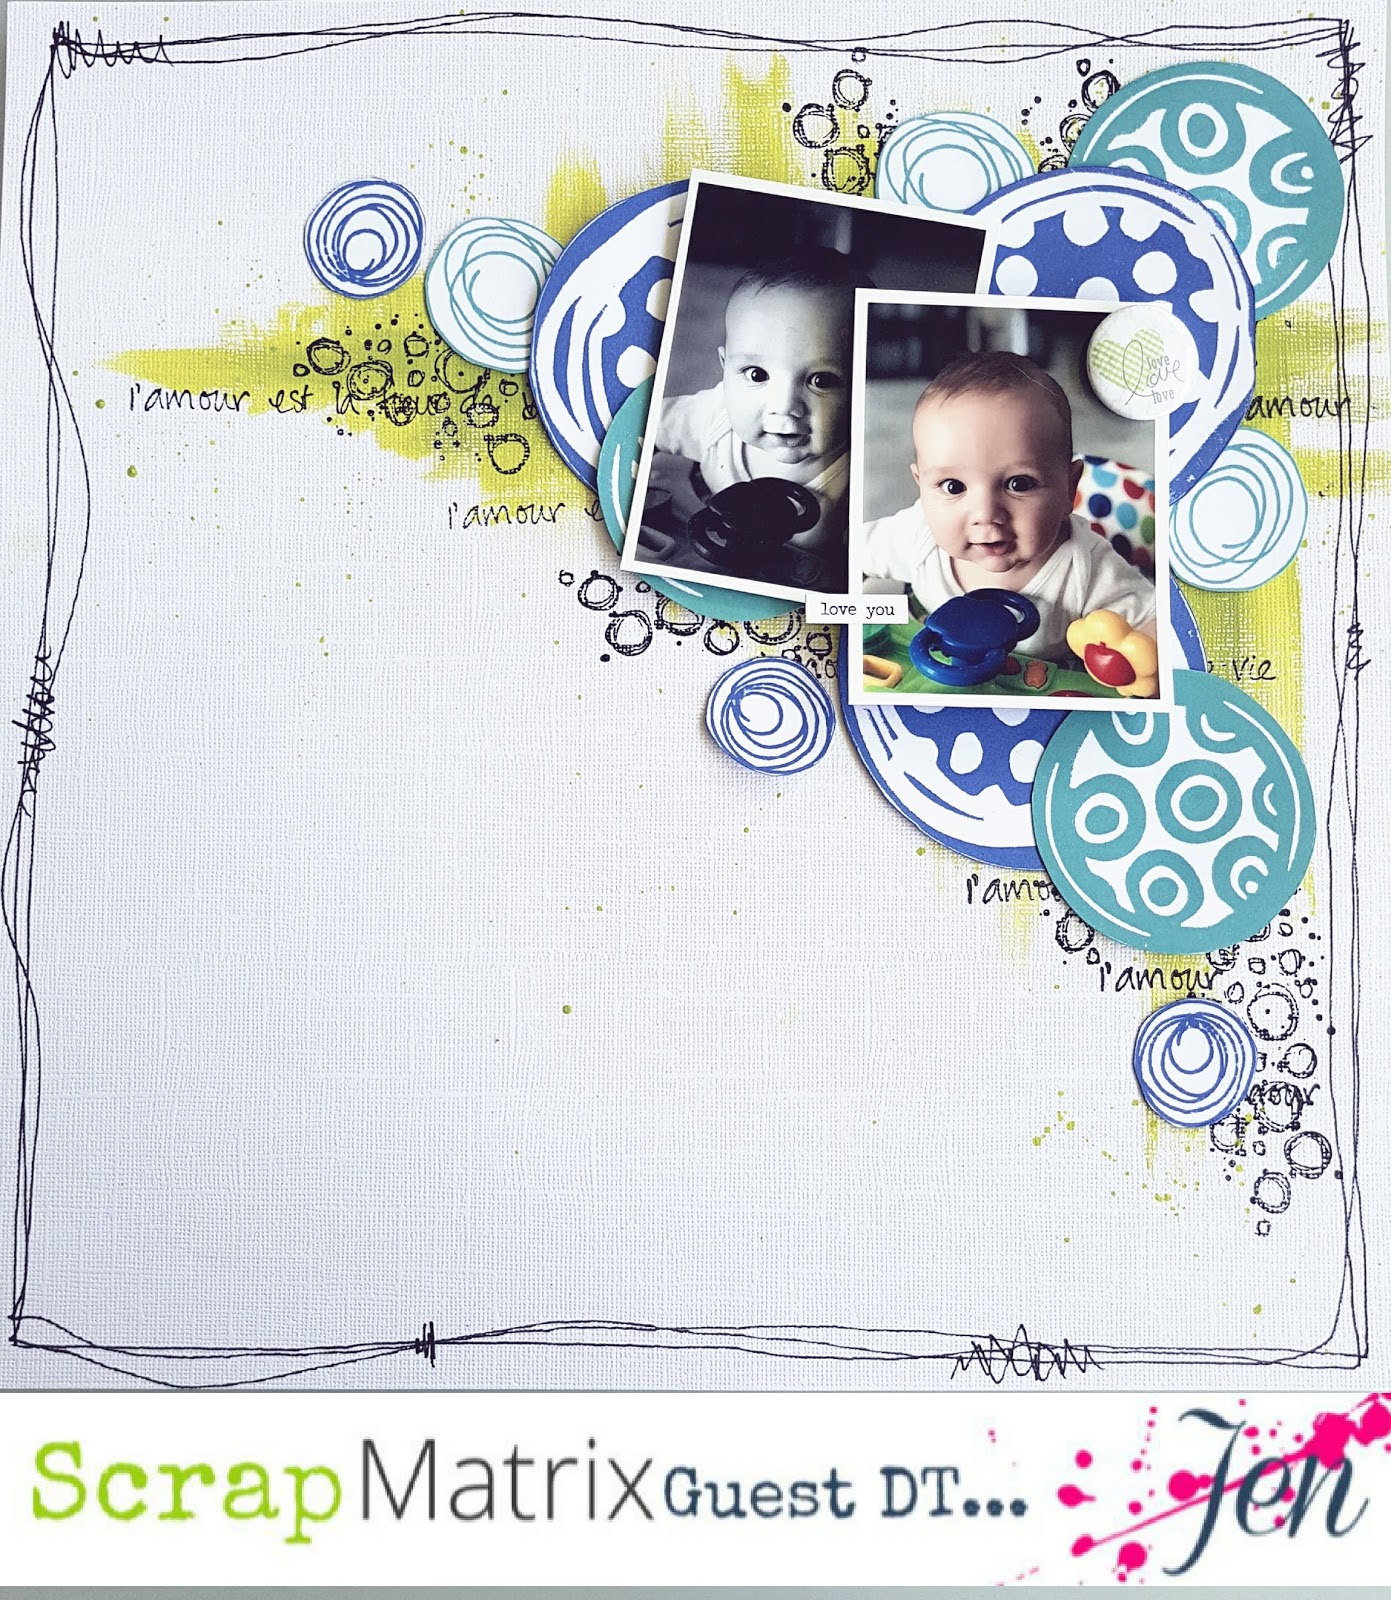
First I grabbed a sheet of white cardstock and my Paperartsy paints in Limelight and Granny Smith.
I painted first with Limelight going up and down , then side to side.  I repeated with Granny Smith but with smaller strokes.


 Next I used the circle stamp from Paperartsy stamp set ETS24 and stamped it randomly over the page with Black Stayz-On.


 Then I used one of the quote stamps from Paperartsy stamp set JOFY35 trying to use mainly the l'amour part on the right side and lower part.


I grabbed my Art Foamies Circle Salad set next, and stamped them with Distress Oxide Ink in  Blueprint Sketch and Broken China.  I repeated this with the circles from Paperartsy stamp set ETS09 and cut them all out.

I drew three lines around the page adding a few scribbles here and there with a black pen.

Now Tammy uses tags, stamped images, journaling and stickers to finish her page but I was doing it my way.
So I printed out two photos of my youngest nephew, one in black and white, one in colour and arranged them with my circles.  I had a flair button that fit with my colours and a 'love you' quote sticker from Ranger that I added to the colour photo.


 And this is it.  My Tammy inspired page.  A little different but the same. 


I hope you enjoyed my first project for this month. 
I can't wait to see how Tammy inspires you.
 Just don't forget to share it on the Facebook page.

Jen
>^.^<


Tuesday, 3 March 2020

What do you see? Tam creates.....

Good morning creative souls.
Tam here today to share my first couple of Paper Artsy projects.

For this Challenge, I pulled out all my PaperArtsy Stamps and decided to look at them differently....
What could I create that's a little quirky and unexpected.


Meet Owlivia and.....


Finlay!

So let's see how they come together....

Let's start with Owlivia....


I knew I wanted to use my new Paper Artsy stamps - Tracy Scott ETS38 and JOFY 90
I hadn't opened them yet, so this challenge came at the perfect time.

I also dug out an couple of older stamps - both Tracy Scott ones - one from her previous release Tracy Scott ETS34 when she was last in Australia, and one from a couple of years ago -

As soon as I looked at the mini mandalas I saw owl eyes.....
So I loosely sketched an owl with pencil onto some Art by Marlene Watercolour paper. Very very loosely - you don't need to be able to draw, this is just to help with placement of the stamps.


Once the eyes were in, I immediately saw wings instead of flower petals,
 and feathers instead of  carvings....


Lastly, the mandalas became ear tufts and feathers....


Ok, now I had the base of my owl, it's time to add colour.

Lots of blending of colours and flicks of paint...


I finished it off with some doodles and pen work....


Love those eyes!


I enjoyed this so much I just had to try another one.....

I used three of the same stamps, but I also added in another older Tracy Scott set ETS09
Oh and I used the Tracy Scott set ETS 35, I just forgot to take a picture.


Time to follow the same process as Owlivia......

Love hearts became lips
Flower petals became a tail
A spiral for an eye
Circles for bubbles
and carvings and flowers buds for fins....


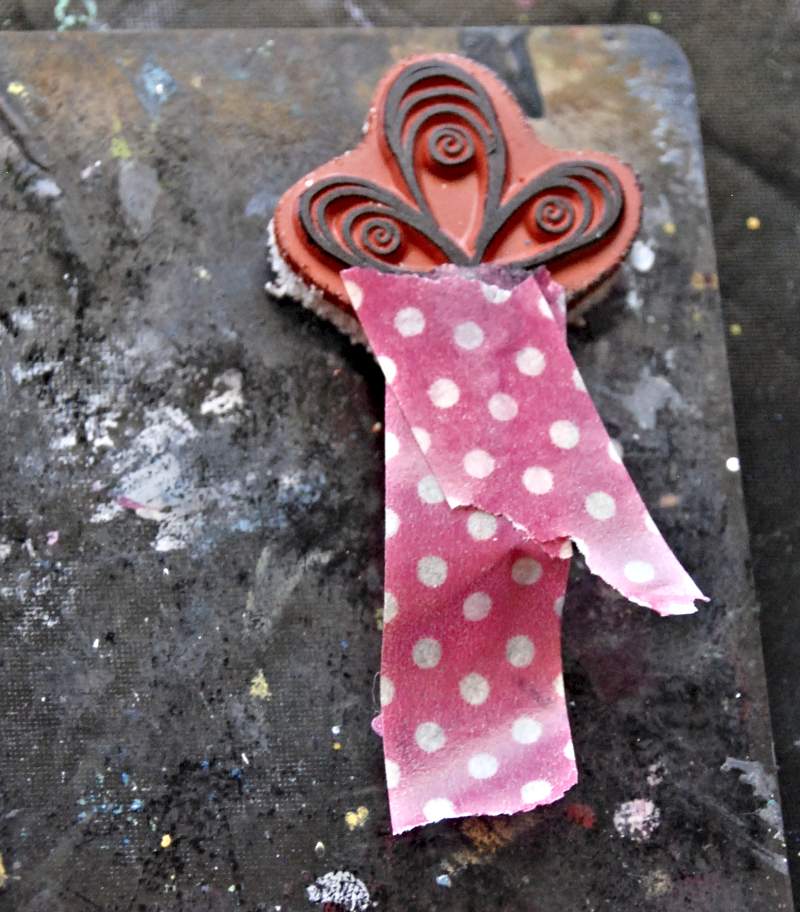
For a couple of these stamped images, I didn't want the entire stamp - for example, I didn't want the stem from the flower bud, so a quick easy solution is to cover with a bit of washi before stamping.


Time to add the watercolour, and the extra details with the penwork...


Happy with the outcome. 
Just love those lips.


If you follow my work you know I have created a couple of critters using stamps before.


In case you missed them you'll find the link to the HERE.

I'd love you to have a go at this fun technique.
What else can you see in those stamps?
Stand on your head, squint - you may be surprised what you find.....

What are you creating with the current PaperArtsy Challenge?
I can't wait to see.


Much love 
xx

Friday, 18 October 2019

Jen's Art Journal Page.


Okay, okay, some of you may have picked up by now that I'm a bit of a feline fanatic. 
I'm not a crazy cat lady though, I do have limits. 

This page happened because it's been a few months since I've done anything cat-themed and I always find their appearance inspiring.  It's not a great photo, the pic has shown up more blue than the aqua it really is and the page is a little buckled, but it makes me happy.  Sadly, I forgot to take photos as I went along, but the process was really quite simple.

I've done this in my large journal and used Paperartsy paints and Tracy's stamps and stencil.


The background was done by using Paperartsy paints Mermaid, Glass Blue and Blue Lagoon. I just smeared them all over the page with my fingers. It's very theraputic, although messy.  I then used the Tracy Scott stencil PS124 with Snowflake, lightly sponging it.  
My cat was made from watercolour paper, cut out and painted with Midnight. The quote done with a Posca pen.


The flowers and butterfly are from Tracy's set ETS28.  These I positioned onto white card and traced around with pencil. I then used London Bus, Tango, and Tangerine Twist blending them with a brush and then my fingers. (This always seems to happen.) I stamped them with Archival Ink Jet Black,(using  my pencil lines as a guide),  cut them out, and using a warm grey pen, went aroung the cut edge.


I positioned my cut images, marked where they would go and used the small flower from the ETS24 stamp set with Archival Inks Garden Patina and Manganese Blue.

I painted the edges of the page with Mermaid and used a black pen for the outline. Mixed some Midnight paint with water and splattered it over the page. then glued my cut outs onto the page with Gel Medium.

I hope this wasn't too boring since I didn't take any progress photos. I'm really sorry about that, but when you feel the inspiration spark you just gotta go with the flow. 

I hope those of you who got to go enjoyed Tracy's classes. I'm really jealous. 
Well, that's it,  my battery is nearly gone.   
Happy crafting!

Jen.


Thursday, 3 October 2019

Tracy Scott Inspiration by Tam

Hey there beautiful creatives.

What an EXCITING month!!
Not only do we have a very cool Tracy Scott Challenge.....but she's also teaching classes at a 3 day workshop at Scrap Matrix!!!!

We just love her to bits.
So what better way to celebrate her, then to make October ALL about her!!!
Tracy mania is in full swing!!

So, my turn to share my creations.
Lately, I've been playing around a bit, creating some watercolour animals.
I thought I'd incorporate some Tracy-ness into them.......


Yep two gorgeous colourful birds.
Take a closer look at their tails......all Tracy Stamps!!

So let's take a look at how they came to be.....

Let's start with that gorgeous Flamingo!
I named him Floyd.
Yep so funny right?? 
Pink Floyd!!!


I began by grabbing a sheet from my Art by Marlene Large Album.

I then loosely sketched Floyd in pencil.
And began the watercolour process....

On a side note, I've tried a few different papers for my watercolours. I love the Paper in the Art by Marlene Journals.  It's so thick and can handle a LOT of water)


Once dry, I got out a mix of Tracy Scott stamps....
I began to add them using a masking technique we learned last year at the Tracy Scott event.

Stamp each of your flowers onto cardstock and then cut them out...


NEVER throw these away, these can be used over and over for many projects.

Begin by stamping your first flower, then cover it using the mask you have just cut out.
Line it up as best you can.
Then stamp your next flower. And repeat.
This pic shows the process....


Continue until you fill up his body.
You'll see mine aren't perfect.
That's ok.
They can be fixed up later....


Once they are all stamped, I then coloured them in with various watercolours.....
I also drew in any missing lines with my Fudeball pen and added some white Posca Pen too, just for a few highlights.


I then went in and added more depth of colour to Floyd.
I added fine details with pen and finished with lots of paint flicking!!


I really love it.
The flowers really suit his flamboyant style. (and those lashes!)

Ok, onto the second creation.....
Mr Peacock!!


I began by going through some of my older Tracy Scott stamps.
ETS09 is one of my faves that I come back to over and over.
I use the circles and flowers a lot, but thought it was time to look at those leafy sprigs....


Some see leafy stems, I see Peacock Feathers....or plumage!!

My favourite watercolours are Art by Marlene.
I've been using the 'Bold and Bright Set' for a while, but not long ago I got the 'Bright and Whimsy'.
Time to burst into the box.
It has some gorgeous blues, so  peacock is perfect!!


I began by sketching out and adding some base watercolours to the page.


Once dry, I began stamping on that glorious tail....
I then went in and filled in the details, with black pen.
Plus I added more colours and depth to Mr Peacock.


Finish with those flicks of paint.
The more flamboyant and bold....the better!

The only thing missing is a name....
It's a boy as the colourful peacocks are.
He needs something flashy and gorgeous and proud and proper.
I'd love you to let me know.

So that's it from me today.....
Two gorgeous hand painted birds, made extra special with Tracy Stamps.....


I'll be back again a bit later in the month.

Some of you I will be seeing soon at the Tracy Scott weekend!!
(Tracy included!! I can't wait to be inspired by my colour sister)
Woohoo!!!

Until then I ADORE seeing our Scrap Matrix Shares Page on Facebook filled with Tracy Inspiration.
What a month!!
What a girl!

Oh and just imagine how much Tracy Inspiration there will be AFTER the weekend!!!

Much love
xxx


Art by Marlene Watercolours Bold and Bright