Friday 23 November 2018

'Blossom and Shine' By Elisa Ablett

Hi Everyone,

Elisa here from the design team with my latest layout based on this month's 
Metals and Petals challenge. 

The Challenge details and album can be found in the Scrap Matrix Shares Group  on Facebook, join today for inspiration and keep up to date with the new products coming into the store!

I utilised the gorgeous papers from the 7Dots Studio Garden Party collection again for this challenge and the gorgeous Berry Jane Davenport Inkcredible Ink.

I also tried my hand at sewing on my layout!!!


Products from Scrap Matrix Store :-


Image result for 7 dots studio garden partyImage result for jane davenport inkredible ink berry

Image 1    


Here are some close ups of the finer details.


Cover your metal butterflies in gesso, then splatter ink over the top and let dry. If you have a sewing machine or like hand sewing, add grungy sewing and threads to your layout by sewing your German Scrap Medallions onto tags and then glue to your layout.


Spritz water into small puddles onto your page and then drop ink into the puddles and let the ink spread causing crystallisation around the edges. 

Let dry and then stamp over the top to create grungy flowers. 

Snip your quotes into smaller pieces to fit with your design!


Use a distress tool to smooth ink through stencils over the whiter areas of your layout. I used a couple of colours from the Distress Oxide Range including Bundled Sage and Black Soot.

That's it from me today, make sure you leave me some love in the comments and I hope to see you soon over on the Scrap Matrix Shares Page!

Elisa xx


Tuesday 20 November 2018

We're on an adventure - 2nd share with Helen

Welcome back to the Scrap Matrix challenge this month 
where we have a unique mood board to inspire you;
it's all about petals and metals.


I chose to scrap a photo of my Grand daughter, 
who loves the great outdoors.


First up I used clear gesso to seal the background paper,
it's by 7 Dot's Studio, Garden Party and perfect for my photo.


I wanted to use this gorgeous floral stamp by Paper Artsy to frame the photo. I stamped it with Black Archival ink and fussy cut the images, before coloring them with Tim Holtz Distress Oxides. 


Don't be afraid to cut the pieces apart to suit your needs;  it makes the stamps so much more versatile.


 This stencil is wonderfully eclectic, with heaps of different patterns and shapes. Just the thing for adding texture.
It's a fave for me.


  I scraped some texture paste through one corner of it. 


Next I started auditioning various 7 Dots Studio tags and a doily from my stash, to form a nest for my photo.


Adding in a title and some metal flowers.


Fiddling around with placement of the flowers 
and trialling a metal heart.


Hmmm...maybe some chipboard too?  What do you think?

Eventually I'm happy with the placement and add some wax to the chipboard piece to create a metal sheen.


The process of adding bits & bobs, taking them off again, changing the position of pieces, can take ages, as I'm a slow scrapper.


The flicks of yellow Oxide inks add some contrast and 
draw the eye to the texture paste.


The rusted heart seemed the perfect embellishment for the corner.
Voila!  I think it's finished, although I have been known to take it all to pieces in the morning and start again! Luckily there is not enough time to do that for this layout.

I hope you find time to play along this month.  
We'd love to see your take on the challenge.

Just add your entry to the Scrap Matrix Shares Page and don't forget to let us know what Scrap Matrix products you used and what inspired you.  You could be in the running for a $30.00 gift voucher and perhaps a Guest Design Team spot down the track.


Scrap Matrix Products used:-

Thursday 15 November 2018

Colouring Petals and Mixing with Metals by Monique

Hi everyone, welcome to our Scrap Matrix Blog!
Monique here sharing my latest layout - created for the Scrap Matrix "Metals and Petals" challenge.

I had loads of fun with this layout - using some beautiful Stamperia Paper and colouring flowers with some Prima Paints.....

This is what I created:


This is how I created my background:

First, I mixed some Paper Artsy Fresco Finish Paints in Green Patina with some texture paste, and applied it to my layout using one of my favourite 13 Arts Stencils. 


Next, I mixed some more Paper Artsy Fresco Finish Paint, this time in Mudsplat, with some more texture paste, and applied it using my Carabelle Studio A4 Stencil called Calligraphic Composition.

Can I just say I loved the way the Paper Artsy Fresco Finish Paint mixed with my texture paste?  Wow - such solid colour!

Next, I broke out one of my new Paper Artsy stamps and stamped on some more yummy texture using a dark brown archival ink.


There we have the background!

Next, I simply cut out some tags, and a photo mat from the gorgeous Stamperia "Clockworks" paper, and layered them under my photo.  I added some string to some tags for extra texture, and also cut out some clock images from another piece of paper in the range to add to the paper layers.  Stamperia paper is so good for this - it has such beautiful images and is so beautifully layered with images that you can have so much fun fussy cutting out divine embellishments.


I wanted to add a few flowers - no, I really don't have much of a problem adding flowers to my boy layouts, especially ones with a steampunk feel!  Anyway, I got out some Petaloo Mini Paintables  and my Prima Metallic Accents Watercolour set and painted them in a lovely teal colour to pick up the colours in my background.


I then started to put everything together.  I picked out some chipboard cogs from the Blue Fern Studios Cogs and Gears set, and painted them in Paper Artsy Fresco Finish Paint in Mudsplat and gathered together my metals - including some Prima Mechanicals Rustic Washers and Steam Punk Gears.  

When I was putting everything together, I was having trouble deciding where to place my flowers, so I took photos of what I was trying to make my mind up about, and compered them side by side.


I quickly decided I preferred the bottom photo.  The main reason for this is the pop of teal/mint forms a visual triangle around the photo, which then draws the eye to the photo - the main focus of my page.  In the top photo, the visual triangle draws the eye down into white space, and the eye is left floundering, wondering what to look at.  This is a very useful technique when you are deciding on your placement of embellishments.

Again, here is my layout once I was satisfied with the placement of all my embellishments:


Here is a full list of the products available in the Scrap Matrix Shop


Well that's all from me today, I hope I have given you some inspiration.  You still have plenty of time to enter the "Petals and Metals" challenge.  When you are finished, simply upload a picture of your creation to the "Petals and Metals" folder on our Scrap Matrix Shares page.  I  must say I am absolutely loving all the gorgeous creations I am seeing so far - so keep them coming in Scrap Matrix fans!


Wednesday 14 November 2018

Metals & Petals layout .... by Lynn

Hi everyone, Lynn here to share my second layout for this months challenge - Metals & Petals.

I have loved this months challenge.  Sadly we had to put our furbaby down a month ago, and I have created this layout in memory of her.


I have used Happy Accident paper, 13 arts stencil and crackle paste to create some texture in the background.  I have used paper artsy paints - Tango, Greeen Patina, Banana and Pumpkin soup.  I have stamped around the area where the layout will go with Tim Holtz Stampers Annoymous Stamp - Perspective.


The flowers have been created using wipe off sheets - this is where I have been making background and wipe off the brayer onto paper.  I have then stamped the Paper Artsy Stamp - ETS22  onto this paper and cut out.


I have randomly used some deco foil around the layout to add some "bling"


Metal flowers have been cut in half and inserted behind the photo 


I have die cut a heart and stamped the word fly from the Paper Artsy stamp set.  The "something to remember" is a sticker from the 13 arts collection - Secret Letters


A white paint pen adds finishing touches on the flowers and a "favorites" sticker from the Mambi sticker set

Products used:


Thanks for stopping by and I hope that you are inspired to have a go at this months challenge.  You do not need to have a blog just post your layout, tag, card, project into the Scrap Matrix Shares Album in facebook and tell us at least one product that you have used that is available at the Scrap Matrix Store - easy peasy!

Til Next time - Happy Crafting.


Monday 12 November 2018

Tam paints petals and adds metals.....


Good morning Scrap Matrix lovelies!
 
Tam here again to share my second post for our very cool challenge "Metals and Petals".


I got a bit painty with this one, inspired by someone I love and follow on Instagram - Lydell Quin.
 
I just love that background, and I love the contrast of the metal  flowers against the arty background.


So let's take a look at how it came together.
 
I began with a background sheet of paper from 7Dots Garden Party Range.


I then decided to add colour using Prima Watercolours in Tropical.
 
This required a layer of gesso to protect the paper.


I swiped it on using an old store card - and really only put it where my painting was gonna go.


I decided to go with blues - I selected this colour as both my girl and I were wearing blue in the photos I wanted to use.
 
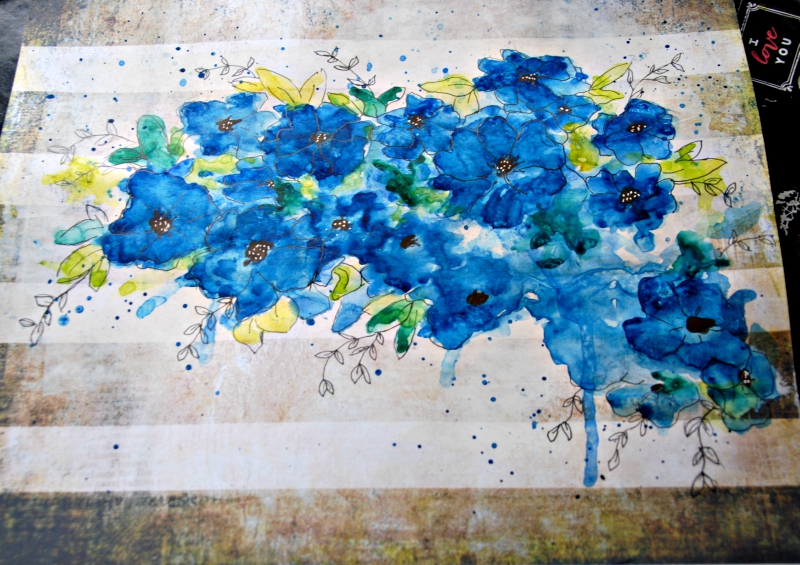
So I began - initially I just kinda blobbed it on (yep technical term).  Make sure to use plenty of water. This helps it to look blobby rather than painted on.  Not sure if that makes sense.
 
Anyway, I used the two different shades of blue to create depth.
 
I then added flicks by tapping the end of my brush.
 
Hmmmmm they don't really look like flowers at this point.....


I let it dry and began to look at the blobs - thinking, which of these could become flowers.
 
I then went over these, and moved the brush gently, hoping this would look like petals.
It kinda worked!!!  I also let some run down the paper a little.
 
I then added some greens in various shades, in between the flowers and around the edge.  These will be leaves. I didn't try to make leaf shapes - just more blobs.


Can you see the flowers yet???
 
I can!!


Time to get out my Dina Wakley Scribble Sticks. I added black to the centre of the flowers.
 
I also began to outline the flowers and petals using a fine pen.
I added in leaves and a few stems too.


I also added white gel pen to the centre of the flowers.
 
See!! There they are!!
 
Ok, time to add my photos, and a few layers behind them.
 
 
Vicki has just got these awesome stamps in.....and I may have bought quite a few.....to see the range head HERE


I selected the scalloped border.
I stamped it onto some scrap and cut it out.


I then added a few tags by 7Dots (of course!). I used my fave tags - Writer's Block, and added a few 7Dots embellishment stickers too.


Now it's time to add some metal!
 
I love these gorgeous silver metal flowers, and knew they'd be perfect against the blue flowers.


I adhered them with some 3D Gloss Gel.  Such an easy way to add metal - and it allows you to tuck it in between your layers.


I then cut out a few of the butterlies from that gorgeous 7Dots paper - .Garden Party - Born  I had left on my desk from my previous creation.


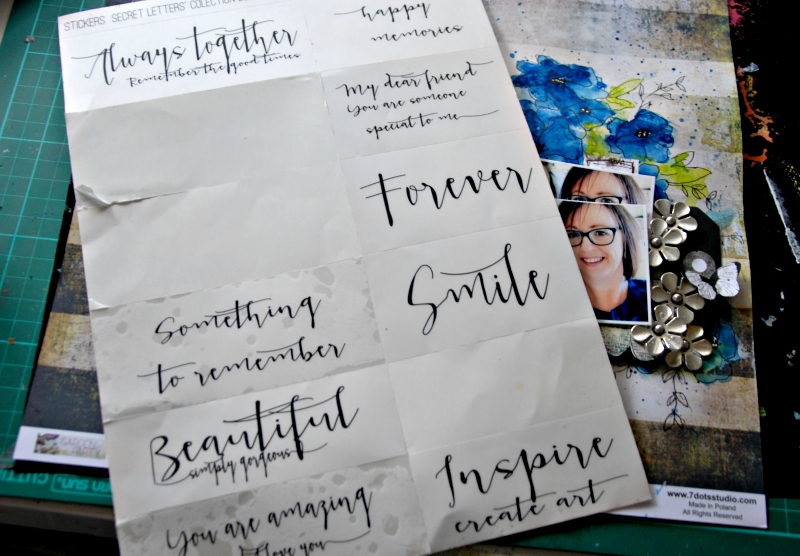
Now time for the journaling, and capturing the story behind the photos.
 
This one's all about my daughter being accepted into the NYSF Program for 2019, which includes a trip to Canberra to engage in all things science-y.
It's a highly sought after achievement, and is a national program, so we were so excited that she was selected. She'd worked so hard.
Isn't she amazing? Brains and beauty!
 
So proud, definitely needs documenting.
These photos were taken at an acknowledgement ceremony at Government House.
 
 
I used some 7Dots Word Stickers and an embellishment sticker, which I recorded the facts on.


Then for the title, I added some 13Arts Clear Stickers.


I then wrote my personal words around these.


I really love the way these clear words look on the page - I love that they merge into the background - fits perfectly with the hand-drawn elements amongst my flowers.


I'm really happy with how this turned out.


I love the artsy style, I definitely feel like I'm getting braver with my painting!
 
The trick - just try it!


So are you having a go at out 'Metals and Petals' Challenge?


It's a goodie....and all you need to do is upload your entry - whether it be a layout, an art journal page, some cards, a canvas, some tags....whatever!
 
Just make sure to use some products available from Scrap Matrix, and include some metals (could be actual metal - Scrap Matrix has stacks! You'll find them HERE, or it could be chippy you've altered to look like metal), and some petals (flowers, stamped, stencilled, drawn, painted......)
 
Load it into the correct album in our Facebook Scrap Matrix Shares page, and let us know in the comments what the products are.
 
I can't wait to see what you do......the possibilities are endless!
 
I hope today has inspired you to get a bit painty......
 
I'll be back next month.
 
Luv Tam
xxx
 
 
Scrap Matrix Products used: