Tuesday 31 October 2017

'hello' Art Journal Page for September Challenge - Lydia

Hello arty friends of Scrap Matrix, Lydia back to share my project for this months Scrap Matrix Challenge. I had a little bit of fun and got messy with this months challenge which is 'Watercolour & Words'. So be sure to head over to the Scrap Matrix Shares Faceboook group to enter this months challenge.


For my project and interpretation of this challenge I had some fun and made a easy art journal page featuring Tim Holtz Distress Inks which you an find in the Scrap Matrix store HERE as my watercolour.

 
So here are some close ups of this art journal page. If you have seen my previous projects for Scrap Matrix you will know the colours I use. I will always have some sort of pinks and blues on my projects with a touch of other colours too. These colours just sing out to me and I find it easy to create with them.
 
For my 'Watercolour & Words' challenge project as  mentioned above I used Tim Holtz Distress Inks in the colours 'worn lipstick', 'tattered rose', 'peacock feathers' and 'mustard seed'. All of these colours can be found in the Scrap Matrix store in both mini and regular size. 
 
Now to achieve the background effect I have here, all I did was use the packing technique. All you will need to a little piece of plastic packaging, with a little bit of ink and a spray of water and than simply rub that on your surface. 
 

As for the word part of the challenge I used a 13 Arts stencil called 'Art Brush' which can be found in the Scrap Matrix store HERE. I just used the words passion, inspire and create with some white texture paste on the background. I also used a wood veneer Heidi Swapp 'hello' from here mixed media Project Life set.


I love how this art journal page turned out and I have to say it is my favourite project for Scrap Matrix so far. I hope you enjoyed this project and I hope to see you all over on the Scrap Matrix Shares Facebook group entering the challenges.
 
Lydia xxx
 
 
Scrap Matrix Products Used:


Monday 30 October 2017

New Life by Elisa Ablett

Hi Everyone,

My turn up on the blog today with a very vibrant mixed media layout featuring a load of 13 Arts products including the 'Aria's Story' collection.

I started the background using the 13 Arts 'his time' stencil along with black modelling paste and some stamping using a small Paper Artsy Stamp

I hand coloured the chipboard feather and a white Satin flower with yellow Ayeeda Ink and a black ink pad.

I also fussy cut the 13 Arts feather stickers to fit in the right hand side cluster of embellishments. 

I also added a cute round embellishment from Charms Creations.


Here are some of the products used from the Scrap Matrix Store !

Image 1


Image 1


!3 Arts Chipboard - Strength In Numbers


Y


Bird in a Circle


That's it from me today, make sure you head on over to the Scrap Matrix Store to have a look at all the gorgeous products in store.

Make sure you leave some love xx

Elisa xx


Sunday 29 October 2017

Water colour blossoms

Hello lovelies

I am very excited to share my first post as guest designer for this gorgeous shop and blog.

For this project I went way out of my comfort zone and just enjoyed playing with the gorgeous Prima Marketing Watercolor pencils (Earthtones) and an old Winsor and Newton set I bought close to 16 years ago. So if you had any doubt that they are value, rest assure though a little more pricy than your average watercolor set, yet it really is worth every cent.


The good news.... Scrap Matrix has both these gorgeous products in store :) 


I started doing a rough drawing of the cherry blossom or flower image using my Prima watercolor pencils.


Next I blended the lines with water and a paintbrush, adding different shades of brown.


I then added some pink tones using the Winsor and Newton set.


Next I added fine pen lines to add definition.


Once I was happy I added white lines using a white Sharpie pen.


Last but not least I added some yellow watercolor paint to my background.

I hope you enjoyed your visit today and like to invite you to visit us again. This beautiful talented team has lots of ideas and beautiful projects to spark your mojo.

Till next time have fun experimenting and dare to go out of your comfort zone.

Xxxx

Friday 27 October 2017

Elena's Challenge Share(Watercolour & Words)

Hello friends!
 
This is Elena Smoktunova and I want to show you an art journal I created for the October Challenge! I love the challenge my darlings!
It has everything that I like to do! Stamps, and sprays, and watercolor!
 
How do I do it?
At first I swipe a clean page with gesso a little. After drying I have fun with stamps, paints, sprays.
 I allow to dry. After that I make the composition. It is real an art therapy!
 
Watercolour & Words


Here's a closer look as it is beautiful!


Thanks for looking at my creation!
See you!


Scrap Matrix products:

Tuesday 24 October 2017

Rebecca's first Watercolour and Words Share

Hi Everyone,

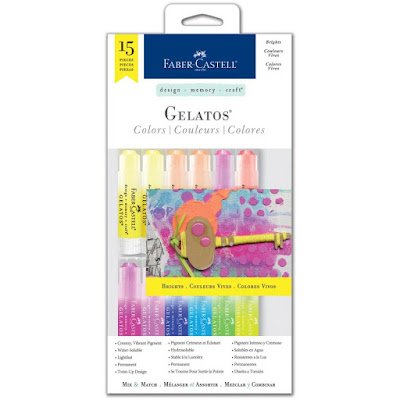
Rebecca here with you today to share my first Watercolour and Words project with you all. This month I was fortunate enough to work with the wonderful Faber Castell Gelatos in colour collection Brights. 

Have you ever crafted with gelatos? can I let you know how much I LOVE them!!. Gelatos have always rated very very highly on my 'always have in my craft room list' ever since doing a 2 day workshop with Donna Downey. 

I have created 3 tags combining Gelatos, Paper Artsy stamps, Scrap Matrix Metal and Tim Holtz Paper Dolls. Side note on the Tim Holtz paper dolls, Vicki has had these on back order for quite some time. A super popular and often sold out item world wide. We are all crossing our fingers that they will be in Scrap Matrix store very soon. 


This is the one and only stamp set I used to create all 3 tags, just look at these stamps, AMAZING. You could use these stamps for so many things, tags, cards, scrapbooking, journaling. Endless opportunity. 


Faber Castell Brights pack, 15 wonderful little colourful babies. If you not worked with these before, they wind up like a chapstick, the colour is super pigmented and a little goes a very long way. Very good value for money. 

 Faber Castell Gelato - Brights

How do they work? how did you get that colourful background? the answer is so simple!!. The below photo will show you the three step process

  1. I began by painting the tag with with white gesso
  2. Scribbled over each tag with 3 different coloured Gelatos
  3. Colour smudged it all with my fingers, very carefully I used 3 fingers, not wanting to smudge colours too badly between each other. 


Now for a few close up photos, tag by tag......


Thank you all for checking in here, I wish you all a very happy and creative day! 


Scrap Matrix Products Used 


Monday 23 October 2017

'Allow your soul to grow' by Elisa Ablett

Hi everyone,

Elisa here from the design team with my layout created for the Watercolour and Words challenge. I thought i would share the close ups of the finer details of the layout and a handy step by step tutorial on how i put the layout together.

The main focus of my layout was using the Ayeeda Water Inks from 13 Arts and the versatile 13 Arts - Strength in Numbers Chipboard Sheet.


Here is my finished layout, I love the boho look of the watercolours and flowers so I decided to continue that on with some hand drawn flowers and vines.


Lets have a look at how I used my focus products to create my layout:


Step 1 - I drew a very faint line halfway down the page and then sprayed water onto the bottom half of page tilting the page to let the water run down. Then drip the pink and scarlet Ayeeda ink onto the water letting it pool in the water that you have sprayed on.


Step 2 - Add a couple more colours to your page, you can use a pipette to have more control where your colours end up.


Step 3 - While your page is still wet add 13 Arts Splash Glitter Ink - Pink using the dropper provided.


Step 4- Ink your chosen chipboard Kinder Kreations Zen Leaf Chipboard with a black ink pad and let dry, once dry thread the wire ends of your Green Crystal Stems through the chipboard leaves.


Step 5- to start your flowers ready for fussy cutting - Spray your craft mat liberally with water and then add drops of ink onto the water, grab a piece of white mixed media cardstock and turn it upside down and smooth over the ink. You will end up with a sheet of coloured paper ready for you to stamp on. I did two of these sheets and made one with darker colours and one with more violet and green. Put it them aside to dry. You can also flick water onto the page to create a distressed look like the photo below.


Step 6 - Once your background has dried, grab a black marker and hand draw (or zentangle) (or if you aren't confident in drawing download a free template, or trace a design in) 


Step 7 - I found an old transparency from Kaisercraft and cut it up to use as a feature piece on my layout then layered German Scrap - renaissance-petite-black trim and German Scrap - ornate-garland-2-black and black /molossi-crystal-lines


Step 8 - Glue down your chipboard pieces and crystal gem and Scrap Matrix metal- leaf-pretty-silver as pictured above, add some stamping and extra crystals.


Step 9 - Now onto the stamping, I used an awesome set of stamps (Paper Artsy -e-tracy-scott-11-a5-set) that are available in the Scrap Matrix store today. I stamped on both sheets of paper that I made with the coloured backgrounds. I then fussy cut all the pieces out.


Step 10 - Glue your photo down along with the green fussy cut border like the photo below.


Step 11 - Layer all your pieces by using 3D foam mounting dots and glue


Step 12 - Using the pink glitter ink from 13 Arts and the dropper provided add small drops to the butterfly as an added feature.


Step 13 - Pick your desired Chipboard and stickers - I used 13 arts 'Small saying's stickers and 13 Arts chipboard. Colour your chipboard with your green watercolour 13 Arts ink and let dry, once dry glue it to your layout. Also add your sticker to your page, i added mine to the side of my photo.


Here are some close ups of the finished layout!


Well that's it from me! 

I hope you have enjoyed the tutorial and seeing how my layout came together.

Don't forget to leave some love and make sure you visit the store either in person or online to say Hi! and check out all the wonderful and unique products.

Hugs

Elisa xx