Showing posts with label Paperartsy stamps JOFY. Show all posts

Friday, 10 April 2020

What an Inspiration...


Oh my. Where do I start.  
I cannot tell you exactly when Tammy's work started to catch my eye.  I'm pretty sure that it was in a scrapbooking magazine.  I haven't bought one of those for years now though, so it was some time ago.  

Her bright colours always stand out.  
The layers of elements and stamping, seemingly randomly placed, always look perfect to me.  
And how does she come up with the ideas of using stamps for functions other than their initial purpose?  She keeps telling me that she is an upside down and back to front person, but she seems normal to me. 😆  In fact, since joining as a guest design team member, she has been very helpful, encouraging, inspiring and supportive.  
A truly wonderful person who genuinely cares. 

Well, that's enough gushing from me.  


This is my inspiration for my project.  

I found this prompt for this month's challenge a little daunting.  I'm hopeless at trying to copy someone else's work and my first three attempts failed miserably because I wanted to use different products. 
So I went through the blog and followed her directions.  
Those who know me will be shocked.  Me, follow instructions!  I normally just look at the project and do it my way.  
Her instructions are so easy to follow, how could I have gotten it so wrong. 

So here is I what I did.

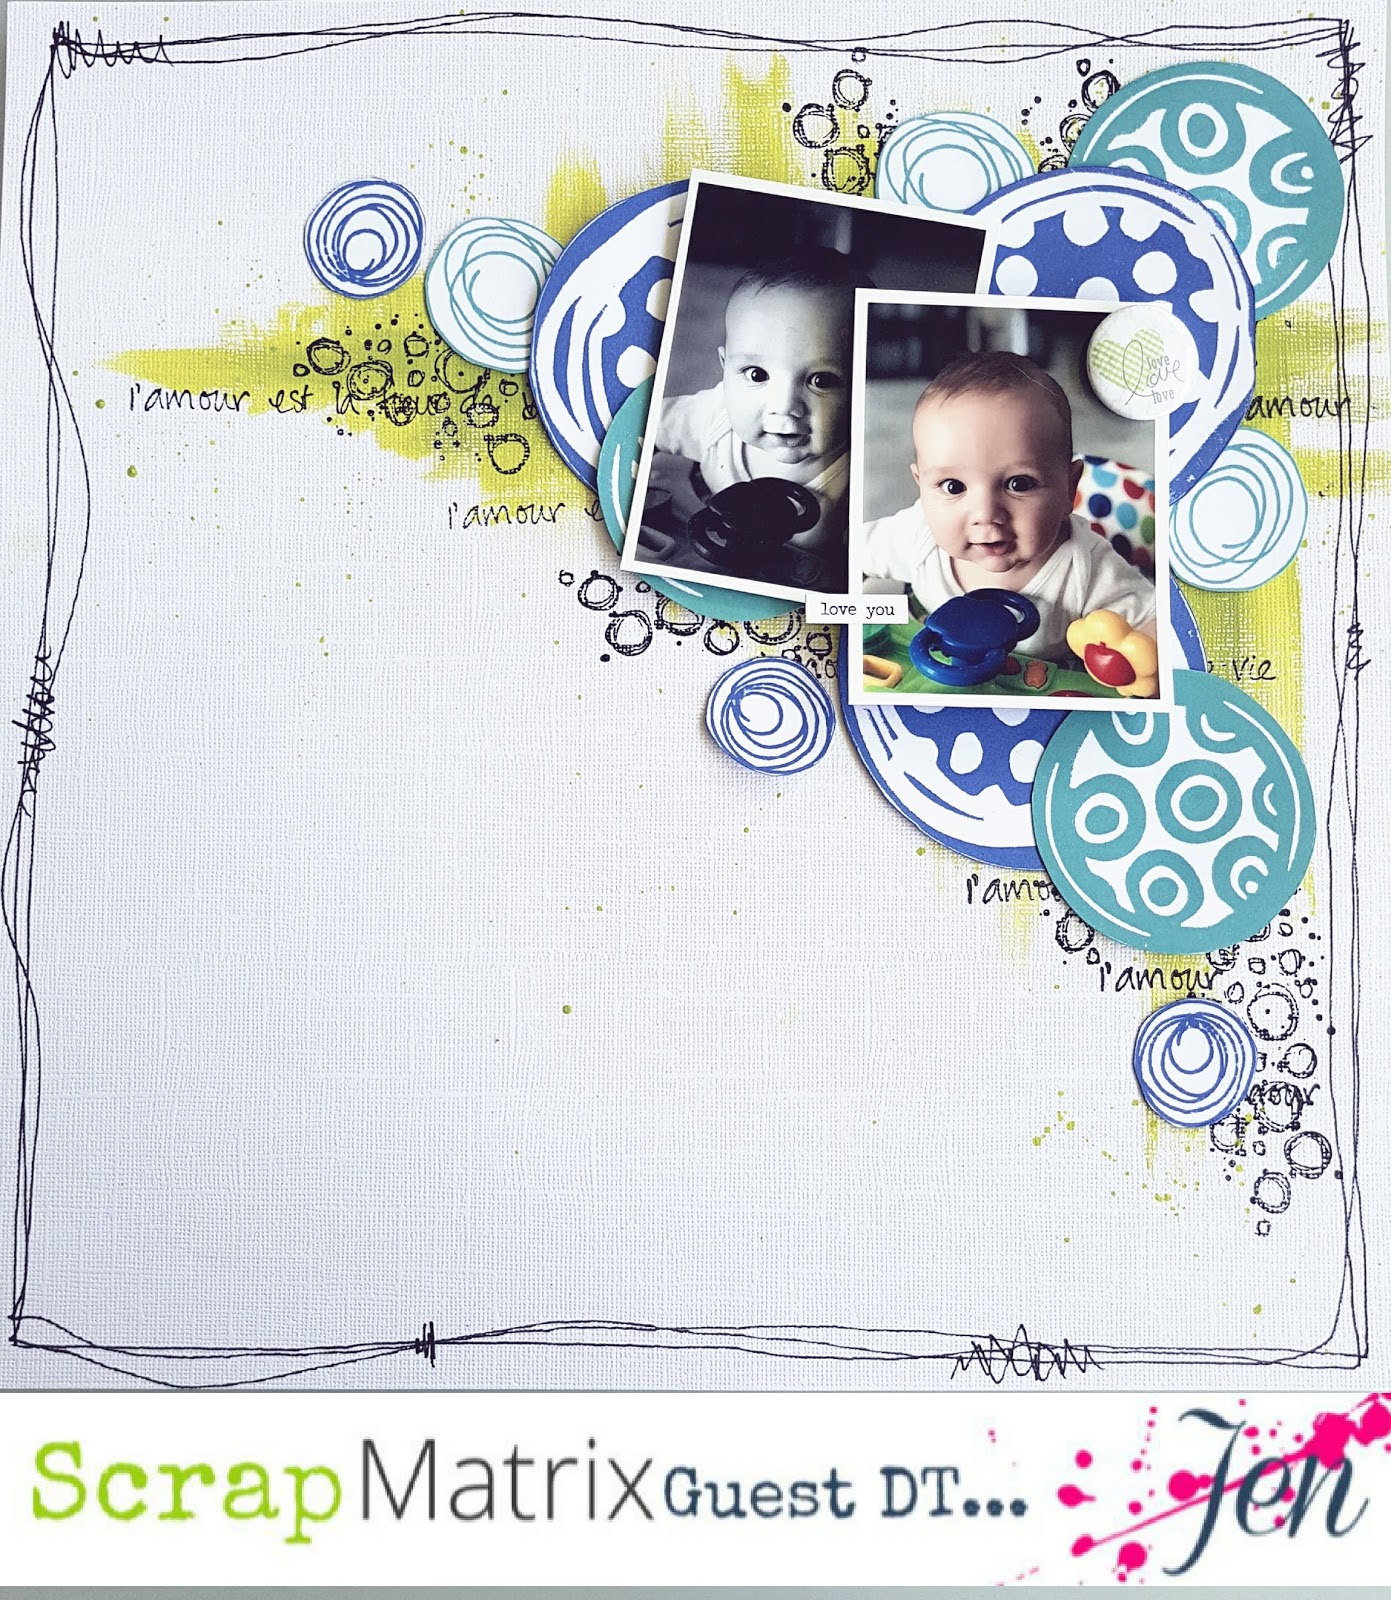
First I grabbed a sheet of white cardstock and my Paperartsy paints in Limelight and Granny Smith.
I painted first with Limelight going up and down , then side to side.  I repeated with Granny Smith but with smaller strokes.


 Next I used the circle stamp from Paperartsy stamp set ETS24 and stamped it randomly over the page with Black Stayz-On.


 Then I used one of the quote stamps from Paperartsy stamp set JOFY35 trying to use mainly the l'amour part on the right side and lower part.


I grabbed my Art Foamies Circle Salad set next, and stamped them with Distress Oxide Ink in  Blueprint Sketch and Broken China.  I repeated this with the circles from Paperartsy stamp set ETS09 and cut them all out.

I drew three lines around the page adding a few scribbles here and there with a black pen.

Now Tammy uses tags, stamped images, journaling and stickers to finish her page but I was doing it my way.
So I printed out two photos of my youngest nephew, one in black and white, one in colour and arranged them with my circles.  I had a flair button that fit with my colours and a 'love you' quote sticker from Ranger that I added to the colour photo.


 And this is it.  My Tammy inspired page.  A little different but the same. 


I hope you enjoyed my first project for this month. 
I can't wait to see how Tammy inspires you.
 Just don't forget to share it on the Facebook page.

Jen
>^.^<


Thursday, 19 March 2020

Paper Artsy Month - Art Journal Page with Lynn

Hi everyone, I am up on the blog to share my second page for this awesome month - Paper Artsy month.

I have used Jo Firth Young Stamps - I am so in love with these at the moment - the quirky flowers are really speaking to me

Here is my art journal page


This page started off as a "mop it up" page.  This is where I had brushed off excess paint onto a blank page.  

I decided that it looked like the wind going in a direction and would incorporate that in the placement of my "Flowers".
I had gaps to fill in the background and used Paper Artsy Fresco Finish Paints in Bubble Gum, Cherry Red and Zesty Zing  colours.  I have then stamped out the images from JOFY74 as the head of the flower and the stem from JOFY75.


I then got very excited and forgot to take photos!!!!  So I will have to tell you instead!

I have coloured the flowers using Dylusion Paint Pens, as well as a Posca Paint Pen for the White areas and highlighted some of the black areas using a  Tombow Twin Tip Marker Pen 


I have also made some marks around the outside of the page to give it a border.


I have taken some close ups which I will detail the extras that I have done (note is now on my desk - "TAKE MORE PROGRESS PHOTOS"!

I have used the White Posca Paint pen to add some white highlights to the flowers and scribbles around the edge if the page 


I have added some detail back into the leaves with a black pen.


I have stamped a saying from the stamp set EKC28 by Kay Carley


Well - thanks for stopping by and I hope that you have found some inspiration from my page to create an art journal page, layout or project using a Paper Artsy product and put a photo into our Scrap Matrix Shares Page to be in the draw to win a gift voucher - it is that easy :) 


Tuesday, 3 March 2020

What do you see? Tam creates.....

Good morning creative souls.
Tam here today to share my first couple of Paper Artsy projects.

For this Challenge, I pulled out all my PaperArtsy Stamps and decided to look at them differently....
What could I create that's a little quirky and unexpected.


Meet Owlivia and.....


Finlay!

So let's see how they come together....

Let's start with Owlivia....


I knew I wanted to use my new Paper Artsy stamps - Tracy Scott ETS38 and JOFY 90
I hadn't opened them yet, so this challenge came at the perfect time.

I also dug out an couple of older stamps - both Tracy Scott ones - one from her previous release Tracy Scott ETS34 when she was last in Australia, and one from a couple of years ago -

As soon as I looked at the mini mandalas I saw owl eyes.....
So I loosely sketched an owl with pencil onto some Art by Marlene Watercolour paper. Very very loosely - you don't need to be able to draw, this is just to help with placement of the stamps.


Once the eyes were in, I immediately saw wings instead of flower petals,
 and feathers instead of  carvings....


Lastly, the mandalas became ear tufts and feathers....


Ok, now I had the base of my owl, it's time to add colour.

Lots of blending of colours and flicks of paint...


I finished it off with some doodles and pen work....


Love those eyes!


I enjoyed this so much I just had to try another one.....

I used three of the same stamps, but I also added in another older Tracy Scott set ETS09
Oh and I used the Tracy Scott set ETS 35, I just forgot to take a picture.


Time to follow the same process as Owlivia......

Love hearts became lips
Flower petals became a tail
A spiral for an eye
Circles for bubbles
and carvings and flowers buds for fins....


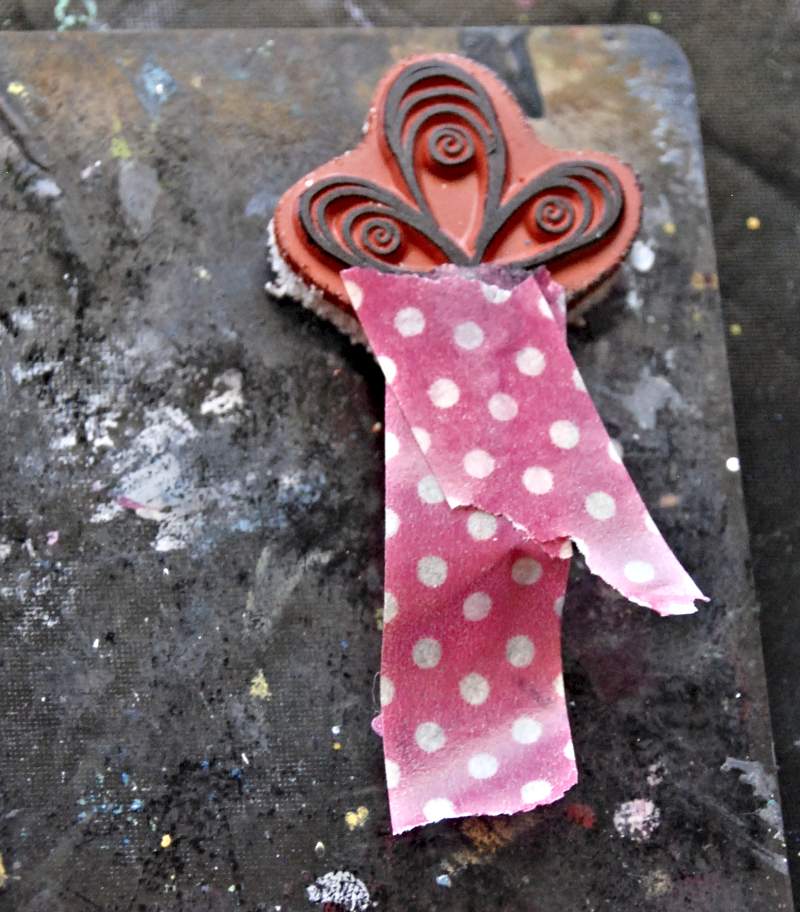
For a couple of these stamped images, I didn't want the entire stamp - for example, I didn't want the stem from the flower bud, so a quick easy solution is to cover with a bit of washi before stamping.


Time to add the watercolour, and the extra details with the penwork...


Happy with the outcome. 
Just love those lips.


If you follow my work you know I have created a couple of critters using stamps before.


In case you missed them you'll find the link to the HERE.

I'd love you to have a go at this fun technique.
What else can you see in those stamps?
Stand on your head, squint - you may be surprised what you find.....

What are you creating with the current PaperArtsy Challenge?
I can't wait to see.


Much love 
xx

Saturday, 18 January 2020

Summer Blooms


Hi!
  Today I've got three cards for you using the Colours of Summer theme.


Summer seems to be filled with birthdays to me.  
A lot of my favourite people seem to be born during these months. 
I'm constantly making cards, (and attending celebrations), so I thought I make some using the bright colours from Ranger's Distress Inks and Paperartsy's JOFY large blooms.

So this is what I used:

Card Blanks
White Cardstock
Paperartsy Stamps - JOFY 71, JOFY 72, JOFY 73 
Distress Inks (DI) - Twisted Citron, Mowed Lawn, Salty Ocean, Ripe Persimmon, Mustard Seed, Squeezed Lemonade
Archival Ink - Jet Black, Library Green
Coloured Pencils

Firstly I blended my DI inks onto the cardstock then stamped my chosen designs with Jet Black. (Of course I forgot to take photos of this step.)  I added details with my pencils and the Posca pen and black pen.


I next chose my two favourite DI greens and blended these onto another piece of cardstock. Grabbing the stencil, I blended Salty Ocean over it .  I stamped one design in Library Green randomly over the cardstock.  I stamped the second design with embossing ink and covered it with embossing powder. Heated it with a heat gun to set it.


I trimmed the paper into several sizes and attached them to the card blanks.   I used a black pen to trace around the pieces to add some definition.  I cut out my petals and centres and glued them to the cards, (using 3D foam for the centres).


So that's it.  Three simple cards for Summer.  I hope you all get to spend some time in your craft rooms.  It's a great way to relax. 
I'm off to another celebration.  I hope they like the card I made. 😄


Monday, 18 November 2019

Joyful Blooms

Welcome everyone!

 I hope your day is going well and that it is full of sunshine and laughter. (Unless you need rain, then I hope you get enough to brighten your day).


I have three cards to share with you today.  It’s not what I had originally planned, though. I had a disastrous attempt at a project and ruined a sheet of 7 dots paper before I decided to stick to what I know best.  Being a guest on this blog has pushed me to try and do better and to try new things, but this time my hubris got the better of me. Oh well, back to my cards. 


Once again I’ve used Paperartsy Stamps, this time from the JOFY collection.  I love Jo’s whimsical blooms. They make me smile and fill me with joy.  So maybe my cards can bring you a little bit of happiness.  Here’s what you will need: 

·         White and black cardstock.
·        7 Dots paper – I’ve used Epilogue from the writer’s Block collection
·     Distress Ink – Peacock Feathers, Picked Raspberry, Mowed Lawn,
 Hickory Smoke, Salty Ocean and Twisted Citron
·         Archival Ink – Jet Black
·         Lindy’s Stamp Gang spray – Clam Bake Beige
·         Clear Gesso or Gel Medium
·         Modelling Paste
·         13 Arts stencil – Aria Song
·         Paperartsy stencils – 154, 155, 156
·         Paperartsy stamps – JOFY 73, 74, 76, 82
·         Pencils to colour and highlight (optional)
·         Posca pen – white
·         Sequins, (optional)

Step 1.  Blend inks randomly over cardstock using Peacock Feathers, Picked Raspberry and Mowed Lawn.  Then using your craft mat/piece of packaging/acetate stamp each ink pad and spray a little water on them. Smoosh ink onto coloured card. (You may have noticed I love this technique.)  Using Lindy’s spray, flick some ink over the card.


Step 2.  Stamp your chosen designs with Jet Black and cut them out.  (I wasn’t sure at this stage what I was going to use so there are a few left over.)  I also stamped some onto a blank card and coloured them with pencils. There are a couple of stamps where it is possible to cut out sections and layer the blooms.  I’ve done this where there is text.

Step 3.  Cover the sheet of 7 Dots paper with Clear Gesso. Let dry. Stamp Salty Ocean onto craft mat, spray with water. Using a brush, paint it randomly over the page. Lightly mist with water. Dry with heat gun.  Repeat with Twisted Citroen.  Grab your desired stencils and using Hickory Smoke place them randomly across the page. When you are happy with the result cut them to size. (I’ve used 13.5cm cards. So I cut them to 12.5cm).


Step 4.  Stamp the circles stamp from JOFY 73 with Hickory Smoke randomly around the edges.  Using the 13 arts stencil, I’ve used modelling paste randomly over each card. Let dry.

Step 5.    Using Distress Inks I’ve stamped foliage stamps from each set onto the cards. Also with Jet Black I’ve stamped the flowers from JOFY 82 so I didn’t have to cut out the stems and stamens. I’ve then attached my cut out flowers using either glue or 3D foam. I’ve also blended the inks around the edges of each card.

Step 5.  Add highlights with Posca pen and glue sequins .Attach to black card and the card bases. Attach sentiments with 3D foam.


I don’t think I’ve forgotten anything, so pop on the kettle and hop into your craft room. 

Happy crafting.
Jen.