Friday, 30 March 2018

'Transform' by Elisa Ablett

Hi Everyone,

Elisa here from the design team for Scrap Matrix with my latest layout based on the latest Scrap Matrix challenge - textures and layers.

 This is a slightly darker layout than what i usually do but i wanted to create a night cityscape on my background to go with the cityscape in the glasses of the snap chat filter in my photo.

Some of the textures and layers that I used to create this layout include - Prima Finnabair Metallique Wax in Aged Brass rubbed over a black embossed card stock, Black Pico Embellisher used to create scribble writing and to add details to the background, Dina Wakely Scribble Sticks (Yellow) to hand colour the butterflies, Black Dylusions spray to create splatters, Black 13 Arts Water Ink to create the horizon for my cityscape. 

All of the products can be found in the Scrap Matrix Store or be ordered through Vicki from Scrap Matrix.

I hand drew the buildings and bridges and houses with a black marker and using a paintbrush i coloured in the windows to match the touches of yellow, gold and brass in my layout. If you do not feel confident with drawing your buildings, Vicki has a great selection of City Buildings Stencils or there is the new Stamp Set #52 from Aall & Create that has buildings as well.

Sometimes its good to step out of your colour comfort zone I think!

The link to the Texture and Layers challenge in the Scrap Matrix Share group is below:-


Products used from Scrap Matrix Store - Links underneath the photos!


Stamperia Double-Sided Paper Pad 12"X12" 10/Pkg Blue Stars


Y


undefined


http://scrapmatrix.com/ayeeda-water-ink/

That's it from me today, I hope that i have encouraged you to try a different colour combination on your next layout, maybe go a little urban perhaps!

Hugs xx

Elisa 


Tuesday, 27 March 2018

Helen's First Texture Share - March 2018 - Happy

Hello there, welcome back to the Scrap Matrix Blog where today I'm sharing a page which celebrates all things Texture.

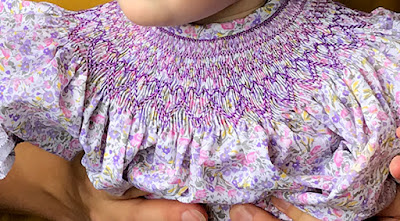
I love to get messy with mixed media and thoroughly enjoyed creating this layout. I used various techniques to create pretty texture. The page celebrates my Grand daughter's first Birthday. She's wearing a dress which I smocked for her.

The smocking is stitched on pleats of fabric and I used that concept to kick start my project.

Inspired by Marilyn Rivera, I attempted pleating with paper. 
I used Maja papers, similar to this one and this one, in the store.
First I sprayed water onto the paper and then gently folded it to create the pleats.
Next, I attached it to a co-ordinating card stock with some heavy duty tape. 

Then using Tim Holtz texture paste, I created texture on a 
Ranger craft tag with a stencil by Paper Artsy PS086. I dried it with a heat gun.
After smooshing some Distress Oxide inks
 onto a craft mat and misting them with water, I muddled the colour onto the texture paste.
Then I painted on some Distress Oxide inks trying to achieve some light and shade with the colours.
I added a bit of gesso to the background paper, 
before adding some random stamping, some Scrap Matrix lace and a doily from my stash.
To add more texture, I hand stitched with DMC thread.
A close up of the chipboard, beads, sequins, muslin, stamping,
ink puddling and splashes. The little butterfly was fussy cut from 
a sheet of embellishments by 13@rts "Freedom"

I hope you will play along at Scrap Matrix using "Texture" and be in the running to win a generous prize from Vicki Christenson.

Why not check out the Scrap Matrix store for all your 
arty crafty supplies.

Saturday, 24 March 2018

Rebecca's First Texture Share

Hi Everyone, 

Rebecca here with you today to share my Design Team project for the 'Show Us Your Texture' Challenge Share. This challenge was one I was super looking forward to, it meant a lot of options were open to push the creative mind. I had not ever used the Finnabair Art Extravagance Patina Effect Paste Set, may I tell you that this set is totally AMAZING and can work wonders. 

I took my little bland beige coloured horse and transformed it into a vintage looking animal of wonder (well I think so anyway if I do say so myself).  

In the back ground you can see chipboard cogs, watch pieces and brass bits and pieces. These have all been given a touch Tim Holtz Vintage Photo and  Finnabair Art Alchemy Wax in Vintage Gold.
 

Below you can now take a mini tour around and a few close up shots....


Scattered micro beads and small watch parts add extra dimension. 


How awesome are these Scrap Matrix Box Corners? - LOVE THEM!!


Thank you so much for taking the time to visit today, I wish you all a happy and creative weekend. 

~ Rebecca ~


Scrap Matrix Products Used

Friday, 23 March 2018

Monique's First Texture Challenge Share

Good Morning Everyone!

Monique here with my first "Show Us Your Texture"  Challenge Share.
When I first saw this challenge's criteria I was so excited - this is right up my ally!  I adore texture, and I always add heaps to my layout with stamping, distressing, mixed media - I love it all!!

This is what I created:


This photo of my son was taken a few years ago, but nothing much has changed - he still pulls this cheesy grin when I ask him to smile.  It is so frustrating, and I keep saying "Don't say cheese."  Hence the title..lol...

I went to absolute town using the divine AALL & Create Stamps and Stencils.  I took some inspiration from the 7 Dots Studio Writer's Block papers I used and used my AALL Stencil #18 to create a background with texture paste, Dylusion Spray in Postbox Red and Dylusion Paint London Blue. I used a baby wipe to wipe away some of the ink so the stencil could show through a bit more.   I then stamped some of the script from the AALL Stamp Set #25 on my background before layering Dina Wakely Washi Tape, with some random strips of paper over the top.  I used cut out letters from the 7 Dots Studio Inkwell Paper and lots of journaling dots from the Writer's Block 6x12 stickers sheet and journaling strip sheet.  I finished the layout off with some KK Geo Stars and some more stamping of the chevrons from that awesome AALL Stamp Set #25 .

Here are some close ups:


Here is a full list of products I used with links to the Scrap Matrix Shop:

7 Dots Studio Writer's Block "Burdon" and "Inkwell"

Well I hope this has given you some inspiration to go and have some fun with creating plenty of texture with your next project - if you do, don't forget to enter it in this month's Scrap Matrix Texture Challenge for your chance to win a great prize.  Simply upload a photo of your creation into the Texture Challenge album on the Scrap Matrix Shares Facebook Page.

Wednesday, 21 March 2018

Tam's first Texture Share

Hi everyone, today I'm here to share my first creation for Textures Challenge

Right up my alley!!
I'm a mixed media addict so textures and pastes, paints and stamps appear on just about everything I create.

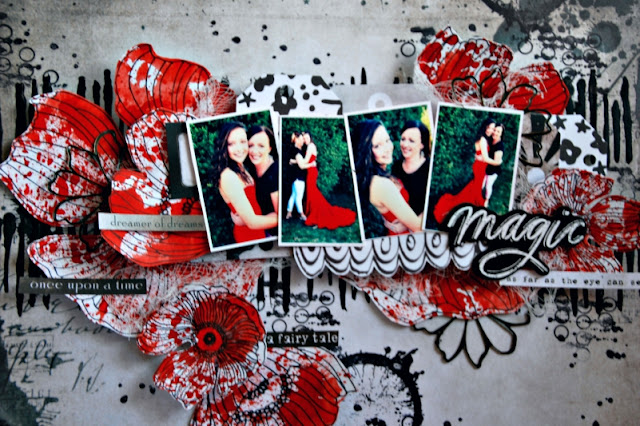
Recently my daughter attended a prom.  She's just so gorgeous, and I normally prefer 'everyday' pictures but she was wearing the most stunning dress, so I got plenty of shots!


Yep, lady in red!
Red is not a colour I use a lot of and if I do, it's usually in small amounts, but this dress just called for me to go with the red.

I teamed it with neutrals and just let the red shine.


So I began by selecting my background sheet of paper and began by
adding black gesso with a cool stencil from AALL & CREATE.


I knew I wanted my photos to be towards the top of the page so I focused on this area.


 I then grabbed some white cardstock.  I use 'Marshmallow' as it's perfect with water and various mediums -  no need to gesso first.
I then used the 'packaging technique'.  Apply some Dylusions Spray Ink to some plastic (left over packaging is perfect).  Add a spritz of water to get the colour flowing, and then splodge it directly onto your cardstock.


Using a black waterproof ink, stamp your images onto the cardstock.


I then cut out these stamped images.
You could choose to add more colour, but I like them just like this - some quite red, some more white - I love the arty look.


Now that my black gesso had dried, I stamped a few stamps onto my background.


I then cut out some pieces from this sheet (designed by the fabulous Fiona Paltridge).


I ended up not using the heart. Lol.


I then began to add it all together.
I adhered the photos using a few layers of foam tape, as I wanted to be able to tuck various tags, diecuts, gauze etc behind the photos.


This also allowed me to tuck the photos underneath.
I bent the petals upwards to give them more dimension.


I then tucked in a few of my favourite metal flowers.


Finally I added my title and a few word stickers plus the all important journaling!


And that is that.
A layout documenting my 'Lady in Red'.


Don't forget to head on over to the Scrap Matrix Shares group on Facebook and add in your creations using different textures/paints/stamping from Scrap Matrix.
There's so much to choose from, Vicki has the latest and greatest on the market!!
 

Just add it to the Album titled "Textures" and let us know what Scrap Matrix products you used in the comments section.
It's that easy - no need for a blog, plus you could win an awesome Scrap Matrix prize!  Vicki is very generous and we LOVE seeing what you come up with.

I'll see you again soon!!

In the meantime you can see more on my BLOG.


Scrap Matrix Products used: