Monday, 10 February 2020

My Little Book of Prints - Jen.


Hi Everyone!

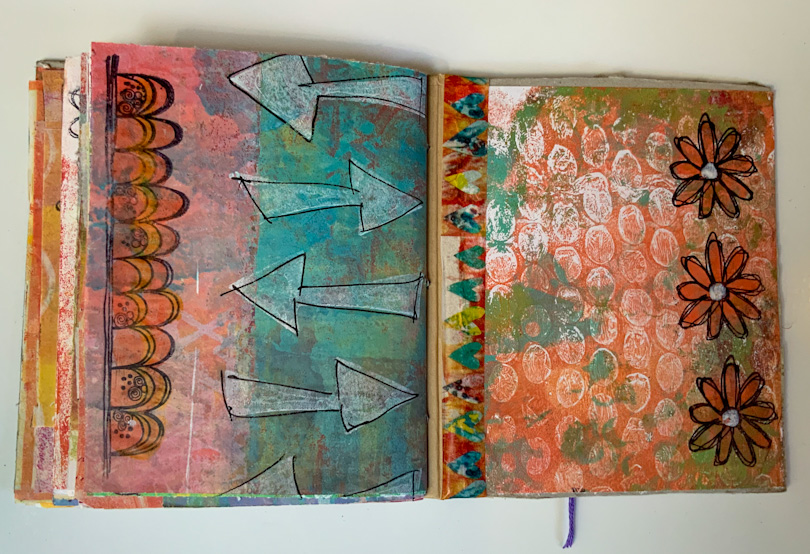
  I hope that you have all been in your craft rooms, (or craft spaces), and have been busy gel printing.  I decided to make a little book out of mine with the help of a Birgit Koopsen video.
I didn’t have much experience with gel printing.  I’d had a couple of sessions playing but wasn’t getting any results I liked, but if at first you don’t succeed, try, try again. The results were much better this time around. 

Firstly, while I was waiting for my parcel to arrive from Scrap Matrix, I decided to make my own texture plate.  I had lots of old chipboard letters taking up space and decided to glue them onto a thick piece of cardboard.  I also pulled apart a piece of cardboard so that the corrugated part showed and found some different sizes of bubble wrap. Finally my parcel arrived, (no thanks to Australia Post), and off I went.


This is what I used:
Cardstock – A5 white
Dina Wakley Media AcrylicPaint – White, Buff, Heather, Carnation, Aloe, Sky, Lapis, Peacock, Blackberry, Ruby, Tangerine, Lemon and Evergreen
Carabelle Studio Art Mask – Indian Mandala
Carabelle Studio ArtPrinting – Abstract Flower and Leaves
Carabelle Studio ArtStamp – Dancing in the Rain, Scribbled Leafs & Textured Circles,  Leafs, Blooms and Circles Elements, and Fabric Collage.
Archival Ink – Emerald, Cobalt
Sports Tape.


I then chose my six favourite prints and scored them down the middle lengthwise and folded them in half.  I then stuck them together using glue tape.


 I cut off a length of sports tape and created a spine.


 Next I chose two more prints for my front and back cover and glue them on.


My next step was to randomly apply my stamps on the various
pages in coordinating colours


I’m very happy with the results.  This was a great way to use those prints.  I can’t wait to see your little books of prints. Don’t forget to share them on the Scrap Matrix Share Page.  Hop into your craft rooms and get creating.


 Here is the link to the YouTube video.


Bye for now.
Jen. 
>^.^<


Saturday, 8 February 2020

Little Journal by Lynn

Hi everyone, Lynn here to share a little art journal that I have made featuring this months challenge using mark making and gel printing

Image may contain: text


I dont think there is anything more satisfying - and messy as gelli printing !!

I got out my Paper Artsy paints, stencils, foam stamps, Dina Wakley Paints and assorted types of paper - music paper, lined paper, butcher paper, and plain paper.  

If you have not used a gelli plate before, I suggest you google or search you tube as there are so many ways you can use a gelli plate - and remember if you dont like it- more paint and cover it up!!!


Once I had enough papers done, I trimmed them up to size and created an "album" using some stiff cardboard for the front, spine and back.

I made three 'signatures' and bound them together using tapestry cotton,


I have used a number of Tracey Scott, Paper Artsy Stamps and Pitt Pens to create marks on the pages.


I encourage you all to give it a go - it is so much fun and very satisfying.  there are no rights or wrongs, no mistakes - just enjoyment,

Have a go and upload your project to our Scrap Matrix Shares page on facebook to be in the chance to win a voucher at the Scrap Matrix shop - simple = easy peasy.

Til next time - happy crafting and have fun

Products Used:

ETS02 Stamo
ETS02 Stamp


Friday, 7 February 2020

'Breathing of your Heart'
with Lisa Amiet


Hello all!
It's Lisa here on the blog today to share some inspiration with you,
for our latest challenge. 


Ok, so I will start with a confession,
 that this is a bit new to me, but I gave it a good try. 
I'm not sure how I feel about the finished product lol.


This page is built up of many layers. 
I started with a coat of 'Liquitex Gesso' on my page. 
I have then applied some 'Black Gesso', with some plastic packaging. 


I have roughly applied a mix of 'White Gesso', 'Dina Wakley Acrylic in Turquoise'
and 'Paper Artsy Fresco Finish Turquoise'
I have then used the plastic again to scratch and scrape the still wet paint.


I have then used a couple of my stencils, 
The 'Grungy Grid' and 'Hazy Days Chevron' with both the 'Black Gesso'
and 'White Gesso', sometimes a mix of both colours, that I applied with a sponge. 


I have added some more colour with a light touch and rubbing of 
'Dina Wakley Acrylic in Lemon'


More layers of black applied with plastic. Also the start of some doodling.


Next, some stamping, using my 'AAll & Create #3' stamp and 
some 'Distress Ink in Mustard Seed' and 'Ranger Archival Ink in Black'.


Add in some more doodling and some splashes of my left over paints. 


To finish I have used some of the 'Dina Wakley Collage Backgrounds' quotes,
and of course some more doodling. 


Some more close ups :)


It is growing on me a little. 


I hope that this has inspired you to make a mark, and give the challenge a try, 
you never know what you'll get in the end!

Until next time!

Lisa


Scrap Matrix Products Used:

Lemon 
Turquoise 
Turquoise

Wednesday, 5 February 2020

Make your Mark!

This month is all about making your mark....


For this layout I used my Gel Plate and made a layered background on white Card stock and lots of bright colored Heavy Body Acrylic paint from Dina Wakley
I also added a few Art Foamie Stamps to build up layers in the background, Brayering the paint onto the stamp.


I then added some square frames cut from black card stock. After that I stuck my photo down.


Now its time to make my mark!!!
I did this by stamping cirlces with lids, doodling with Irresistable pico embellisher and Posca Paint pens.


I hope this inspires you to make your mark!!! Please enter this months challenge for your chance to win!

Tuesday, 4 February 2020

Mark Making & Gel Printing : Gel Print Cards


One of my favourite ways to spend an afternoon is experimenting with a gel plate. I usually start with a plan but once I have finished the papers I create,they tell their own story. For this challenge, I wanted to create cards all with the one set, so I chose one of my favourites: Tracy Scott ETS27.

I have used paints for this project, starting with yellow tones as I wanted something for the bee stamp. After I pulled each print, I just added a few more colours, pulled another print until I felt I had enough to play with.

For the bee card, I have used some honeycomb chipboard to make some marks. First I pressed it into the paint randomly and then I painted the cardboard in a contrasting colour and pressed it again onto the gel plate. Before adding the chipboard to the card,  I embossed it with black embossing powder. For an extra layer, I added some Tim Holtz tissue paper.


For my next print, I added a stencil and painted a contrast colour over it . After I pulled this print, I painted a thin layer of red, which gave my the print for the ladybug stamp.


I just loved the blue print, which was perfect for the dragonfly stamp. Stencils are so much fun to experiment with and no two prints are ever the same.


I added some plastic wings to the dragonfly, which I made using Stazon Ink on a sheet of plastic. For this project, I used Dylusions paint in Calypso Teal, Postbox Red & Melted Chocolate.  Paper Artsy Paints: Aqua Duck Egg, Granny Smith, Zesty Zing, Banana, Butternut. Dina Wakley paints: Tangerine and Lemon.


I hope you have as much fun as I did with this challenge and I look forward to seeing your creations.