Showing posts with label Bling. Show all posts

Thursday, 12 December 2019

A touch of bling....

Hello creative ones.

Tam here with a couple of projects. Now these only have a smidge of bling, a spattering.
You see, although I'm a massive fan of sparkles and the magic around Christmas time, I find it hard to add bling to my pages.
As you know I love to add colour and paint - and this is usually matte.
So this challenge had me a little stumped.

Add to this the fact that I've been in a creative rut for a few weeks.
My mental health really needs me to find that damn mojo.
One of the ways I find the hiding spot of my lurking mojo is to crack OPEN something NEW!
I've been hoarding the Dina Wakley Collage Collection!!
I just love Dina's style, and I just wanna flip through the book - NOT cut it up!
But it was time.
My mojo had made sure of that.

So here's my first creation with it.....


Boom!! 
Mojo back!


Let's take a look at how it came together though, because it did take me a while to nab the sneaky bugger.


I began with that gorgeous collage collection and my Dina Wakley Art Journal.
I found myself still a bit overwhelmed at this point so I actually jumped on YouTube and watched a couple of videos. 
One was by Niamh Baly - and that was it - Bam!! I knew what I wanted to do!
Thanks Niamh for helping unearth my creativity again. xx

I think I've discussed before the way I manage you tube.
I only ever allow myself to watch 1-2 videos then it's create time.
Sometimes watching someone else creates leaves me feeling itchy to play and has me running straight for my craft room.
However it is easy to get bogged down and watch video after video.
DON'T LET THIS HAPPEN
It's a time warp.
1-2 then get OUT!!


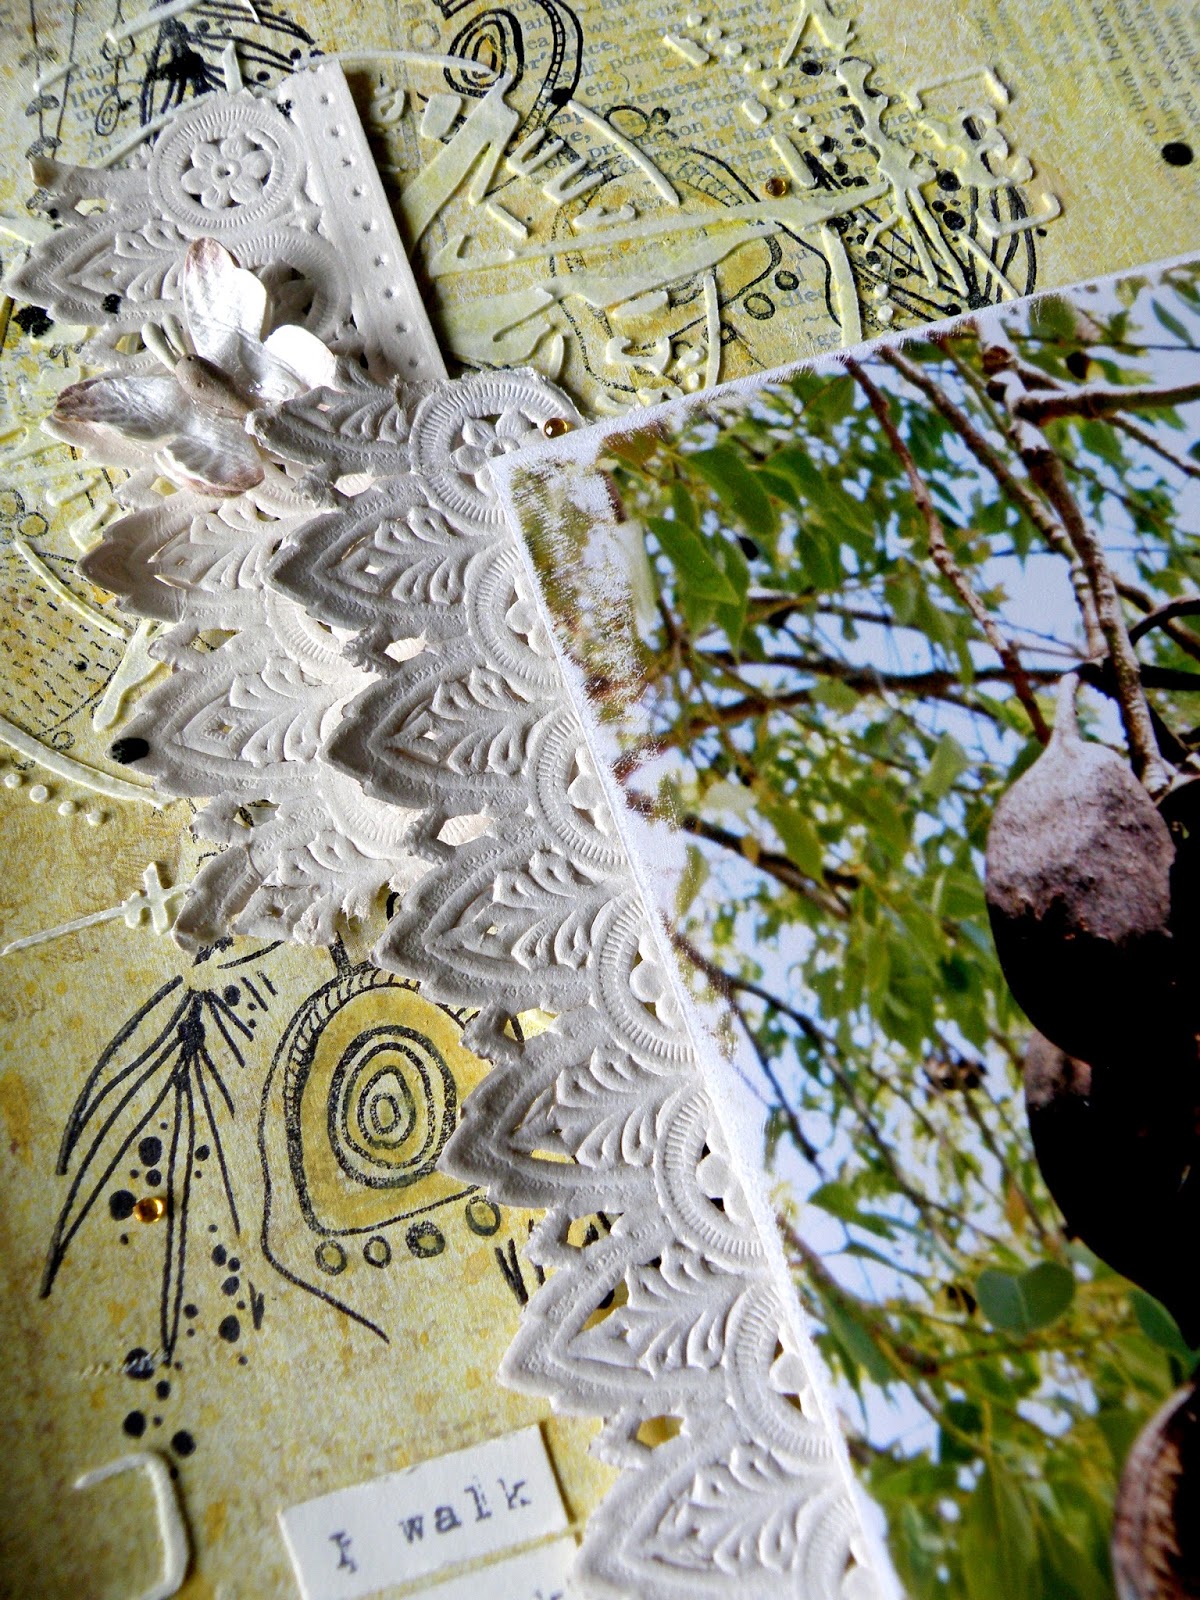
Ok, so after flipping through the book, I decided to start with some of my fave colours.


I very randomly squeezed out some 'Peacock' Paint.


Then I took to it with an old store gift card.


I then repeated this process adding some 'Lime'.


I tore out one of the faces (as inspired by Niamh).
I love that these pages are the same size as my journal, so I can add them in as extra pages very easily. Perfect fit.


I cut around the side of the face, and then trimmed the right side off a little too.


I then added it to the right hand side using some Dina Wakley washi tape.
Make sure you add some to the inside of the flap too.
Instant extra page in my journal. 
I love these interactive elements.


Ok so now that it's there, I need to bring in that pink that's on the reverse side.
I used 'Fuschia' paint to do this.


Again, random.


From the scraps cut off the face, I cut out some circles and half circles.


I then went in with some white gesso and a baby wipe and that gorgeous leaf stencil called 'Deco Leaves' by The Crafters Workshop. Definitely my current fave.

I also added in a touch of 'Ruby' paint to go with the inner circle on the reverse of the flap, and also a touch of  'Evergreen', just to help blend the colours a little.


I then did the same with black gesso, and added some random flicks and lines.
This is when I felt it all came together.


I then stuck down my circles using matte gel medium.


I decided to add my title using Dina Wakley collage Words - 3x3" set.
I tore it up and placed the words so they were peeking out from under the flap.


Stick this down with matte gel medium.

NOW's the time to add in some bling.
I added swipes of gold to my layout. I used the PaperArtsy 'Gold' Paint.
Tracy Scott introduced me and at first I was all 'oh no I like it without', but now I'm converted. 
Pffffft!
It just adds some depth, some interest.
It kinda lifts the whole project.....
Sometimes you don't need a stack of bling....just a touch of sparkle will do!


I added some scribbles to the page and around my circles using my fudeball pen.


Finally I added some journaling in that circular shape underneath the face.


There you have it.
By the time I was half way through this creation, I knew my creative block was gone! 

Thank goodness...I can breathe again.


Let's take a look at the interactive flap now that the page is finished.


If you haven't seen the Dina Wakley Collage Collective.....it's so worth a look.
Page after page of gorgeous loose scribbly art.
There's tags, die cuts, washi tape looking strips, faces, just so much, and the great thing is they a afterre featured in both thick cardstock and a finer paper - perfect for adhering with gel medium.

I was so happy with the result, I decided to create something else.
I follow Susanne Rose and she often creates circular patterns, adding stamps, die cuts etc. They always look amazing, and when I saw the cute little bird page in the Dina Wakley Collage Collection, I thought I'd give it a try......
(thanks for the inspiration Suzanne xx)


I used Dina Wakley Scribble Sticks for this one, and I added a couple of Tracy Scott stamps from the  NEW ETS35 set


I added a few swipes of 'Gold' PaperArtsy paint and I also rubbed some through the 'The Crafters Worshop Deco Leaves Stencil'. 


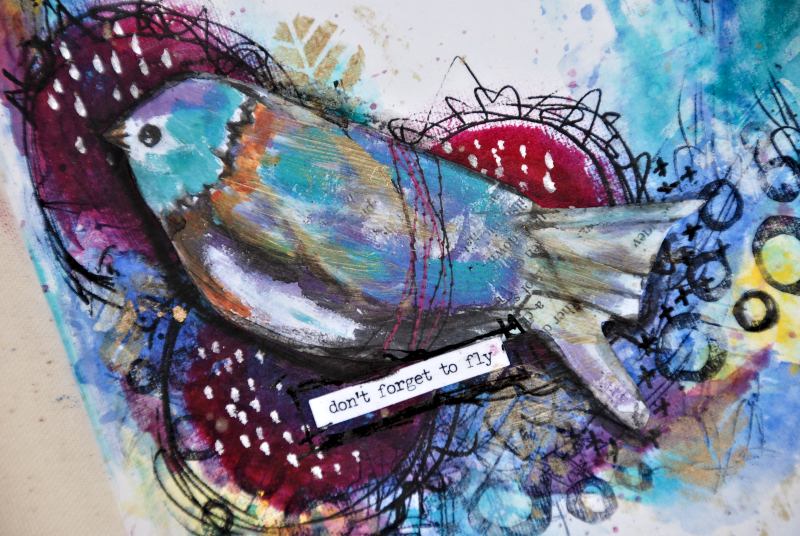
After I finished and stepped back, I noticed the outer circle kinda reminded me of a bird nest, and those large circles were a bit like eggs!
That's part of the joy of art journalling - things kinda just happen. 
Once you get in the moment, the art kinda just falls onto the page.

That's it from me!!
I'll see you all again in 2020.

Thanks so much for following along with me this year, and a big hug to all of you who comment either on Instagram, Facebook, the blog or privately.
I love knowing that I have inspired you in some way.
It makes all the late nights (with wine)! typing these up worth it.

So much love, Tam
xxx


Sunday, 1 December 2019

Our final challenge for 2019!!!!

Hi everyone
Well apparently it is December 1st!!!! WHAT?!?

So that means this is our last challenge for 2019!

Thankyou to all who joined in this year.
A special thanks and hug to everyone who played along, but all of you who follow along, leave comments, participate, be inspired....you make this special place what it is and we are grateful for each and every one of you.
We are super proud of this space.
It's friendly, kind, safe and full of inspiration from not only the Design Team but also some super talented crafty lovelies. It's just lovely to have a place where others 'get it'. Where we can be ourselves and share our art, and know it will be met with 'ooohs' and 'aaah's and not 'huhs' and 'but whys'.

So this challenge is gonna suit all of you.
From those of you who just LOVE CHRISTMAS and NEW YEAR festivities.....to those that don't but just love a splattering of shiny....


We all love bling.....some a little.....some a lot!
So create with bling....
it could be sparkles, metallics, shimmers, metals, paints, crystals....
endless inspiration.

To get that inspiration flowing.....let's take a look at what the DT have created....


and our fabulous Guest Designers are back again.....


Aren't they just beautiful!!!!

We look forward to seeing yours....
Just head to our Facebook Group and pop your entry into the 'Bling it On' Album, and in the comments let us know which Scrap Matrix Products you used.

Yep that simple!

Keep popping back every few days as our DT will share step by steps of their projects and also they will share their second creation for this challenge.....


Wednesday, 25 April 2018

"I photograph" .. with Alz

Morning peeps!

I'm so very excited to join you with my first official Design Team member project ..

I photograph

I was inspired to create this layout by the current Tic Tac Toe challenge which, for a fun twist, also challenges you to create a monochromatic layout.


I've used the far right vertical line .. pretty patterned paper, lace and paper flower. My background was created on a very pretty piece of patterned paper from the Blue Fern Studios Wanderlust collection (Mountain View). I didn't have any fabric lace so used Embossed Paper Lace (love this stuff!), and the flower I found laying around my desk gathering dust, literally.

To create my background, I ripped some pages out of a dictionary I picked up for just a few dollars from one of our local op shops and, using a good old fashioned glue stick, randomly stuck strips of varying sizes down.


Once the glue was completely dry, I started picking off the bits that hadn't stuck down. I find this gives a really soft and random edge to the dictionary paper.


I was going to use some of the Lindy's Stamp Gang sprays and wasn't completely sure how they would react on the old dictionary paper versus the Blue Fern Studios patterned paper so, using a baby wipe for a soft and diluted, finish, I applied white gesso to my page.


Next up I sprayed the background with two yellow Linda's Stamp Gang Flat Fabio sprays. I started with the lighter colour first as I hadn't planned to use quite so much of the second, darker colour but it was just so yummy (Pineapple Paradise) I couldn't stop! I did end up with some lovely depth of colour though.


Once all this was dry I created a cascading, stamped image which I thought suited my photo perfectly, with Aall & Create stamps and a Jet Black Ranger Archival Ink Pad. I stamped them on scrap white paper first to cut out the images and create masks. I've used this technique previously (see here for step by step pics).


I also used an Aall & Create stencil (#8) with Ranger Texture Paste (I used the Opaque Matte) to add some texture to my page. I love this stencil and see it being used on so many of my pages.


So anyways, that's my background done and dusted. Next up it was time to stick down my photo and get on with embellishing. Frequently I'll use layers behind my photo but decided to skip that step for this page. It just didn't seem to need it.

I used a Paper Artsy Fresco Finish Acrylic Paint in Nougat to paint a strip of white French Lace Embossed Paper Lace, a paper flower from my stash, and one of the chipboard flourishes from the Blue Fern Studios chipboard packs (Mini Flourishes). I tucked the Embossed Paper Lace in behind my photo and added a Petaloo Mini Paintables Butterfly. In this instance I didn't need to alter the butterfly, but look forward to altering the other seven left in the pack (such good value).


I created a small embellishment cluster in the lower left corner of my layout grounding both the Embossed Paper Lace and my photo, using the Blue Fern Studios chipboard mini flourish, my painted paper flower, and two metal leaves. Vicki has a great range of metal in store; you can find it all here. At this time I realised the colour on my chipboard flourish was all wrong so I got out my Prima Watercolour Pencils and coloured it yellow.


Finally it was time for the finishing touches. Whilst I had the Prima Watercolour Pencil out I coloured in some of the stamped Aall & Create images. I flicked around some Black 13@rts Ayeeda Glitter Ink and stuck on some of the yellow 2mm Molossi Crystal Gems. I used Tim Holtz Idea-ology Chit Chat stickers to create my title "I photograph" and printed my journaling using a free typewriter font I found online .. 1942 report.


So that's my first monochromatic tic tac toe layout done and dusted! In case you've forgotten (this post is very long after all lol) I created the layout for the current Scrap Matrix challenge to create a project (not necessarily a scrapbooking layout) using a line from the tic tac toe box ..


But remember, it must be monochromatic, which means one colour with neutrals. I don't know about you, but I interpret neutrals to mean black, white and creams. Oh and you have until the 14th of May to upload photos of your project to the Scrap Matrix Shares page on Facebook. Please remember to add your photos to the Tic Tac Toe/Monochromatic April album.

Oh and heh please do let us know which Scrap Matrix products you've used. We all love seeing how different peeps use different products in different ways. That's a lot of "differents" lol!

Anyways that's it for me today. I look forward to dropping in again soon to share another monochromatic, tic tac toe layout with you.

Til next time, be cool!
Cheers .. Alz  :)


Scrap Matrix products used ..
Lindy's Stamp Gang Flat Fabios - Bonjour Butter and Pineapple Paradise
Ranger Texture Paste - Opaque Matte
Metal leaves .. see here for more metal
Prima Watercolour Pencils - The Basics (yellow #16)
Save