Showing posts with label Prima Watercolour. Show all posts

Monday, 12 November 2018

Tam paints petals and adds metals.....


Good morning Scrap Matrix lovelies!
 
Tam here again to share my second post for our very cool challenge "Metals and Petals".


I got a bit painty with this one, inspired by someone I love and follow on Instagram - Lydell Quin.
 
I just love that background, and I love the contrast of the metal  flowers against the arty background.


So let's take a look at how it came together.
 
I began with a background sheet of paper from 7Dots Garden Party Range.


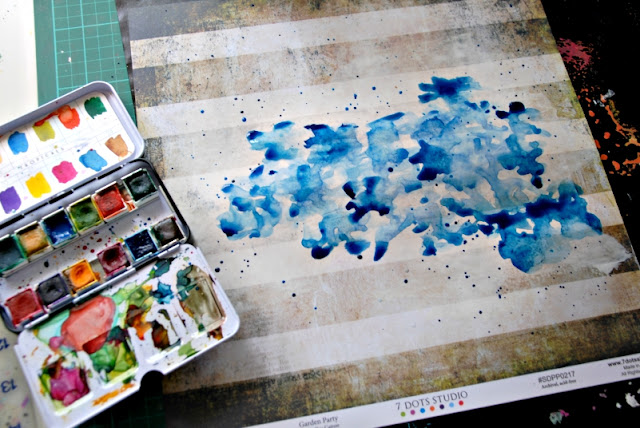
I then decided to add colour using Prima Watercolours in Tropical.
 
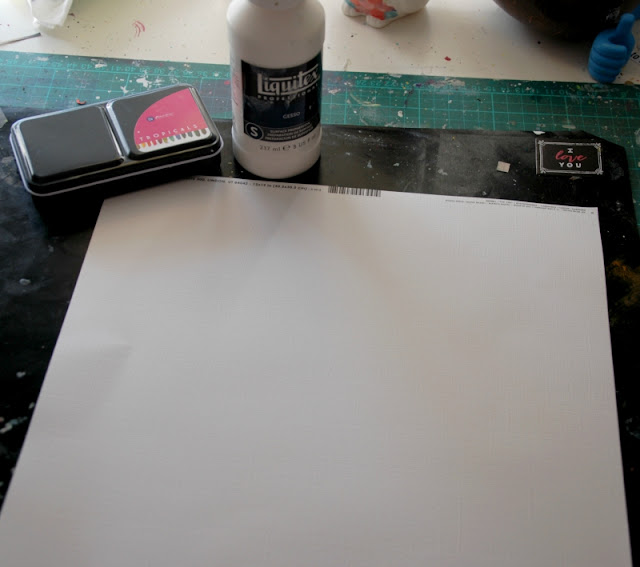
This required a layer of gesso to protect the paper.


I swiped it on using an old store card - and really only put it where my painting was gonna go.


I decided to go with blues - I selected this colour as both my girl and I were wearing blue in the photos I wanted to use.
 
So I began - initially I just kinda blobbed it on (yep technical term).  Make sure to use plenty of water. This helps it to look blobby rather than painted on.  Not sure if that makes sense.
 
Anyway, I used the two different shades of blue to create depth.
 
I then added flicks by tapping the end of my brush.
 
Hmmmmm they don't really look like flowers at this point.....


I let it dry and began to look at the blobs - thinking, which of these could become flowers.
 
I then went over these, and moved the brush gently, hoping this would look like petals.
It kinda worked!!!  I also let some run down the paper a little.
 
I then added some greens in various shades, in between the flowers and around the edge.  These will be leaves. I didn't try to make leaf shapes - just more blobs.


Can you see the flowers yet???
 
I can!!


Time to get out my Dina Wakley Scribble Sticks. I added black to the centre of the flowers.
 
I also began to outline the flowers and petals using a fine pen.
I added in leaves and a few stems too.


I also added white gel pen to the centre of the flowers.
 
See!! There they are!!
 
Ok, time to add my photos, and a few layers behind them.
 
 
Vicki has just got these awesome stamps in.....and I may have bought quite a few.....to see the range head HERE


I selected the scalloped border.
I stamped it onto some scrap and cut it out.


I then added a few tags by 7Dots (of course!). I used my fave tags - Writer's Block, and added a few 7Dots embellishment stickers too.


Now it's time to add some metal!
 
I love these gorgeous silver metal flowers, and knew they'd be perfect against the blue flowers.


I adhered them with some 3D Gloss Gel.  Such an easy way to add metal - and it allows you to tuck it in between your layers.


I then cut out a few of the butterlies from that gorgeous 7Dots paper - .Garden Party - Born  I had left on my desk from my previous creation.


Now time for the journaling, and capturing the story behind the photos.
 
This one's all about my daughter being accepted into the NYSF Program for 2019, which includes a trip to Canberra to engage in all things science-y.
It's a highly sought after achievement, and is a national program, so we were so excited that she was selected. She'd worked so hard.
Isn't she amazing? Brains and beauty!
 
So proud, definitely needs documenting.
These photos were taken at an acknowledgement ceremony at Government House.
 
 
I used some 7Dots Word Stickers and an embellishment sticker, which I recorded the facts on.


Then for the title, I added some 13Arts Clear Stickers.


I then wrote my personal words around these.


I really love the way these clear words look on the page - I love that they merge into the background - fits perfectly with the hand-drawn elements amongst my flowers.


I'm really happy with how this turned out.


I love the artsy style, I definitely feel like I'm getting braver with my painting!
 
The trick - just try it!


So are you having a go at out 'Metals and Petals' Challenge?


It's a goodie....and all you need to do is upload your entry - whether it be a layout, an art journal page, some cards, a canvas, some tags....whatever!
 
Just make sure to use some products available from Scrap Matrix, and include some metals (could be actual metal - Scrap Matrix has stacks! You'll find them HERE, or it could be chippy you've altered to look like metal), and some petals (flowers, stamped, stencilled, drawn, painted......)
 
Load it into the correct album in our Facebook Scrap Matrix Shares page, and let us know in the comments what the products are.
 
I can't wait to see what you do......the possibilities are endless!
 
I hope today has inspired you to get a bit painty......
 
I'll be back next month.
 
Luv Tam
xxx
 
 
Scrap Matrix Products used:


Friday, 12 October 2018

'Dear Me' by Tam

Hi everyone, Tam here and today I'm sharing with you something very personal, something that I have struggled with over the years.
I am definitely putting myself out there and I am actually terrified.  But I am doing it for a few reasons.

  1.  It's something I've been meaning to do for years, but never have - always making excuses.
  2.  I believe scrapbooking/creating is a highly personal as well as therapeutic process.  It is definitely somewhere I turn in times of stress.  I need it to cope with life's challenges. So it's important that I scrap the darkness as well as the light. 
  3. I'm all about words and photos. About telling your story. So much of what we create now has no journaling, no handwriting. My voice, my words are an integral part of my creating. If I don't have a story, then I struggle - I just sit and shuffle. For me, the story is the base for everything else, it's the spark.
  4. Maybe, just maybe this idea will resonate with some of you.
  5. It's therapeutic for me. I need to do this.
So here goes....

As soon as I saw the 'You've got Mail' Challenge, my mind began whispering "it's time..." I tried so hard to ignore it, but it was very persistent!
I have written myself a letter, a very important letter of forgiveness and acceptance.


So it's titled 'Just for You' and it begins 'Dear Me' and ends with 'Love Me'.


Once I'd made the decision to create this page, it just kind of happened, it flowed out of me and onto the paper and I'm so glad it did.  The words were added without a draft, there was no need to practice, my heart knew what it needed to say.

It was so therapeutic.

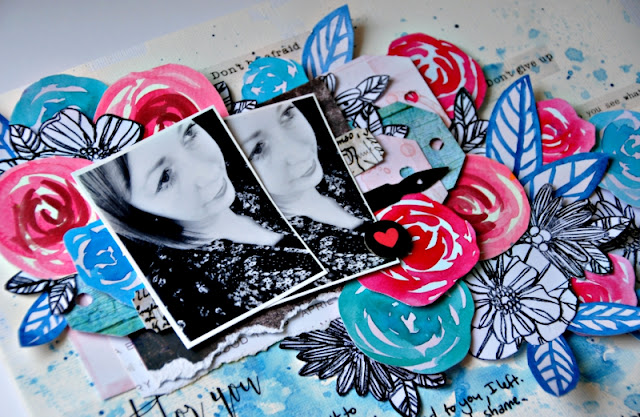
As this page was all about myself.....I decided to have a go at hand painting and then fussy cutting some roses and leaves (something else I've wanted to do for a long time) and mixing these up with my favourite 'Aall & Create' Stamp.

So let's look at how this page came together....


I began by adding a thin layer of white gesso to some white cardstock.

Whilst this was drying, I began painting my roses and leaves.


I used my Prima Watercolours - I have 'Tropical'.  I LOVE the colours.
I ended up not using the yellow roses or the green leaves, so they are on my desk waiting for something else.


Once dry, I cut them all out.


I then stamped using Archival Ink and that gorgeous AALL & Create Stamp.  As you can see they didn't stamp perfectly - I need to refill my ink I think. (lol - I sound like Dr Suess!) but that really doesn't matter. I'm happy with imperfection.
If an area really bothered me, I just went over it with my Fudeball black pen.

Ok, time to go back to the background.


I used the 'packaging technique' for the background. 
I added some watercolour to some old plastic packaging, and then I turned this over onto my backround, smoodging and smooshing as I went!!


I really love the effect this technique gives, and the amount of control I have over where the paint ends up!


I then added layers behind my photos, and I created some tags from leftover scraps of paper.


I began poking these out from underneath my photos.


I then began to add the flowers and leaves - I wanted them to look like they were cascading down the page.
I also knew I wanted to write the letter directly onto the background and so I made sure I left enough space for that.


Time to write that letter....
I added a 13Arts Clear Sticker as my title.....I popped this down first so I knew where to start the words.


Some of the flowers are adhered with foam dots to give extra dimension.


I love the look of the black and white stamped images alongside the bright flowers.


I added a few embellishments too - a little chippy heart and that gorgeous 'German Scrap Pen Nib'.


I also added in some 13 Arts Clear phrase stickers.....they were just perfect, and I love the way they become part of the background.


I will definitely be using more painted flowers in the future..... I see a whole new style evolving.


Have you thought about writing yourself a letter?.......what would you say to your 15 year old self? What does your soul need to hear?
I recommend it.

Here's a quick reminder of the moodboard to use for inspiration:

Just pop your entry in the 'You've Got Mail' folder over on our Scrap Matrix Shares Facebook Group. It doesn't have to be a scrapbooking layout....it could be an Art Journal page, some cards, a canvas. Just let us know what Scrap Matrix Products you used in the comments and you could win either a $20 voucher at the store or a chance to guest design in one of our upcoming challenges!!


I really hope you have enjoyed this post, don't hesitate to reach out to me.
 
Love Tam
xxx


Scrap Matrix products used:

White Gesso
White Bazzill
Watercolour Paper Pad
Prima Watercolours - Tropical
AALL & Create Stamp #20
13Arts Marta's Small Message Clear Stickers
13 Arts Stickers Clear - Secret Letter
13 Arts Paper -
7Dots Studio Paper Pad - Verano Azul
German Scrap Pen Nib Black
7Dots Airmail Die Cut Elements
Fudeball pen
Ranger Ink Black


Saturday, 22 September 2018

Living life .. with Alz

Morning peeps!

I'm here to share another "You've been framed" layout with you ..

Living life


I had a ton of fun creating the background for this layout. It was a bit of an experiment with a new product (new for me that is) for adding colour and I wasn't at all sure how the colours would turn out. With a bit of blind faith, and a lot of Prima Metallic Accents Semi Watercolour Paints I made this ..

(I used a sheet of 12x12 heavy weight watercolour paper)

I love the way the colour has seeped into the watercolour paper whilst the mica powder has stayed on top, giving a kind of blended but opaque finish at the same time. Super cool!

Whilst this was drying, I played with the idea of leaving the background as it was to show off the beautiful colour, shimmer and shine, or to add more layers. In the end, more is always more, lol, so I grabbed some stencils (many stencils!) and my Tim Holtz Distress Inks (Mustard Seed, Scattered Straw, Tumbled Glass, Pumice Stone, Tea Dye and Broken China) and using (mostly) like colour on colour, went to town.


So I'm digging this, but it needed more because, well, more is always more! It needed texture. Something organic and beach-y. Because this was my photo ..

(I love, love, love the new Tim Holtz Mixed Media Mat!)

The Finnabair Texture Paste in White Sand with the Joggles 9x12 Wander stencil would be perfect, or so I thought.

But, once dry, now you see it ..
and now you don't ..
.. which was a bit of a nuisance cos I wasn't going for 'subtle' lol!
(Oh and this depended on the angle from which you were looking at the background.)

What to do la? It'd been a while since I played with my Faber Castell Gelatos so figured 'why not?'. Using Gold Champagne and Silver Ice from the Metallics pack, I placed the Joggles stencil back over the White Sand Texture Paste and smeared the Gelatos on top of the texture paste with my finger and once dry ..

now you see it ..
and now you don't now you still see it ..
magic! (lol)

That was my background done and dusted.

I knew I wanted to use polaroid style frames and chipboard circles to create a layer of frames behind my photo. Because I couldn't cut in a straight line if my life depended on it, I decided to die cut some frames using both 13@rts Colour Basics patterned paper from the 6x6 pad and Tim Holtz Idea-ology tissue paper which I adhered to white cardstock to give it some substance. Although the tissue paper I used is currently not in store, you could just as easily use the Botanical Collage Paper.

For my chipboard circles I used Blue Fern Studios Graduated Circles, the largest of which measures 11" across. The smallest, which I've used on this layout, measures 3" across. In all, you receive five funky circles in the one pack. Oh and I also used the 6" circle on my layout.

(cool huh?!)

I inked both circles with the Pumice Stone Distress Ink, coated them with Ranger Glossy Accents and, whilst wet, sprinkled on some Prima Art Sugar Glitter in Antique Silver. I stapled my paper frames to my background, glued down my chipboard circles, added White French Lace Embossed Paper Lace, and that was my layers done.

ps: if you check out my yellow polaroid frame you can see
that I can't even die-cut in a straight line lol!!

As you probably know by now, I love using flowers on my layouts. This one would be no different and, luckily for me, Petaloo had the perfect flowers for my page .. Ivory Burlap Blossoms and Ivory Mini Paintables. I tucked a teal bloom Um Wow Flair in with a couple of my flowers and added my title "living life" using individual words from Tim Holtz Idea-ology Chit Chat Stickers on top. I printed my journaling using a free font 1942 report and I was done. Here's a few close ups of my finished page ..


Oh and by the way I forgot to add that when it was all stuck down and finished, or so I thought, I decided to flick around a small amount of Turquoise 13@rts Splash Glitter Ink!

Have you thought of playing along with our "You've been framed" challenge this month? You have until midnight on the 30th to upload a pic of your project to the Scrap Matrix Facebook Shares Page. Oh and heh don't forget to let us know which products available from Scrap Matrix you've used.

That's it for me today. I hope you're having an awesome start to your weekend.

'Til next time.

Cheers .. Alz  :)


Scrap Matrix products used:
Prima Art Sugar Glitter - Antique Silver
13@rts Splash Glitter Ink - Turquoise Glitter
Save