Showing posts with label 13Arts. Show all posts

Saturday, 8 December 2018

'Arty Angels' by Elisa Ablett


Hi everyone,

Oh my goodness, December already! this year has flown by....

Instead of getting all Christmasy at Scrap Matrix for our Challenge, Vicki went with a veritable rainbow of colours which is just AMAZING!

This is a fabulous challenge as it gives us all a chance to learn a bit more about the colour wheel if we are rusty or to use the entire Rainbow and I LOVE COLOUR.

Here is the link to the challenge album in the Scrap Matrix Shares facebook group.

No automatic alt text available.
 

After a bit of research I wanted to show you what you can do with a colour scheme that sits next to each other on the colour wheel, it's called an Analogous Colour Scheme. 

Analogous Colours from the Colour Wheel - Analogous colour schemes use colours that are next to each other on the colour wheel. They usually match well and create serene and comfortable designs. Analogous colour schemes are often found in nature and are harmonious and pleasing to the eye. 

I picked a 'cool' colour Analogous scheme of Blues, Turquoise and Greens and I was inspired by the water colour colour wheel in the bottom left hand corner of the challenge graphic.

 
Related image


Products and links to the Scrap Matrix Shop: - 

Head on over today to check out the great range of Scrapbooking and Mixed Media products on offer.


http://scrapmatrix.com/search.php?search_query=paint+chips - 7Dots Paint Chips Collection, Tags and Stickers.

Let's take a look at the close ups for the finer details :- 


To colour my Angels, I sprayed a small amount of each of the colours onto my craft messy mat and used a small paint brush to colour my Angels. I also added more water where needed to create a more pastel version of the colours.


Add some coordinated accents like wings, tags, tabs, quotes and distressed sewing! 


To create some texture in the background, I added some modelling paste through a stencil, and then used the sprays over the top and then tipped my page so the sprays would run down over the stencilled back ground. 


Add some extra hand drawn circles over the top of your wheels that you have created and some inking through stencils and splatters to tie the layout together.

That's it from me today, thank you for stopping by the blog, i hope i have inspired you to take on the Colour Wheel challenge and also an Analogous Colour Scheme!

Hugs xx

Elisa 
 

Wednesday, 6 June 2018

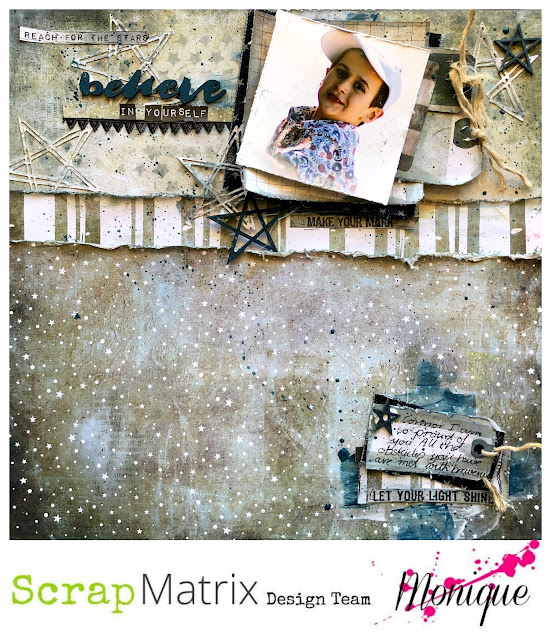
"Believe In Yourself"

Hi everyone,

Monique back again today with my second layout for Scrap Matrix's "The Point Is" Challenge.
To refresh your memory - here is the moodboard for the challenge:


This is just such a cool mood board - and so much inspiration in one picture!!

This time, I used stars to "make my point,"  inspired by the gorgeous 7 Dots Northern Lights "Frayed Knot" paper.

Here is a quick step by step of how I created this layout:

1.  Select 3 pieces of coordinating paper.  Leave one paper whole, cut one sheet about 4"x12" and the second sheet 8"x12."  I used 7 Dots Studio Northern Lights papers - "Frosted" and "Frayed Knot."


2.  Use your 12"x 12" paper as your base and layer the other two papers on top - you can distress the edges to add more texture, if you want.  I used Tim Holtz Distress Ink in Iced Spruce.


3.  Stencil on some detail with a stencil and some ink.  I used 7 Dots Studio Cotton Candy Dreams "Stars" stencil and some Distress Ink in Iced Spruce.  Add some Gesso to a craft sheet, and water it down.  Use a credit card or paint scraper to lightly scrape the gesso on the layout just under where you will place your photo, once dry, add some colour by scraping on some watered down acrylic paint.  I used Dina Wakely Acrylic Paint in Marine.  I later added some gesso and paint the same way to the lower right hand corner.


4.  Start putting together your photo mat.  Cut a piece of paper to go under your photo (I used 7 Dots Studio "Northern Lights Board Games," distress the edges and ink.  I also popped a couple of tags from the 12" x 12" Northern Lights Tags sheet, which I also distressed and inked, under my photo.  I also used a darker piece of denim fabric under my papers - I just wanted something dark to "ground" the photo mat a bit.


5.  Add your photo to your photo mat, and then adhere to your layout.


6.  Next, use a die to cut some stars out of some coordinating paper (I used 7 Dots Studio Northern Lights Board Games.)  Paint some chipboard star shapes in acrylic paint.  I used Dina Wakley Acrylic Paint in Marine.  Arrange the stars across your layout, leading the eye to your photo.

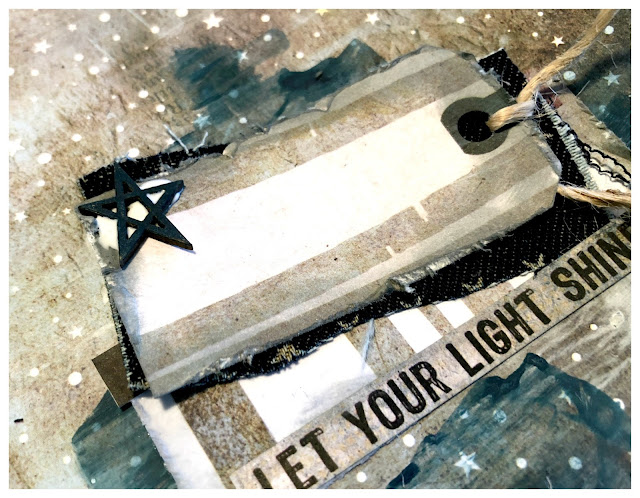
7.  Layer some coordinating paper, stickers and tags to the lower right corner.  This is the space to do some journaling.


8.  Finally, add some word stickers (I used 7 Dots Studio Northern Lights Word Stickers 6 x 12,) and your title.  I used chipboard word from the 13 Arts Strength in Numbers chipboard sheet.   I flicked on some more paint and did a bit more doodling 

Here is a complete list of the products I used which are available in the Scrap Matrix shop.

7 Dots Studio"Northern Lights" papers "Frosted," "Frayed Knot" and "Board Games"
Kinder Kreations Chipboard Stars

Well that's it from me today folks - don't forget, you have until midnight on the 14 June to upload your entry.  Simply add it to the "What's the Point" album in  the Scrap Matrix Shares page on Facebook.


Sunday, 13 May 2018

Lynn's second layout

Good morning, today I would like to share my second layout using the Tic Tac Toe board - and the colour I have chosen is brown to go with my heritage layout.  This is a photo of my Mum and her parents - A great photo being mothers day today!

Here is the board


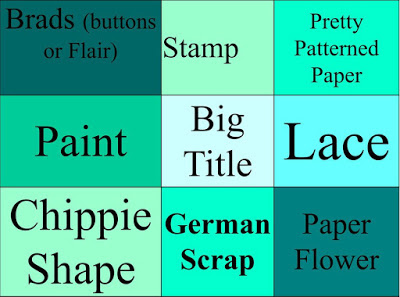
and my layout - I have chosen across the top - buttons, stamp and patterned paper


I began by colouring the lace and flower with 13 Arts Ayeeda Paint Rainbow - Brown and left to dry.  (I love this lace has the name of my grandma in the photo - Freda!)


I have used  Maja Design paper from the Vintage Autumn basic collection. I have torn the paper and used the back on the bottom and the front on the top.  Plain brown cardstock in the middle.  
The edges have been inked with Distress Ink - Walnut Stain.

I have used a 13 arts stencil and clear crackle paste around the areas where the photo will be.  Once dry I have lightly sponged over the top with Distress Ink Walnut Stain and Vintage photo


(doesnt look that wonderful at this stage!!!!!)

I have die cut the frame to go behind the photo and using this as a guide I have stamped behind the photo and under the brown lace with Blue Fern Studio Stamps and Stampendous Embossing Powder - Pearl


It was then just a matter of putting it all together with the flowers, adhering the buttons to the metal leaves and adding the title from 13 Arts Secret Letters collection

Here are some close ups:


Products Used


You still have until midnight tomorrow to enter the challenge - all you have to do is create a project - page, art journal, card, tag and upload it into our album on the facebook page Scrap Matrix Shares - and dont forget to name one thing that you have used that is available in the Scrap Matrix store.  Easy peasy! 


Thursday, 10 May 2018

"Hold dear always" .. with Alz

Morning peeps!

I'm back to share another Tic Tac Toe Monochromatic page with you. This time I went with brown ..


Hold dear always

.. and the vertical strip on the left .. Brads (buttons or flair), Paint and Chippie Shape.    


This layout posed some challenges. First of all, brown. What was I thinking? Lol! Its not that I don't like brown. I mean crikey, I have a brown dog, and brown furniture. In fact my whole house is varying shades of brown now that I think about it. Except for some accent walls. But I digress (oops).

I created my own background on watercolour paper with various inks, stencils, stamps and 'stuff'. First, I used the same technique for sticking down dictionary paper as I used in my last project (see here). Once it was completely dry, I sprayed my page with water and started adding 13Arts Ayeeda Paint Rainbow Colour in Brown. Because I was working on a few pages at the same time, I had the luxury of allowing my page to dry naturally which meant I could allow each layer of the brown ink to dry before repeating the process, ie, spraying my page with water and adding some more of the 13Arts Rainbow Colour. By doing this, I was able to achieve, albeit not a lot, but some, depth of colour in my brown.


Of course I couldn't stop there, so I grabbed my TCW Mums Stencil and Paper Artsy Fresco Finish Chalk Acrylic Paint in Nougat and sponged the paint through the stencil onto my background. Once it was dry I felt it really needed some definition so messily outlined each of my Mums' petals, three times. I did it whilst I was 'watching' TV so it really didn't take that long. Next, I added some black texture paste through another TCW stencil. Finally, as you'll see on my close up photos below, I used various Aall & Create Stamps and a Jet Black Ranger Archival Ink to add that final touch to my background.    


As with my last share I decided against using layers behind my photo. With hindsight, a few weeks after creating my layout, I think maybe some plain white and/or cream layers would have worked well. But at the time, well yeah. Moving on lol! It was time for embellishing, one of my favourite parts of scrapping.

I sprayed various pieces of Chipboard (Circle Words Adore Italic #2 and Doily Border) with 13Arts Ayeeda Chalk Mist in Dark Brown and once dry (which took a while as chipboard is sooooo absorbent), inked the edges lightly with the Jet Black Ranger Archival Ink. Inking the edges gave the chipboard just a bit of definition helping them to stand out from the page.


I removed the 'pearl coloured' centres from some Prima flowers and replaced them with Prima Memory Hardware Glass Pearls in a dark colour. I also painted some Metal Flowers with black paint and then lightly scratched back some of the dried paint to reveal the metal underneath. In my embellishment clusters I also included some of my favourite flowers (Petaloo Botanica Minis) .. they're the perfect size for tucking in here and there, you can do so much with them, including leaving them plain, and a pack seems to last me an awful long time.

Because of the Tic Tac Toe line I had chosen, I had to include a Brad, Button or Flair. I went with an Um Wow Studio Flair. I've said it before, and I'll say it again, I love these flairs! They're just that little bit larger than your average flair, and they're just that bit flatter. I love them!!


Some of my stamping was a wee bit messy so to partially cover and distract from the particularly bad spots, I stamped some birds with Aall & Create Stamp Set #6, cut them out, coloured them with a brown pencil from the Prima Watercolour Pencils in Earth Tones, and adhered them to my page with foam tape.    


I also scattered around a few black rhinestones I cut from a strip of Molossi Crystal Lines. If, like me, you love bling, you seriously have to get some of these Molossi Crystal Lines! A packet will last you forever. No joke. Yes, you can use them as a strip, but one packet comes with five strips, and you can cut them up into smaller strips or individually as I generally do. Aaaand at the time I wrote this post, there are eight different colours in stock, including teal and pink and lime green .. sigh!    


Finally, I needed to add a title and some journaling. You'll probably notice I tend not to journal a lot on my pages. I also don't usually add large titles. I like to rely on my product to provide my title and/or journaling. For example, I could have titled this page "Adore" as that's the word being repeated on my chipboard circle. But I have a lot of pages titled "Adore". So I added some of the words from Tim Holtz Idea-ology Chit Chat stickers - Verbiage, and that was that. My second Tic Tac Toe Monochromatic layout was finished. Yay!

Don't forget you have until midnight on the 14th of May to add your entry to the appropriate album on the Scrap Matrix Shares Facebook page. Please also share with us which Scrap Matrix products you've used. Finally, because this is yet another long post, and you might need a reminder, here's the Tic Tac Toe Monochromatic board for you to have another look see at ..


I've really enjoyed the entries loaded so far and look forward to seeing more .. even yours! So get creating and have fun!!!!! Til next time ..

Cheers .. Alz  :)


Scrap Matrix products used ..
Ranger Archival Ink - Jet Black
Chipboard - Circle Words Adore Italic #2 and Doily Border
So Much Metal - flowers
Save

Monday, 30 April 2018

'Forever' By Elisa Ablett

Hi Scrap Matrix lovers!

Elisa here from the design team with my latest layout based on this month's awesome Tic Tac Toe/Monochromatic Challenge and I have a process video for you on how to complete this layout step by step! I am still new to Youtube and process videos so be kind :-) 
This layout I chose a Red, Black, White and Grey colour scheme and of course my usual mixed media and stamping!

If you haven't joined in the challenge this month there is still a VERY small amount of time left - head on over to Scrap Matrix Shares to add your photo.


Here is my process video :-) 


Here are some close ups for you !!


Products used from the Scrap Matrix Store


Image 1


undefined


That's it from me today, I hope you have enjoyed my process video, make sure you leave me some love  and subscribe to my channel if you would like to see more!

Elisa xx