Sunday, 10 May 2020

Zesty Cards

Hi Everyone! 

I'm hoping the day is treating you well.
Today I'd like to share my first project for the month. 
I've made three cards which I hope will brighten your day.


I have to admit these were not the first thing that came to mind when I saw this month's challenge. 
All I could think of was how fresh and clean citrus colours were, 
then I thought of refreshing cool drinks and cocktails.  
This could be because Autumn took its sweet time arriving up here and I was feeling a little warm. 
So because I was unable to come up with a way to draw Fluffy Ducks, Grasshoppers, Tequila Sunrises and Margaritas, (I may be showing my age here), we now have three cards. 


First I grabbed my Distress Inks in Squeezed Lemonade, Carved Pumpkin, Ripe Persimmon, Worn Lipstick (does anyone else think of Barbara Cartland when they use this colour? No, it's just me.), Twisted Citron and Mowed Lawn. 
Using an Ink Blending Tool, I applied my chosen colours diagonally across a piece of white cardstock roughly about 14.5cm x 10.5cm in size.
I then repeat this but I blend over the previous colour a little so that there is no clear line between each colour.   Next I wet my fingers with water and 'flick' it over the cardstock.  I usually place some paper towel over it to soak up the water after a few seconds.  (This is not necessary given the shortage of paper towels at the moment. When will this madness end!)
  Tip:  Have a piece of scrap paper handy.  Place it on the sections you have already blended.  This stops any fingerprints being left behind. 


I grabbed my Carabelle Studios stamps and chose the Happy Poppies, the Leafs and the Blooms and Circles Elements sets as well as a script stamp from my stash.
  I stamped the Blooms and Circles Elements and script stamp randomly over the card in coordinating colours from the Archival Inks range, (but I've forgotten which ones), and my focal stamps in Jet Black Archival Ink.


 On a separate piece of white cardstock I stamped my focal images again and cut them out.
  Tip: I always go around the edges of my fussy cutting with a dark grey pen.  This hides any mistakes. 
Next I used my Ink Blending Tool to go around the edges of the cardstock in the same colours.


I finished my cards by attaching them to a card base and a Tim Holtz sticker for a sentiment. 

I also coloured a few of the smaller features of the stamps (that were too small to cut out) with a white pencil and flicked some white paint over them just for some added interest.


Well, there you go.  Another project done. 
It's really gloomy here today and these cards really brighten up my table.
  If the current circumstances are making you feel a little gloomy, I fully recommend popping into your craft room and grabbing some citrus colours.  You'll be right in no time.
 Don't forget to post your projects on the Scrap Matrix Shares page for your chance to win a prize.

 Jen 
>^.^< 


Friday, 8 May 2020

My take on the Citrus Moodboard .... Lynn

Hi everyone, Lynn popping in to share with you an art journal page that I created for this months moodboard challenge.

I am sure you have seen the moodboard, but in case you havent seen it -


This is definately a colour palette that I like and I have created this art journal page:


I started this page and got so involved with it that I forgot to take step by step photos!!!!

SO I could talk (write steps) you through it but decided I would create another one - 


Please excuse the photo - I had no choice but to take it at night as I dont generally see my place in daylight hours in winter with my job - like the art journal page says - "It is going to be ok!"

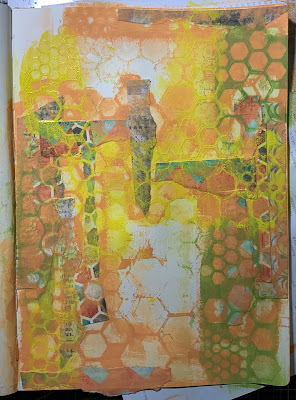
I began with some pages from the 7 Dots Cotton Candy collection ripped into strips and adhered with Matte Medium


I have then used Paper Artsy Fresco Finish Paint - Butternut and did the stencil wipe off technique shown by Lisa Oxley.  I have used a hexagon shaped stencil by The Crafters Workshop


I have then added Paper Artsy Fresco Finish Paint - Granny Smith - doing the same thing with the same stencil - caution tho - you must dry between the layers


 and as everything needs to be done in 3's or 5's I have added another colour - Zesty Zing


To make all these blend together and push to the background, I have added white "snowflake" Paper Artsy Fresco Finish Paint


I have then added a Tissue Image of Dina Wakeley's and framed it with Washi Tape and added the saying "Its going to be okay"


I have coloured the face, eyes and lips with Dina Wakely Paints Sand, Turquoises and Ruby.

Using Dina Wakely's black paint and the same stencil I have added some black around the focal image and a saying that Theresa Collins was giving away as a free download last month.

Using a fudeball black in pen I have done some scribbling around the face and edges of the page.


I hope that I have inspired you to have a go at this months challenge - Crafting under these strange world circumstances can be very soothing for the soul!

Thanks for stopping by and I will be back later in the month with another art journal page


Lynn Good


Monday, 4 May 2020

Citrus Anyone? - May challenge - Cards


Hello Everyone,
I have had a lot of fun in my craft room lately. I have rediscovered many hidden treasures and had time to be a little adventurous with others. This month has a wonderful colour palette and was a lot of fun to work with. All of these cards are so different, however they all started with the same base.


I started with a 12 x 12 white card and using  the back of a square shaped art foamy, I painted a random background using the following citrus colours: Dina Wakley Lime, Tangerine, Magneta and Lemon, along with Dylusions Calypso Teal. This piece will make four cards. Before adding the next layer, I cut the card in half and put half to one side.


On the next layer, I painted circle shapes using the back of an art foamy once again. This time I used Neon paints in green, pink, orange and yellow. I love these paints as they just pop on the page.


For the last layer, I grabbed some stencils and added these using the same paints as the base layer.


For my first card, I have used half of the piece that I put to one side. I had recently bought a bundle pack from Scrapmatrix filled with all sorts of trinkets including this chipboard shape. I used this as a mask and sprayed Oxide Sprays Cracked Pistachio and picked raspberry. Once the shape had dried, I added some black paint and glued to the card. I finished off with some black splashes.


The base of this card is the second half of this card stock. Stepping out of my comfort zone, I had a play with this Paper Artsy stamp set by Tracy Scott. ETS37  And can I say... so much fun! This stamp set is so easy to use and the possibilities are endless. This made a very quick and easy card.


The next two cards are made using the base with all the layers. For this card I have used part of the TCW stencil - Botanical Dream. I traced part of the stencil and coloured this with a black marker. The wording is from Art By Marlene sticker sheet.


One square left for this funky card. The edging is from Paper Artsy Stamp set by JOFY - JOFY80. I have coloured the Dylusions Dy-cut with the same colours from the background and once again used the wording from Art By Marlene sticker sheets.


One afternoon and I have four fun cards - each so different. I hope you have enjoyed this read and look forward to seeing your creations. 
Have fun in your craft space and stay safe.


Sunday, 3 May 2020

Creating with Tam

Hi creative souls

Tam here today to share my first lot of creations for our current challenge.
Challenge.....yes definitely a challenge for me this time.
Let's take a look and then I'll explain further....


Another creation inspired by the current pandemic.


This month I struggled - I'm not sure if it's to do with the current situation, or if it's the colours - I don't create with red and orange very often, but hey I guess that's the whole idea....
a challenge!!

Here's the inspiration:


Ok, so I lined up some Paper Artsy Paints to go with the colours.
I selected 'Red Lipstick', 'Smoked Paprika', 'Zesty Zing' and 'Green Patina'.


I was stumped, so I began by going back to an old fave style.
Just paint striped rainbow colours! Lol
I add water and let some of the colour run and blend.


Now it kind of looked like a sunset, which gave me the idea of adding a city scene.
I adore houses, in fact I've just ordered some NEW stamps with houses and can't wait for them to arrive.


So I used the following stencils -  'TCW 6x6" Floating City' and 'City Buildings'.
Vicki is out of this one right now but look at this one HERE.  (Oooh let me think - how can I justify another?!?)
I added paint through them using a dry baby wipe.
I firstly used a touch of Dina Wakley 'Fuchsia', and then 'black'.
This gives the illusion of depth.


I applied the same technique around the edges using the 7 Dots Dreamscapes stencil.
Now add flicks of black paint.


And lastly,  the journalling.


The journalling reads:
"When this is over, may we never again take for granted....
A handshake with a stranger, full shelves at the shops, conversations with neighbours, a crowded theatre, Friday night out, a routine check-up, a stadium roaring, coffee with a friend, a meeting and life itself.
When this ends, may we find that we have become more like the people we wanted to be, we were called to be, we hoped to be. And may we stay that way, better for each other. Because of the worst."


So I decided to have another play....


I began with the same colours as above, but added a touch of  'Aqua' by Dina Wakley.


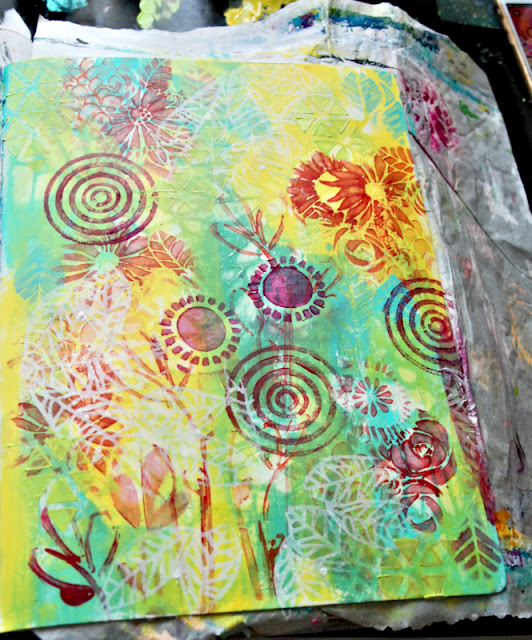
Just spread the 'Zesty Zing', 'Green Patina' and 'Aqua' out randomly, 


Then with a wet baby wipe, rub through the 'Botanical Dream' 12x12 stencil by TCW.


Using the 'Floral Statement' 6x6" TCW stencil and a dry baby wipe, I then rubbed the 'Smoked Paprika' and 'Red Lipstick' through so that some of the flowers and details came through.


I then added some Dina Wakley 'Fuschia' using a dry baby wipe.
I really wanted to use that circular shape in the challenge pic so I added this colour to a Foamie shape called 'Ring Fling' and stamped it randomly.
I added white paint to the Foamie 'Leaf Vine' and added that in random spots.


I added a bit more stencil work using 'Dreamscapes 7dots' and TCW 'Deco Leaves'.
I then grabbed a black pen and a white pen, and added doodling.
Flowers, leaves etc.


This part is very relaxing!!


You can see a bit more of the stencil detail in this pic.


There you have it, a wildflower garden.

I can't wait to see what you create for this one.
Much love
Tam
xx


Friday, 1 May 2020

Introducing May's NEW challenge.....

Hi lovely people,
A quick pop in today to release our new challenge for May.
Grab yourself a cuppa, and relax and enjoy.....

As we begin to feel the weather changing, and as we are at home a lot right now, let's see where this one takes you.....
citrus bliss!


Let's have a look at those clever DT girls and how they have interpreted this one.....


How's that for inspiration???
Those girls exude talent.

Don't forget to pop back regularly, as each of the girls will showcase their creation and show you step by step how it came together.

As we are all home more than we usually are, we'd love it if you could find some time for yourself and join in the fun and have a play.
It's a good 'self care' activity.

Upload your entry to Scrap Matrix Shares Facebook Group.
Just find the 'May challenge' album, add your pic and let us know which Scrap Matrix products you used.
Easy peasy!
xxx