Showing posts with label art foamies. Show all posts

Sunday, 3 May 2020

Creating with Tam

Hi creative souls

Tam here today to share my first lot of creations for our current challenge.
Challenge.....yes definitely a challenge for me this time.
Let's take a look and then I'll explain further....


Another creation inspired by the current pandemic.


This month I struggled - I'm not sure if it's to do with the current situation, or if it's the colours - I don't create with red and orange very often, but hey I guess that's the whole idea....
a challenge!!

Here's the inspiration:


Ok, so I lined up some Paper Artsy Paints to go with the colours.
I selected 'Red Lipstick', 'Smoked Paprika', 'Zesty Zing' and 'Green Patina'.


I was stumped, so I began by going back to an old fave style.
Just paint striped rainbow colours! Lol
I add water and let some of the colour run and blend.


Now it kind of looked like a sunset, which gave me the idea of adding a city scene.
I adore houses, in fact I've just ordered some NEW stamps with houses and can't wait for them to arrive.


So I used the following stencils -  'TCW 6x6" Floating City' and 'City Buildings'.
Vicki is out of this one right now but look at this one HERE.  (Oooh let me think - how can I justify another?!?)
I added paint through them using a dry baby wipe.
I firstly used a touch of Dina Wakley 'Fuchsia', and then 'black'.
This gives the illusion of depth.


I applied the same technique around the edges using the 7 Dots Dreamscapes stencil.
Now add flicks of black paint.


And lastly,  the journalling.


The journalling reads:
"When this is over, may we never again take for granted....
A handshake with a stranger, full shelves at the shops, conversations with neighbours, a crowded theatre, Friday night out, a routine check-up, a stadium roaring, coffee with a friend, a meeting and life itself.
When this ends, may we find that we have become more like the people we wanted to be, we were called to be, we hoped to be. And may we stay that way, better for each other. Because of the worst."


So I decided to have another play....


I began with the same colours as above, but added a touch of  'Aqua' by Dina Wakley.


Just spread the 'Zesty Zing', 'Green Patina' and 'Aqua' out randomly, 


Then with a wet baby wipe, rub through the 'Botanical Dream' 12x12 stencil by TCW.


Using the 'Floral Statement' 6x6" TCW stencil and a dry baby wipe, I then rubbed the 'Smoked Paprika' and 'Red Lipstick' through so that some of the flowers and details came through.


I then added some Dina Wakley 'Fuschia' using a dry baby wipe.
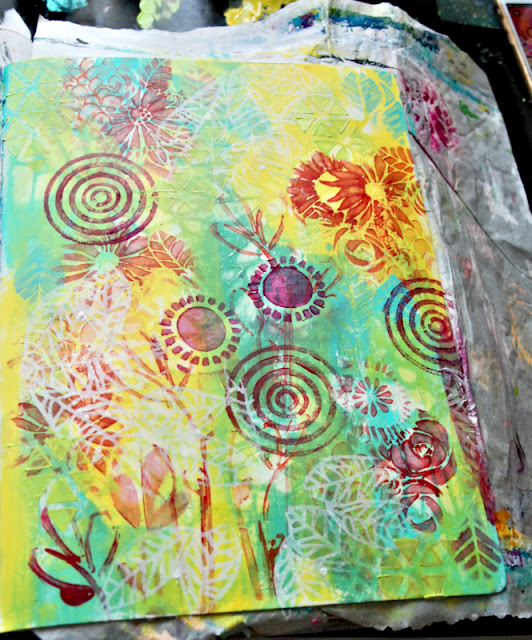
I really wanted to use that circular shape in the challenge pic so I added this colour to a Foamie shape called 'Ring Fling' and stamped it randomly.
I added white paint to the Foamie 'Leaf Vine' and added that in random spots.


I added a bit more stencil work using 'Dreamscapes 7dots' and TCW 'Deco Leaves'.
I then grabbed a black pen and a white pen, and added doodling.
Flowers, leaves etc.


This part is very relaxing!!


You can see a bit more of the stencil detail in this pic.


There you have it, a wildflower garden.

I can't wait to see what you create for this one.
Much love
Tam
xx


Friday, 10 April 2020

What an Inspiration...


Oh my. Where do I start.  
I cannot tell you exactly when Tammy's work started to catch my eye.  I'm pretty sure that it was in a scrapbooking magazine.  I haven't bought one of those for years now though, so it was some time ago.  

Her bright colours always stand out.  
The layers of elements and stamping, seemingly randomly placed, always look perfect to me.  
And how does she come up with the ideas of using stamps for functions other than their initial purpose?  She keeps telling me that she is an upside down and back to front person, but she seems normal to me. 😆  In fact, since joining as a guest design team member, she has been very helpful, encouraging, inspiring and supportive.  
A truly wonderful person who genuinely cares. 

Well, that's enough gushing from me.  


This is my inspiration for my project.  

I found this prompt for this month's challenge a little daunting.  I'm hopeless at trying to copy someone else's work and my first three attempts failed miserably because I wanted to use different products. 
So I went through the blog and followed her directions.  
Those who know me will be shocked.  Me, follow instructions!  I normally just look at the project and do it my way.  
Her instructions are so easy to follow, how could I have gotten it so wrong. 

So here is I what I did.

First I grabbed a sheet of white cardstock and my Paperartsy paints in Limelight and Granny Smith.
I painted first with Limelight going up and down , then side to side.  I repeated with Granny Smith but with smaller strokes.


 Next I used the circle stamp from Paperartsy stamp set ETS24 and stamped it randomly over the page with Black Stayz-On.


 Then I used one of the quote stamps from Paperartsy stamp set JOFY35 trying to use mainly the l'amour part on the right side and lower part.


I grabbed my Art Foamies Circle Salad set next, and stamped them with Distress Oxide Ink in  Blueprint Sketch and Broken China.  I repeated this with the circles from Paperartsy stamp set ETS09 and cut them all out.

I drew three lines around the page adding a few scribbles here and there with a black pen.

Now Tammy uses tags, stamped images, journaling and stickers to finish her page but I was doing it my way.
So I printed out two photos of my youngest nephew, one in black and white, one in colour and arranged them with my circles.  I had a flair button that fit with my colours and a 'love you' quote sticker from Ranger that I added to the colour photo.


 And this is it.  My Tammy inspired page.  A little different but the same. 


I hope you enjoyed my first project for this month. 
I can't wait to see how Tammy inspires you.
 Just don't forget to share it on the Facebook page.

Jen
>^.^<


Sunday, 16 February 2020

What do to with all those "Disaster" prints.. By Tanya Froud

Hi there Tanya here with my second share for the month..

Now I'm sure we all have been playing with our Gel Plates, and I'm sure that you have a pile that didn't make the cut!!!

I know I sure do! Now what can we do with these so we don't waste them?? Rip them up of course!!!!

This first art Journal Page was done with bits of ripped up disaster pieces that could have gone to the bin, but the colors were still kinda pretty so they stayed on the heap.

Once i ripped them i stuck them all down with Mat Gel Medium and dried it. 
Once dry i stamped with Art Foamies and doodled with Posca Pens.

On my Gel Plate I prefer to use Dina Wakley Heavy Body Acrylic paint.


My second Art Journal page was also a piece that ended up on the scrap heap... I simply stamped with art Foamies and added some doodling with a irresistable pico embellisher to the page to bring it all together. Both these project also have stencils and quotes from Tim Holtz

Well Thats it from me this month. I do hope you are all having lots of fun "Making you Mark!"


Friday, 20 September 2019

'Chase the Sun'
with Lisa Amiet

Hello all!
It's Lisa here today to share my latest art journal page
for this month's 'Art Foamies' challenge!

'Chase the Sun'


Now before I tell you how this page came about,
I have to tell you that I'm not a huge fan of this page, 
everything went a bit pear shaped lol.


I have used my 'Dylusions Creative Journal - Large' and I have started with a
coat of 'Paper Artsy Fresco Finish - Pumpkin Soup' paint. 
I have then added another coat, but while it was still wet, 
I used a scrunched up piece of paper to remove some of the paint. 


I have then used my '6x6 Dreamscapes Triangle Stencil' from 7 Dots Studio, 
to lightly ink through with a 'Blending Tool' and 'Distress Ink - Peeled Paint'.


Next is where things changed a bit. I have used my 
'13 Arts Rainbow Color' in Navy Blue,
I have added some water and let the colour flow over my page. 
Once dried I changed it again. I just wasn't feeling it. 


I have used my 'Red Tin Roof Doily #4 Large' stencil, 
and white gesso to sponge through the stencil. 


I have then added some doodles to my doilies. 
I have then added a leaf sticker from the 
'Pinkfresh - Escape the Ordinary Chipboard Stickers'.


I have then stamped out some flowers,
 using my 'Art Foamies Art by Marlene Poppy - Small',
and 'Distress Inks' in 'Rusty Hinge' and 'Peeled Paint'
I have added a word sticker from 'Pinkfresh Boys Fort Element Stickers'.


I have then used my 'Art Foamies Balzer Leaf Vine Small' and 
'Distress Inks' in 'Mowed Lawn', 'Spiced Marmalade' and 'Faded Jeans'
I have cut them all out and layered them down the left side of my page. 


I have then used more of the chipboard stickers
 from the 'Pinkfresh Escape the Ordinary' collection, 
and a 'Pinkfresh Escape the Ordinary Fabric Diecut' arrow layered over my page. 


I have then used my 'Art by Marlene Storms Don't Last' stamps to stamp in 
'Distress Ink Faded Jeans'. I have cut it out and added it to my page. 


I really love the colour scheme of this page, 
but it didn't turn out quite like I had planned, but that's half the fun!


I hope that you get a chance to have an experiment today,
and that this inspires you.

Until next time!

Lisa


Scrap Matrix Products used:
'Peeled Paint'
'Mowed Lawn' 
'Spiced Marmalade'
'Rusty Hinge'
'Faded Jeans'
Pinkfresh Escape the Ordinary 

Monday, 16 September 2019

Sea Shells by the Sea Side- By Tanya Froud

Hi There Peeps! 

Here is my next project - a mixed media layout using  Art Foamies.


To start with I applied Dina Wakley Heavy Body Acrylic Paint to Sea Side Art Foamies with a brayer and stamped 25 images from the Sea Side range.
I dried these and then fussy cut them all out.

On a sheet of white 12x12 card-stock in a band across the middle I stamped Broken Blocks by applying  Dina Wakley Heavy Body Acrylic Paint. I repeated the same technique with the Train Track stamp and the Writers Block. I dried it completely.

Next I matted my photo and stuck it down on the center of the page slightly to the top.
 I then made a cascade of the seashells coming down from the photo mounting them at different heights using dimensional dots.
Then flick some paint splats around and you are done!

A pile of pretty Seashells all cut out....


The Background...


Well That's it from me for today, thanks for stopping by!
Hugs 
xxx