Showing posts with label Tam. Show all posts

Wednesday, 12 August 2020

Tam's back with more drips.....

Hi lovelies

Tam here again to share another drippy creation.....


A drippy girl.....


To create this one I used the following products:


I began by applying white gesso to my page and then sketched a face.


I then used the Prima Bloom Stamps.
I love this stamp set.
Everyone should have this in their collection.....

Firstly I stamped each one onto scrap card and then cut them out.
I use these as masks.


I stamp directly onto the page using archival ink.
NOTE this ink must be waterproof so it doesn't reactivate when liquid is applied.
I then cover that stamped image with it's mask, ensuring it lines up...


I then stamp the next image, overlapping slightly.
See how the mask works?
You are left with layered stamps....


Time to start adding colour....
I used Art by Marlene Watercolours, in both Bold and Bright and Whimsy and Bright.
I layer upon layer the colours until I am happy with the depth and vibrancy.
I aslo sprayed water and allowed the drips to run down the page.


They are just a bit softer.


I also added some drips to her eyes.

I then went in with a fine pen to add some details.


I also added some pen work to a few of the flowers, just to add some highlights.


Finally a few flicks of paint!


Love those drippy flowers....
and I love the white space around it.
Helps the colours to pop.


Keep your entries rolling in.
We love to see how you drip, spray and spritz on your creations.

Much love 
xx


Thursday, 12 September 2019

Tam's Village using Art Foamies

Hi there creative souls!

Tam back today to share my second 'Art Foamies' Creation!!

This one was inspired by many of you who contribute to our Facebook Shares Group.
I love the little community we have there, and recently quite a few of you were creating cute little house pages so I just had to have a go....


And yep I got the idea for that border from there too!!!
LOVE IT!
Thanks everyone for the inspiration.


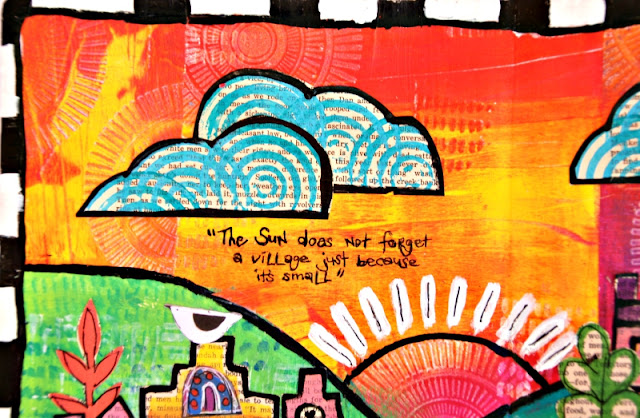
I just LOVE the explosion of colour and the contrast of that black and white border.
I also love the whimsical feel.


I used nearly ALL of the Art Foamies I own on this layout!!

Let's take a look at how it came together...

This page was sparked by your little houses. I knew I wanted to create a village scene.
I was playing around a couple of weeks ago with my Gelli Plate and my Art Foamies, and some of the prints I managed to create reminded me of sunrises....and well the page just grew from there.


These are some of the prints that I created that sparked the sunrise idea...

I made the papers using Dina Wakley Paints, my Gelli Plate, the 'Doodle Centre' Foamie and the 'Dino Skin Small' Foamie.

I just LOVED that pink and yellow sunrise/sunset image, so I adhered this to my page using Matte Gel.  I made sure one of the circular shapes was centred to act as my sunrise image.


I then painted some hills onto the bottom side of this....


Once dry, I added some mark making using the 'Dino Skin Small' Foamie and the 'Inner Struggle' Small Foamie. 
These are available individually, however, I purchased mine in a packet called 'Balzer Deluxe Small'. 
I think Vicki is out of stock of those sets at the moment, however I'm sure if you contacted her she would order them in for you. They are awesome for mark making.


Next step was to make some little houses and trees for my village.
I used 'Art by Marlene - Dutch Houses' Foamies.


I stamped them onto some old book paper.....


I did the same using a couple of the leaves from the 'Art by Marlene Leaf Geo' Foamies.
They make the perfect trees!


I then used the 'Balzer Ring Fling' Foamie to stamp multiple times.
 Once cut out they look like clouds!.
(Note this Foamie is also included in the Deluxe Balzer Pack, or available separately)


I then cut them all out, and outlined them in either black paint or pen.


Cute hey!!
Time to start sticking them down.


Love those clouds!


I added  a quote and a few little bits and pieces from the 'Art by Marlene Die Cuts Sheets'.
I mainly added these to the windows and doors, and made a little garden of flowers....oh and added a cute little birdie.


Lastly, I added that black and white border.
(Oh and a couple of cats!! Wouldn't be somewhere I want to live without them!)


Now just to decide which house I actually want to live in!! 
I think that little one on the left with the love heart and pink roof will be just fine.
Who wants to move in next to me??
What a crafty little village we would have.

Well that's it from me today.
I'll be back again next month.

I really hope you join us this month.
There's so much you can do with Art Foamies, so get playing!!!
Once done, pop over to the Scrap Matrix Shares page and pop it in the 'Art Foamies Album' for September.
Don't forget to tell us which Art Foamies you have used!!


Balzer Deluxe Small Art Foamies
Art by Marlene Dutch Houses Art Foamies
Gelli Plate

Monday, 12 August 2019

Tam returns with more Mandalas and Zentangles!

Hi there lovelies,

Tam back to share a few more creations with you inspired by the very cool 
'Mandalas and Zentangles' Challenge.
I can't seem to stop at just one now, so I go with it!

First up.....
a scrapbook layout


Yep, of course HEAPS of colour!
A giant mandala!


So to start this one I grabbed a few supplies.


I laid the Sweet Posy stencil over my cardstock and marked the edges with a pencil, so I knew where the paint approximately needed to end.


I then began painting in a fan style.


I used Dylusions paints in the following colours:
Fresh Lime
Cherry Pie,
After Midnight
Lemon Zest
Calypso Teal
Crushed Grape


Once dry, I laid down the Sweet Posy stencil, and using Black Paint by Dina Wakley, I rubbed over the stencil using a DRY baby wipe.


and this is what you are left with when you lift the stencil....


I wasn't happy with the way it wasn't centred properly, so I grabbed a Tracy Scott stamp, stamped a Mandala and then cut that out to cover it up.


I then layered around my photo.

I used a few Dies Cuts from Art by Marlene, some whimsy Stickers for the title, another Mandala stamp by Tracy Scott, a sticker from the Pinkfresh Embrace the Ordinary pack, and a MAMBI chip.


I feel that is all that is needed with such a bold background.

I then scribbled with my fudeball pen around the edge of the giant mandala.


Once I stood back and looked at the finished result, I felt that I should have added my paint in circular patterns rather than a fanned look.

It bugged me....
so I went with it and created a very quick art journal page
The whole thing took about 10-15minutes.


This time I used some Dina Paint in:
Lapis
Peacock
Lime 
Lemon


Love those colours together...

So yep this time I just painted circles.


I then grabbed a smaller mandala stencil, and again the Tracy Scott stamps.


To one of the circles, I used the technique above with the baby wipe and black paint.


To the others I stamped some of the mandala stamps, and then added lots of doodles and scribbles.


Finally I added a quote from the Tim Holtz Stickers.

So let's take a look at the challenge.....


I just couldn't go passed that image in the top left corner.....
I just had to have a go....


So let's take a look at this one....

I began again with the Tracy Scott stamps...

I wanted to add them into the hair (like the image)
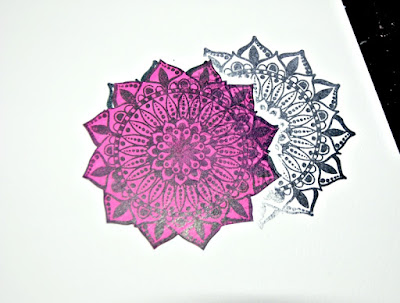
so I stamped half a one onto my page


I then used a cut out stamp as a mask and stamped again.


I repeated this using some of the smaller stamps in the pack.


I then began to add in hair and the face.


Once sketched, I went in with my fudeball pen and began to doodle.

This part is so relaxing....don't overthink it, just do it.


Look at that glorious sun coming in my scrap room!!
Not great for the photos, but definitely lifts my mood.


Ok done!!

Time to add some colour.
I used the Bold and Bright watercolours by Art by Marlene.


I left a few black and white for contrast.


I then added a sticker from the 'Art by Marlene' Whimsy Sticker pack.


So after all that, that's it from me today!!

I can't wait to see what you clever people come up with for this challenge.
Just load your entry into the 'August' Album over on our Facebook Shares page.

See you next month
xxx


Scrap Matrix Products used:

Tim Holtz Stickers