Saturday, 19 October 2019

'follow your heart' by Elisa Ablett


Hi Scrap Matrix lovers!

Elisa here from the design team with my latest creation for Scrap Matrix, a colourful and different scrapbooking page - chock-a-block full of Tracy Scott and Paper Artsy products!

Now to those that don't know me well, I have been away from the team for a short break due to some personal family issues but I am back now and ready to create and share with you the latest and greatest products instore.

If you haven't already headed to Scrap Matrix Shares group on Facebook to see the new challenge for October, I urge you to pop over and have a look and join in the fun for this month. Tracy is in store this month!


No photo description available.


PA Stencil 053 {ETS}Paper Artsy Fresco Finish Acrylic Paints


Tracy Scott Stamp Set #27Image 1


Products used from the Scrap Matrix Store - 


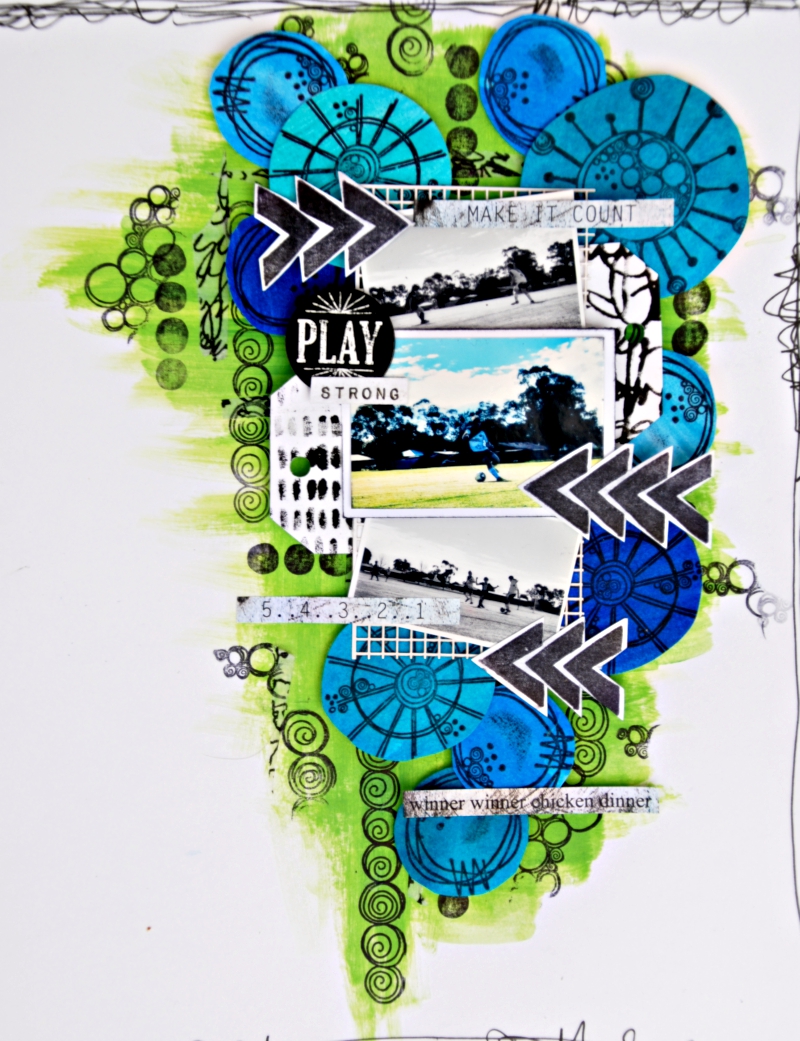
Let's take a closer look at the layout!


To begin my layout, I used a palette knife to spread black gesso over the middle of the scrapbooking paper and I set it aside to dry.

Then once dry, I used the paper-artsy-fresco-finish-acrylic-paints in turquoise, tangerine twist, bubblegum and very berry and using the palette knife again and my finger i smoothed the different colours over the black gesso. This way the colours sat on top of the gesso and didn't absorb or get lost in the back ground paper.

While i had my colours out and about, I finger painted all four colours onto thick white cardstock in true Tracy Scott style, then waited til it dry and then stamped Tracy Scott dragon fly stamp from the Stamp Set 27 which is still in stock with Vicki in store. I also matted my photo with the painted paper so it matched the layout.


Colour your chipboard pieces with white paint or a white paint marker and using your scissors distress the chipboard by cutting off some of the grids. Put aside to dry.


Stencil black gesso or black modelling paste through the Tracy Scott 053  stencil onto the left and right hand side of your pages as per the main photo. Once dry, use a paint marker or gel pen in white to go around your stencilled areas and then use different sized plates from your kitchen or circle templates, add what I like to call distress circles to your page by tracing around the outside of the plate and then moving it slightly to the left and right and tracing around it again. 


Don't forget to add some background stamping before you glue your photo and chipboard down and your quotes for your title.


That's your layout finished!


Thanks for stopping by the blog today, I hope I have inspired you to try this month's challenge.

Hugs 

Elisa x


Friday, 18 October 2019

Jen's Art Journal Page.


Okay, okay, some of you may have picked up by now that I'm a bit of a feline fanatic. 
I'm not a crazy cat lady though, I do have limits. 

This page happened because it's been a few months since I've done anything cat-themed and I always find their appearance inspiring.  It's not a great photo, the pic has shown up more blue than the aqua it really is and the page is a little buckled, but it makes me happy.  Sadly, I forgot to take photos as I went along, but the process was really quite simple.

I've done this in my large journal and used Paperartsy paints and Tracy's stamps and stencil.


The background was done by using Paperartsy paints Mermaid, Glass Blue and Blue Lagoon. I just smeared them all over the page with my fingers. It's very theraputic, although messy.  I then used the Tracy Scott stencil PS124 with Snowflake, lightly sponging it.  
My cat was made from watercolour paper, cut out and painted with Midnight. The quote done with a Posca pen.


The flowers and butterfly are from Tracy's set ETS28.  These I positioned onto white card and traced around with pencil. I then used London Bus, Tango, and Tangerine Twist blending them with a brush and then my fingers. (This always seems to happen.) I stamped them with Archival Ink Jet Black,(using  my pencil lines as a guide),  cut them out, and using a warm grey pen, went aroung the cut edge.


I positioned my cut images, marked where they would go and used the small flower from the ETS24 stamp set with Archival Inks Garden Patina and Manganese Blue.

I painted the edges of the page with Mermaid and used a black pen for the outline. Mixed some Midnight paint with water and splattered it over the page. then glued my cut outs onto the page with Gel Medium.

I hope this wasn't too boring since I didn't take any progress photos. I'm really sorry about that, but when you feel the inspiration spark you just gotta go with the flow. 

I hope those of you who got to go enjoyed Tracy's classes. I'm really jealous. 
Well, that's it,  my battery is nearly gone.   
Happy crafting!

Jen.


Monday, 14 October 2019

Tracy Scott - floral cards

Hello,
What a  fun month it is going to be with a visit to Scrap Matrix by Tracy Scott. I love making cards with her stamps.
 I made these two cards with the same set : Tracy Scott ETS24


On some white cardstock, I sprayed Distress Oxide Sprays using 'picked raspberry', 'faded jeans' and 'cracked pistachio' , randomly across two sheets. Oxide Sprays make lovely effects when you also splash some water and add droplets of the colour over the page. 
When the paper had dried, I added Lindy's Starburst - cocklebells coral which added a lovely shimmer to the page. Unfortunately that is hard to capture in a photo but it adds a lovely touch of sparkle.


Most cards I make are 6x6 however this method can be used on any size card. I cut two pieces of card, one larger than the other. On the larger piece I stamped a boarder and then glued this piece to a slightly larger piece of black card stock.


On the smaller piece, I stamped the same stamp to make a boarder as well as the circle stamp randomly on the card. I then glued this piece to a slightly larger piece of black card stock.


Glue the smaller piece to the larger piece. 
On a separate white card, stamp the block shape flowers.
 I cut two of the flowers down to make smaller flowers and attached to the left side of the card. 
With a black marker, I filled in a couple of the circles. 
 I finished by gluing the whole piece to a 6x6 white card.
 I can later add any sentiment as this is suitable for a birthday or get well card.


For my second card, I have used the left over coloured  paper and stamped the smaller floral from this set. 
I have cut a white piece of card smaller than the base and stamped the block floral and circles across the middle of the card. Cut out the coloured flowers and attach across the middle over the stamped area. 
Once again, I can add any sentiment to the front such as 'thinking of you' or 'thank you'.


Have a great day....


Saturday, 12 October 2019

Happy Tracy Scott weekend with Tam!!

Hi guys
Well we are in the midst of the much anticipated Tracy Scott weekend at Scrap Matrix!!
I have looked forward to this weekend for such a long time (since last time really!)
And today we are right in the middle of it!!!

Yesterday we began, with not one but two classes!
What a start to the weekend.....
Today we continue.

Amongst all this Tracy Mania, I am here to share a few Tracy projects....


 First up a layout, celebrating soccer and stepsons....

Whenever I think of Tracy, I think of flowers, one of my big loves!
But I wanted to push myself to use some Tracy products to create a 'boyish' layout....


So I dug out all the stamps that weren't flowers......
 lots of  Tracy's sets have some boyish elements.
Here's what I gathered up..


These came from two sets. ETS125 and ETS01.

I immediately noticed all the circular shapes which reminded me of some recent soccer photos that I took of my stepsons match.
So I went with blue and green to highlight the colours in the photos (think grass and sky) and his team colours.

I began by adding green paint to the background, fairly haphazardly.
I used Dina Wakley  Lime and Evergreen 


Once dry I added some Dina Wakley washi tape and then stamped a few of the circular stamps onto the background.


I then wanted to add blue. 
So I painted a stack of different shades of blue onto some cardstock.
I used Dina Wakley paint in Lapis, Ocean, plus I used some of the gorgeous blues from Art by Marlenes watercolour set in 'Whimsy and Bright'.


I then stamped some of the larger circular shapes onto them.


Time to cut them out.


I then added my photos to the layout, and added these around the photos.


I added in a couple of handmade tags (created with art foamies and paint).
I also added in some 7Dots word stickers and a Mambi Chip.

Finally I stamped the chevron arrow onto cardstock (from set ETS125) and cut them out,
adding them to the layout.


The final step was to add a border and a few scribbles using my Fudeball pen.


Ok onto my next creation....
a quick art journal page.


I used Tracy's Mandala stencil PS124 and stamp set ETS01 again and  ETS09.


I began by adding white gesso to my art journal, and then I added blue and lime paint to the background using the recycled packaging method.

Basically add a bit of paint, lots of water and then splodge it onto your background.
I used Paper Artsy Beach Hut and Sargasso.


I really love the effect of this.
I also added a few blobs with a paint brush and then sprayed with water, and let it run down the page.
This helps to create the drippy look.


I then added the stencil to the page, and using dry baby wipes, I rubbed paint through the stencil.

I then added some Tracy stamps to create my dreamcatcher tail, and joined them to the stencil with my fudeball pen.


I then added paint to the stamped images.

I also added a rough border and scribbles with my fudeball pen.
Finally a sticker from the Art by Marlene sticker pack and that's it!


This one really was super quick.

Ok, now this last piece, I wasn't going to share and I don't have many photos because it was a complete FAIL!!!!
So much so, that I walked away and went and did something else.
Then a few days later, I came back to it and felt like I had nothing to lose, so I'd just play and see what happened.

To my surprise I ended up loving it.
It was a frustrating process, but when it did happen - the moment it changed - well that was magic!!

So my point is don't discard, keep adding layers, keep experimenting.
You never know what's around the corner.

PLUS sometimes that mistake is a creative gift.  
You see you no longer care about what you are doing.
You have nothing to lose.
You can't stuff it up anymore than it is.
So there's an opportunity to NOT think, to not judge, to just play, to follow your intuition and just see what happens.
That, my friend, is true ART, true freedom....


Yep very aptly titled!!


Those butterflies were cut from an adult colouring book, as they remind me so much of  Tracy and some of her beautiful butterfly Stamps.
I haven't yet treated myself to those gorgeous stamps of hers but you will find them here.
ETS26.  (this may change tomorrow, lol)


I adhered them to the page with Matte Gel.


Sorry I don't have step by steps to show you but this time its more about the exercise, about just letting go, about finding that freedom.

I know I have rambled a bit today, but I'm blaming excitement and anticipation.
I've gotta go get ready for today's Tracy classes.....

Much love...
Tam
xxx

Paper Artsy Paint - Beach Hut, Slimed, Sargasso, Cerise, Banana, Lavender
Dina Wakley Paint - Black, Lime, Evergreen, Ocean
Mambi Chips