Hi everyone
How are you all doing in this bizarre and unprecedented time?
I am having a couple of weeks away from work right now which has been very needed. I work within an essential service and it has been a difficult time going in to work, knowing I am needed, however feeling like I should be at home.
I really value my arty obsession and the positive effect it has on my mental health, but now more than ever this has been a blessing.
Having somewhere to turn to process some of my thoughts and emotions is something I am truly grateful for.
Art Journaling is all about that for me.
If I'm feeling any sort of emotion strongly, it comes through always.
Again, inspired by the current situation.
As you can see I express my feelings through both my journaling and through the use of colour.
So let's take a look at how this one happened...
I began with a page in my art journal - as you can see I'd added excess paint leftover from another project. (can't waste anything!)
I covered it with
white gesso, and was not concerned that some of it was peeking through.
That just adds to the layers.
I began to gather my supplies.
This book is amazing!!!
So much in it, so usable, so inspiring.
I selected this piece.
I then gathered a few more supplies....
I used the colours in the figure as my inspiration.
First I trimmed down the figure.
Time to add colour.
Whilst wet, I wiped off some of the paint with a baby wipe through a stencil.
Such an awesome technique, totally inspired by the fabulous Lisa Oxley.
I used the smaller stencil this time.
You see I love this stencil so much that I recently ordered it in
6x6" too!
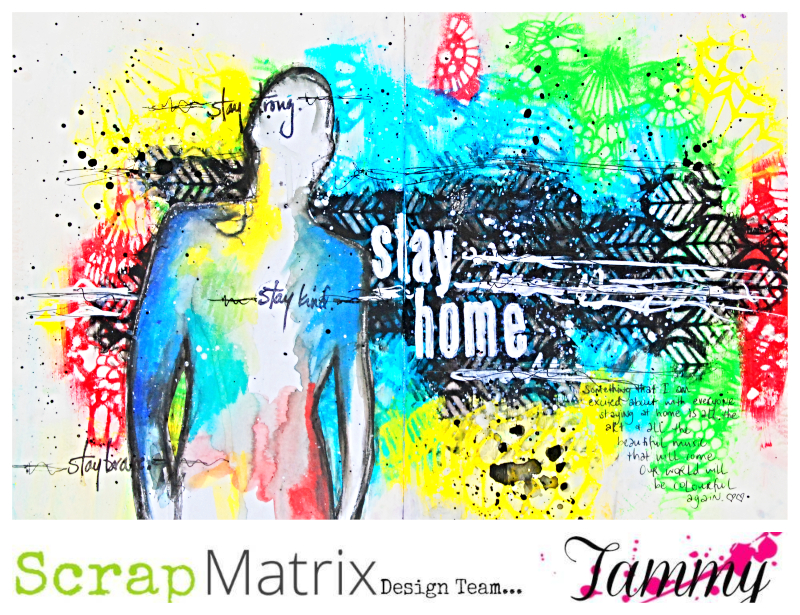
This goes with my emotions, the heaviness that surrounds us all right now.
Another fave.
Look what happened when I pulled it off!
Yikes, my gesso underneath wasn't properly dry and it pulled off some paper.
Ok time to replan.
Instead of placing the figure on the right hand side as previously planned in my head, it now had to go right there to cover up the mess!
Notice that the figure looks like it is sitting upon the top of the page?
Time to fix this.
That dark section seemed like the perfect place for my title.
The lone figure made me think of the current #socialdistancing and #stayathome requirements.
So I grabbed some alpha stamps by
Tim Holtz, and added them with white paint.
'stay strong'
'stay kind'
'stay brave'
Finally I added some journaling.
I wanted it to go with the bright colours peeking through the darkness, so I really wanted to highlight some of my positive thoughts.
It reads:
"something that I am excited about with everyone staying at home is all the art and all the beautiful music that will come.
Our world will be colourful again".
The final step was a few scribbles using my fudeball pen, and some flicks of black paint.
I LOVE IT!!!
I have created another page too.
This one was inspired by a previous page.
You see I have a mini book - 6x6 - it's the perfect size for me.
Due to work commitments, I often don't have a lot of time to create.
Often half an hour or so is it.
If I grab my large journal, often I just feel overwhelmed.
The smaller space of a 6x6" seems to free me up.
It's a place I can experiment, try things out.
I'm not concerned about the end result. It's about colour, about play, about not thinking.
Often those experiments turn up on a large art journal page later. Just with more detail.
So let's have a look at one of these.
Here's my 6x6 experiment.....
Love those glorious drippy colours.
Here's what came through....
Same drippy style, but lots of stamping added.
Let's take a look.....
I began with my inspired piece and applied
gesso to my page.
I wanted to use these like watercolours, so diluted them by adding lots of water.
I loosely sketched a face with pencil.
I began with the
Cherry Red, applying lots of water and letting it run.
I repeated with the other colours, drying inbetween each colour.
This is important, so you don't end up with mud.
I stamped these onto the page, and added the leaves so they were cascading downwards.
I then added in some detail to the face.
Here's the finished product.....
I really hope you join in with the challenge this month.
Our goal as designers is to inspire you.
I often wonder if people read the blog, or try out some of the techniques.
So here's your chance to show me!!!
Plus we can all use a bit of extra colour this month.
For even more 'Tammy' inspiration, keep your eyes peeled on the
facebook page.
I will share a few more projects.
Don't forget you can head to the
'Tammy' album for a one stop shop for inspiration.
Much love, stay safe
xx