Showing posts with label Dina Wakely stamps. Show all posts

Wednesday, 3 October 2018

Tam's got Mail......dear Mama

Hi everyone, Tam here today to share my layout for the current 'You've Got Mail' Challenge at Scrap Matrix.
 
I love this theme......so many options.  As soon as I saw it, I knew what I wanted to do.
 
You see I've had these precious letters that my daughter wrote to me a couple of years ago. They are just beautiful, heartfelt and so very precious to me. I actually carry a copy around with me in my purse at ALL times.  I often sit and read them, and I think they bring a tear every time.
 
Anyway, I really wanted to preserve these letters, and now I have!!
 
Here's my layout.....


Yep, in that hand made envelope sits the letters.


So let's see how this came together......
 
I began with a gorgeous paper from 7Dots 'Writer's Block' Range.  The script feel is just perfect.
 
I knew I would add lots of colour.....yep it's gotta have colour, so I added a thin coat of clear gesso to act as a barrier/sealer to protect the paper.


Whilst this was drying, I grabbed another sheet from the 7Dots 'Writer's Block' Range.  I chose a darker colour, as a contrast to the  background.


I grabbed an envelope that I had laying about the place, and I opened it up, and used this as a template.


I traced it and cut it out


I then taped it back together.....such a simple way to have a perfectly co-ordinating envelope.


Now it's time to add some colour to the layout..... you know how much I LOVE colour!


For this part, I used the 'clear packaging' technique.
 
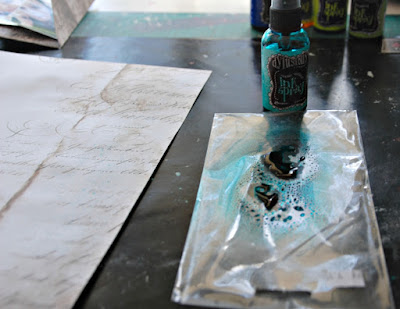
I began with Dylusions 'Polished Jade', and spritzed some onto some old packaging, I also added some water.
 
I then turned this over and splodged it onto my layout. (super technical hey!)


I then repeated this process with Dylusions 'Lemon Zest'.
 
Then just a hint of  Dylusions 'After Midnight'.
 
*Make sure you dry in between each colour*


I then added some string to my page.


You will notice that these are vertical on the page, however, on the final layout they are horizontal.
 
When I got to the very end of the layout, I changed my mind and decided that this needed to change!
So I swapped the string to vertical.
I just felt it 'tied' in with the layout more (he he see what I did there)


I then added a few stamps to the background. 
 
I used AALL & Create #60. I used the circle/script/word section of this stamp.


I grabbed a Dina Wakley flower stamp and stamped this onto white cardstock using an Archival Black Ink.
 
I again used the 'clear packaging' technique to add colour to these stamped images.


I cut these out and began layering and tucking in and around my photos using both the flowers and lots of 7Dots Tags, again from the 'Writer's Block' collection.


For my title, I decided to use a tag I made from 7Dots paper.
 
I stamped onto it using these very cool Idea-ology Alpha Stamps.
 
I added some hand-writing, so that the tag read 'Dear Mama, Love Paige'


I then attached this to the envelope, making sure it could still open and close.


I added a few embellishments, including some 7Dots die cut elements from the 'Air Mail' range, a gorgeous German Scrap Pen Nib, and a cute metal envelope charm.  This just finished off the tag perfectly.


Aren't the pen nibs just gorgeous!!


Now it was time to add in more layers.......embellishments, tags, stickers, pen nibs, and the stamped flowers and leaves.


I added some journaling to a 7Dots tag, and some word stickers from 7Dots too.


Here's the word stickers and embellishments I used.


I then spritzed some of these little white flowers in the Dylusions 'Vibrant Turquoise' and 'Lemon Zest', and scattered these amongst the layers too.


Love the colour combo, and the overall effect.


This layout has a special place in my heart, and I'm so glad this challenge was set as it forced me to create a forever keepsake.
 
What special keepsake/ephemera could you scrap, thus preserving the memories forever?
 
Head on over to our Facebook Shares page to add your entry, and let us know what Scrap Matrix Product/s you used.
Just pop it in the 'You've got Mail' Album.
 
Here's a reminder of the challenge:


That's it from me today.
 
I hope this has inspired you.
 
If you'd like to see more of my work head to my BLOG.
 
I will leave a list of the products used below.
 
See you again soon.
 
 
Scrap Matrix Products used:
 
7Dots Lost and Found Word Stickers
Dylusions Ink Spray - Polished Jade, Lemon Zest, After Midnight. Vibrant Turquoise


Wednesday, 7 March 2018

Smile and Be Happy

Hi Everyone,

Monique back again with my second "All Things Ranger" challenge.

This time, I went to town with paint and colour - using Dylusions Paints and Inks some gorgeous Dina Wakely Stamps.


I have done a quick step by step for this layout, hope you find it helpful!

1.  Scrape some Dylusions Paint in Bubblegum Pink on a piece of black cardstock.  Dry, then apply some Dylusions Paint in Calypso Teal.  


2.  Using the 6x6 13 Arts Stencil "Galaxy,"  stamp some Archival ink in black over the paint. Randomly splatter some white gesso on the background to tone down the colours a touch.


3.  Let's move onto the stamped embellishments.  I got out my two favourite Dina Wakley Stamps.  The Silhouette Woman Stamp, and the Abstract Bloom Stamp.


I then used a technique I have picked up from my gorgeous Scrap Matrix Design Team mate Tammy Klinger.  I sprayed some Dylusions Ink in Bubblegum Pink on an empty stamp packet.  (The picture is of Lemon Squeeze Ink - which I decided not to use.)  


Next, I "splotched" the ink onto some white cardstock and dried it with a heat tool.  I added some "Calypso Teal" Ink the same way, until I was happy with the result.


I then stamped several of the Abstract Bloom Stamps and one Silhouette Woman onto the ink splotches, and then cut all my images out.


NOTE:  I added some Calypso Teal Ink to my Silhouette Woman, and some Lime Green Ink to the leaves of the stamped Abstract Flowers with a paintbrush after I fiddled with the embellishments on my layout and decided more colour was needed.

4.  Let's get back to the layout.  I backed my photos with some black cardstock, and then added another layout with some 7 Dots Studio "Paint Chips" paper - "Glaze."  

5.  I positioned my photo mat on my background, then lightly marked where the edges were.  Next, I added a few layers on the background where the top and bottom of my photos would be.  I used some 7 Dots Studio "Paint Chips" - Glaze paper, some Dina Wakley Media tape, and some German Scrap Baroque Black.


6.  To put my layout together, I added my photos, my stamped images, and some flowers.  I also splattered some watered down Dylusions paint in Bubblegum Pink. Finally, I inked the word "smile" from the 13 Arts "Art Journey" Chipboard and added the words "and be happy" using the Tim Holtz Ideology Label Letters to add a title.
I hope you have enjoyed this little tutorial, don't forget you still have until the 14 March to complete your entry and upload it into "All Things Ranger" album in the Scrap Matrix Shares Facebook page.

Here is a full list, with links, of the Scrap Matrix products I used:

Dina Wakley Stamps - "Abstract Flowers" and "Silhouette Woman"


Monday, 19 February 2018

'You can never have too much happy' by Elisa Ablett - Monoprinting to make a mixed media background!

Hi everyone, 

Elisa here from the design team with my latest layout based on the new challenge for Scrap Matrix , 'to use all things RANGER' on your layout' 

Now this is a fabulous challenge as there are heaps of lovely Ranger products at Scrap Matrix, from all the Distress Ink range, Dylusions, Dina Wakely and Tim Holtz. 

Click on this link to have a look at all the lovely Ranger goodies that Vicki from Scrap Matrix has in store - http://scrapmatrix.com/brands/


Here is the link to the challenge group - Scrap Matrix Shares

Here is my layout for the challenge :-) 

I wanted to incorporate gelli plate printing which is my new 'love' in the background and as much Ranger as possible, so I pulled out my trusty Dylusions paints in bright colours - London Blue, Lemon Zest, Polished Jade, Squeezed Orange and Fresh Lime with a variety of Dina Wakely stamps and Ranger stencils.


TUTORIAL TIME!!

This is how I made the background with my Gel Press Gel Petites.


 Firstly ! gather you supplies, brayer 4 inch hard rubber speedball, your gel press plates, and your chosen colours of paint from Dylusions and definitely a craft messy mat underneath!


Next using your brayer (i smooth a teaspoon amount of paint onto my mat then run the brayer over it til it is covered- you only need a tiny tiny bit of this paint) run your paint filled brayer over your gel plate shapes until the paint is smooth and even.


Next step - you can do it two ways. Firstly you can tip your piece of paper over the top of your shapes and smooth the back with your hand OR you can pick up your gel plate with paint on it and tip gently onto your paper and press gently like a stamp.


Next! this is one of my favourite techniques -  before you load your paint onto your gel shape place a stencil over the top of the gel shape and then brayer your paint over the top, once you have even coverage then gently lift your stencil off and press your paper onto your gel shape.


Another technique is to spray Dylusions sprays over your stencils onto a piece of mixed media cardstock as per the photo above then use your painted gel shapes loaded with paint over the dried sprayed paper as per the photo below.


Gather together your favourite Ranger Dina Wakely stamps!


Load up your stamps with black versafine ink and stamp over the top of your dry monoprints and then fussy cut your shapes out.


Here are all my examples of my stamped monoprints with my gel plate shapes!


Next step - creating your background on your page and putting it all together!

Using your black Dylusions spray and a water spray bottle, take the lid off your black spray. Spray water down the middle of the page and then add drops of the black spray to the water pooled on your page. Then tip your page from side to side gently. Add more black liquid and more water if necessary. Using a heatgun dry your background, add splatters of black dylusions spray by tapping the lid and inner tube of the lid from the spray onto your page.


Layer your fussy cut mixed media shapes until you are happy with the design and stick down.


Add punchinella, a die cut black square and some black cotton. I used 3d foam mounting tape to mount my photo over the frame. Ink your chipboard pieces, I used Scrap Matrix wood cogs and 13 arts Chipboard title.

I also splattered silver watered down mica powder on the layout and painted on my inked title and cogs to give it a little grungy sparkle!  you could try Primary Elements or Opal Magic Mica Powder from Scrap Matrix.


Here are some close ups of final layout.


Thats it from me today!

Hope you enjoyed the tutorial, make sure you leave me some love :-) 


Hugs 

Elisa Xx